


How To Make A Webcomic Website: A Step-By-Step Guide
If you’re starting a webcomic the first thing you’ll need is a website. All the best comics have their own websites for promoting the comic series and the artist.
Anyone new to comics might prefer to start on a free site like Tumblr. But you’ll have a tough time branding your comic and building a name for your series. That’s why self hosted is the best way to go—yet it can be tricky if you’ve never done it before.
In this guide I’ll teach you how to create your own webcomic website on WordPress. This offers a lot more control and you can customize the site however you want.
It may seem intimidating at first but if you’re willing to try you can do this on their own. And by following this guide you’ll have all the help you need.
Why WordPress?
There are dozens of free comic hosting websites. A couple examples are ComicFury and Tapastic, both of which are free to use.
So why is WordPress a better choice?
There are many reasons:
- You can brand your own website
- WordPress offers way more customization
- All your comics are hosted locally on your server
- Your comic looks more professional on a custom domain
- You can add donation links or setup a web shop for merch
Think of your web comic like a brand. It may not rise to the same level as Dilbert or Garfield, but your comic should stand on its own as a recognizable name.
The best way to stand out is with a kickass website using a simple design, a brand logo, and your own domain name. WordPress is free and incredibly easy to learn so it’s the perfect way to start your own comic site without any hassle.
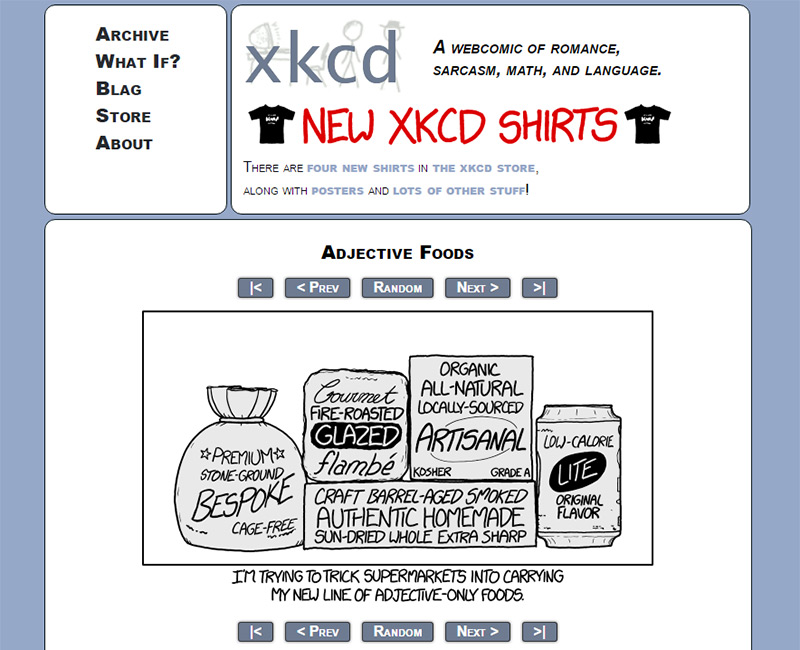
Going this route is also the best long-term solution because you can run your website on WordPress indefinitely. Think about how long xkcd has been online with the same design.
Nobody cares if your comic’s website is beautiful or bursting with color. People just care about great comics and where to find them.
So if you pick a great domain you can run with WordPress for years and never need to adjust much on your site.
The hardest part is getting started but I’ll walk you through the whole process.
Registering Your Site
The very first step is to think up your own domain name. This will be the address people use to access your site, most commonly with the .com suffix.
It’s a good idea to plan your ideas ahead of time and make sure you’re happy with the domain you pick. However it’s possible to change this later so don’t worry too much.
Usually you’d have to register a domain separate from hosting but with BlueHost you actually get a free domain along with your hosting account.
This is a great deal for new artists who just want to dip their toe into the world of web comics. Pricing is very affordable including the free domain+hosting, though you do have to pay for the year upfront.
But it all breaks down to the price of a coffee per month so it’s a frugal investment for new comic artists.
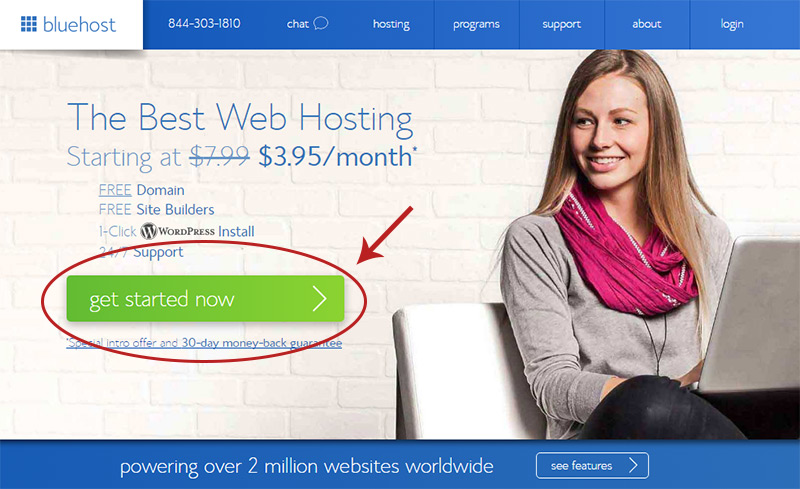
To get started visit the BlueHost homepage and click the “Get Started” button.
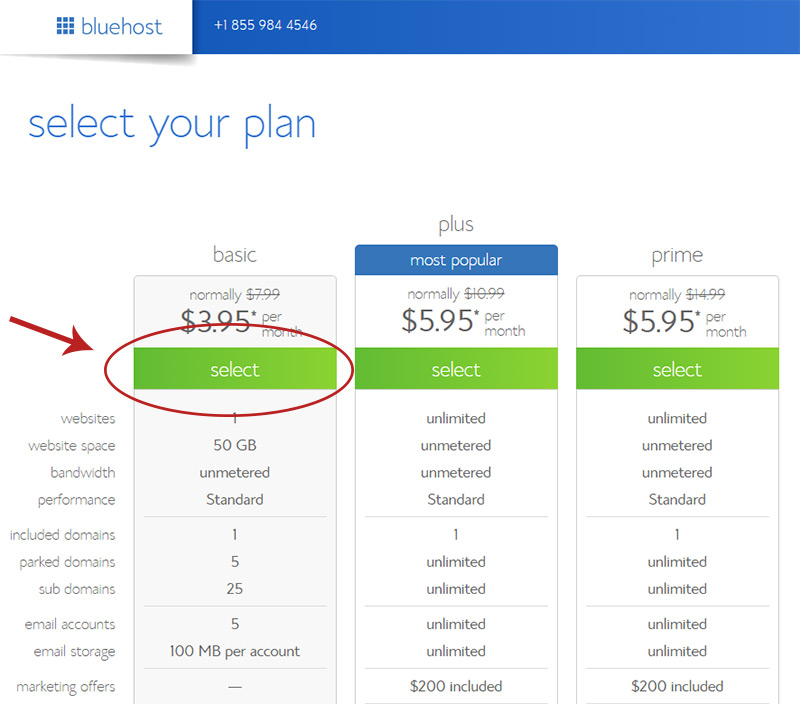
On this page select the basic plan over to the far left-hand side.
This comes with a free domain name, unlimited traffic, and 5 free e-mail addresses. So you can make an email like yourname@yourcomic.com and it’s free with your account.
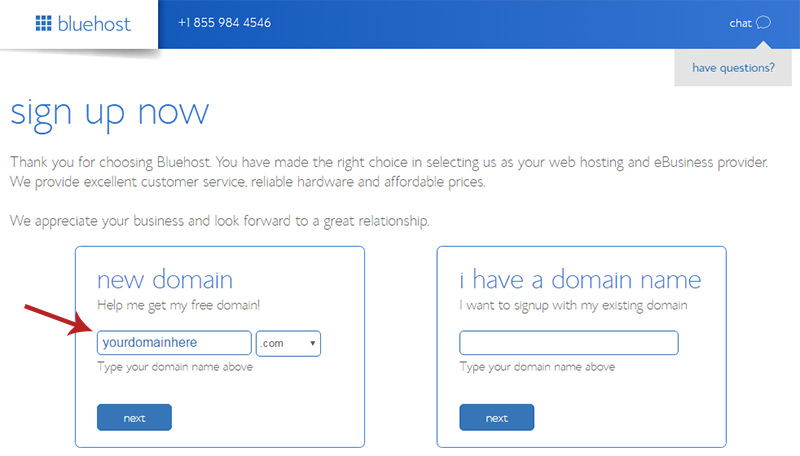
Once you select the plan you’ll have to enter your domain name.
Make sure you enter it in the left box labeled “new domain” because this is how you’ll get it for free.
If your domain is already taken you can try switching to a .net or something similar. But personally I recommend sticking with a .com so try a few different ideas until you find a domain that’s available.
This last page is where you add all the nitty-gritty details like contact & payment info.
But there are a couple things you’ll want to do before placing the order. You should uncheck all the boxes except the one labeled “Domain Privacy Protection”. This keeps your personal info detached from the domain so if anyone does a WHOIS lookup they won’t see your name.
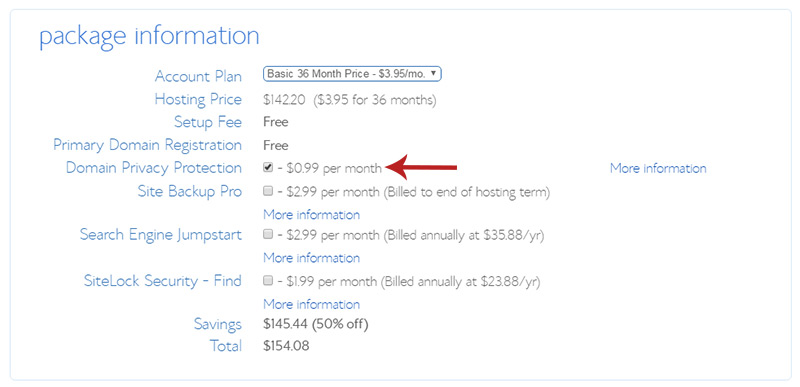
Everything else can be un-checked because none of it is needed.
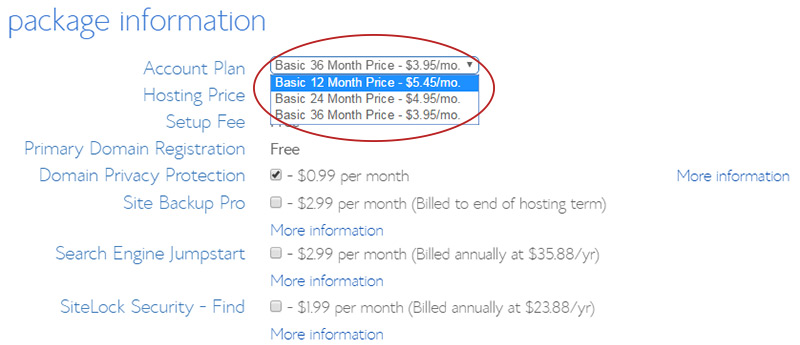
You may also want to update the term length from 36 months to 12 months. It’ll be a much cheaper upfront price and you won’t be committing for three years.
Once you enter all your details and sign up your account should be ready to roll.
You now have an awesome domain and hosting account. Congrats!
Now you just need to install WordPress and get it setup to publish your comic. Usually it takes a bit of technical knowledge of install WordPress from scratch. But BlueHost comes with an instant installer which is one of the reasons I recommend them for new artists.
Installing WordPress
Once you enter your payment you’ll get a confirmation e-mail from BlueHost with a login link. You can click that link from the email, or just click the “next” link on the new page you see after paying.
This new page is usually an upsell page but if you skip it you’ll go right to the password creation page.
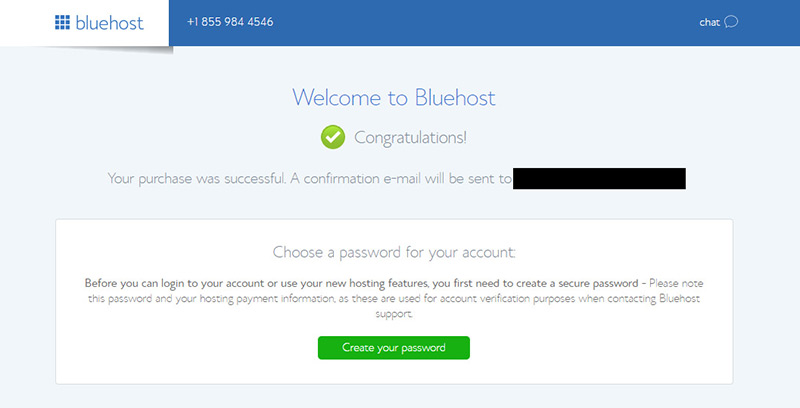
Click the “create your password” button and enter something secure. Note this is the password to your BlueHost account so you’ll need this to log in, make changes, adjust billing, etc. Keep this in a secure place in case you forget it.
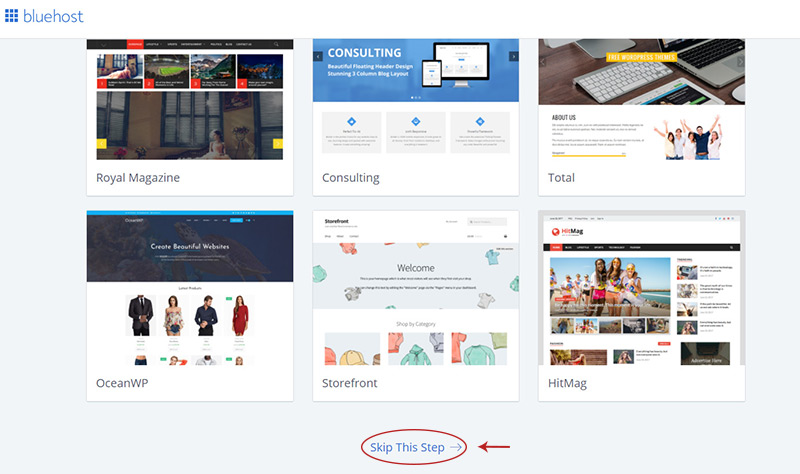
Once you create your password you’ll be directed to a theme selection page.
I’ll teach you how to setup a theme later in this guide, so for now scroll to the bottom and click “skip this step”.
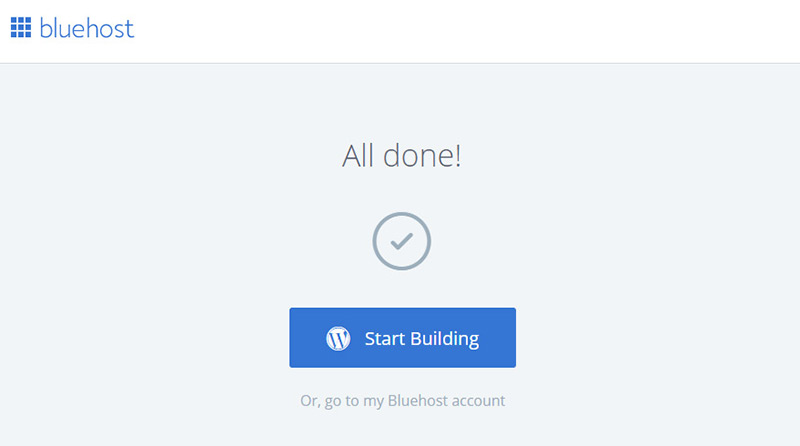
After that you’re all done! BlueHost automatically installed your new WordPress site with one click so you can access it right away by clicking the blue button.
Alternatively you can visit your BlueHost account dashboard page, although that’s mostly for editing your personal details so it’s not necessary right now.
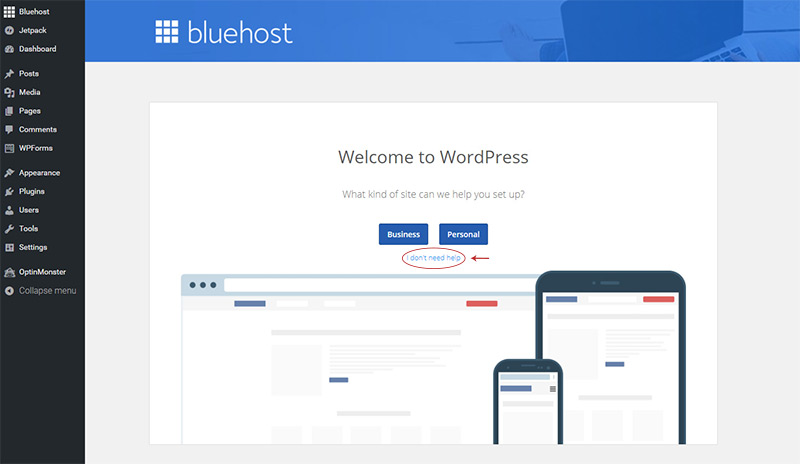
By default you’ll be greeted with a setup wizard but you don’t need to follow that since I’ll teach you everything here. Just click “I don’tneed help” under the blue setup buttons to continue onto the dashboard.
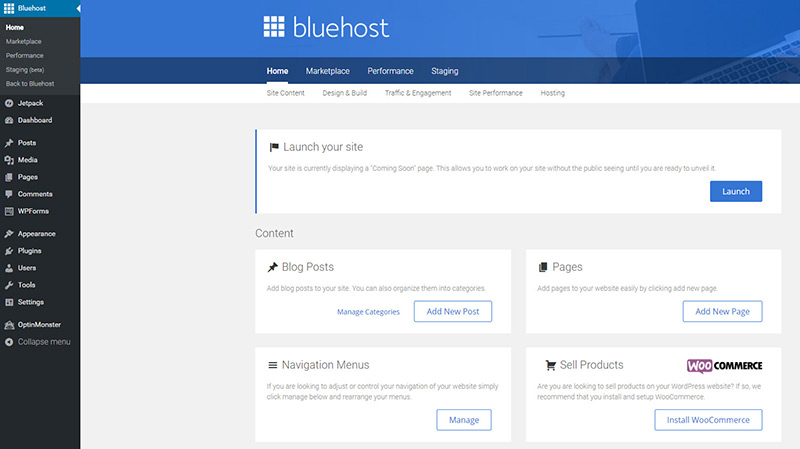
Your new WP site has two dashboards: the main WP dashboard and the Mojo/BlueHost dashboard. You really don’t need the BlueHost one but it does come with a handy feature that keeps your site offline until you decide to launch.
You’ll see this in the “Launch your site” box near the top. This extra dashboard also lets you browse a marketplace of plugins, manage your site’s performance, and check other relevant stats.
I personally feel like it’s extra bloat, but you may love it! Totally up to you whether you wanna keep it or not.
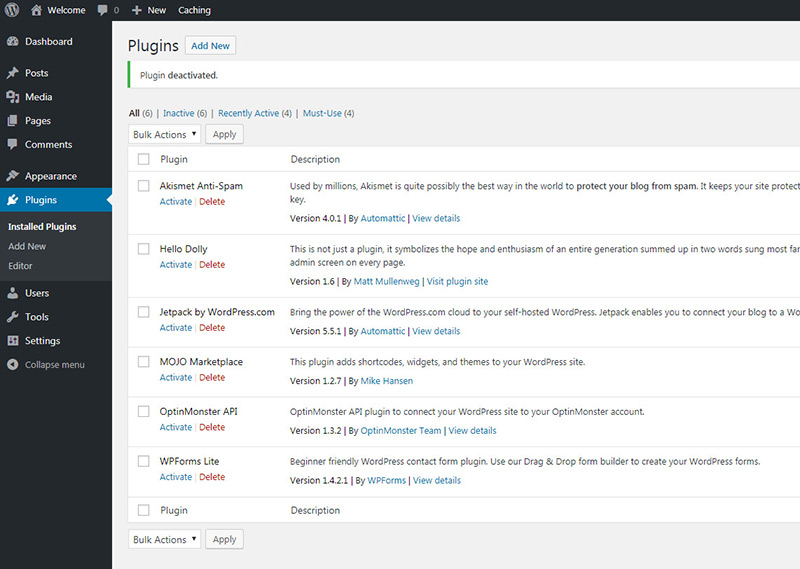
Even if you wanna keep that BlueHost dashboard it’s still a good idea to disable the other default plugins. To do this just click the “plugins” link in the sidebar menu.
On this page you’ll see a bunch of upsell boxes near the top. Scroll down a ways and you’ll find a list of plugins. The ones with a light blue background are currently active, the others with the white background are installed but deactivated.

I personally recommend deactivating all the blue plugins to de-clutter your dashboard.
However if you want to keep the BlueHost dashboard at the top then disable everything but the MOJO Marketplace. That MOJO plugin controls your BlueHost dashboard link and controls the ability to keep your site offline until you’re ready to launch.
If you decide to clean up everything here’s how it’ll look afterwards:
Now this should look quite a bit cleaner and easier to use! From here let’s update a few default settings on the site just so it looks nicer.
Quick Note: You can always access this admin dashboard by adding /wp-admin/ to the end of your site’s URL. So if your site is mywebcomic.com you can access the dashboard by typing mywebcomic.com/wp-admin/ into your web browser.
Let’s start by changing a few default settings in the main admin panel.
These only need to be changed once and they’re all pretty simple, but I’ll walk you through the process.
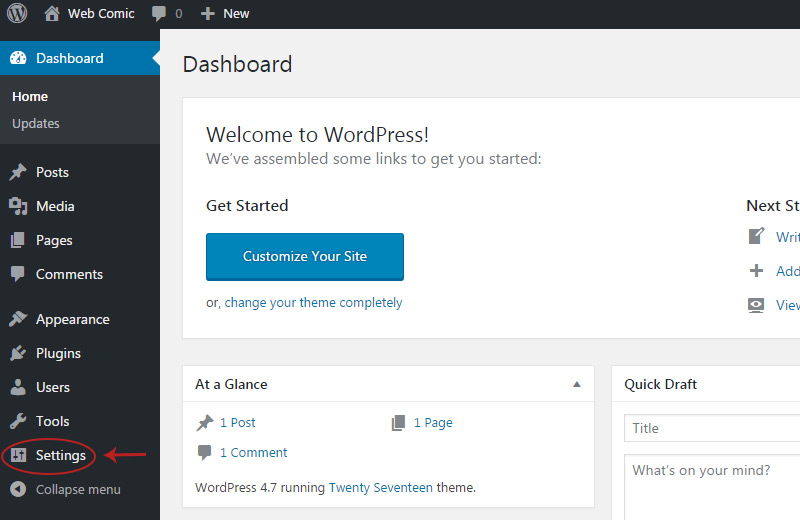
Adjusting Settings
There are lots of minor settings you should change in a new WordPress install, and quite a few that should really be updated right after creating your site. You can change these settings by clicking the “settings” link in the left-hand menu in the WordPress admin.
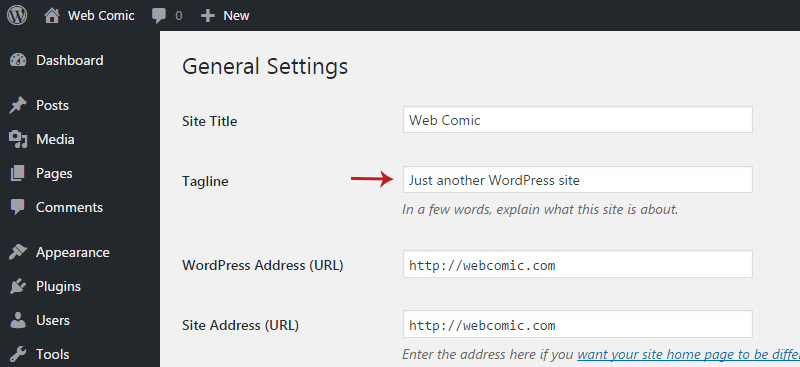
On the General page you can change your site’s name and tagline. For a webcomic site you probably won’t need a tagline so you could just delete it and leave it empty.
Also make sure the “Membership” checkbox is unchecked. There’s no reason to let people sign up to your site since you won’t have other bloggers or artists posting work.
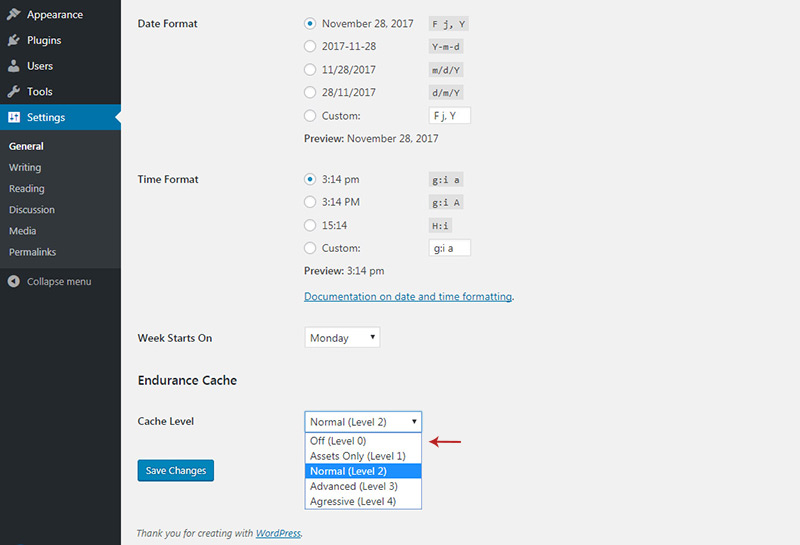
Also before saving this page scroll to the very bottom where it says “Endurance Cache” and change that to level 0. I’ll show you how to install a custom caching plugin so for now you won’t need this.
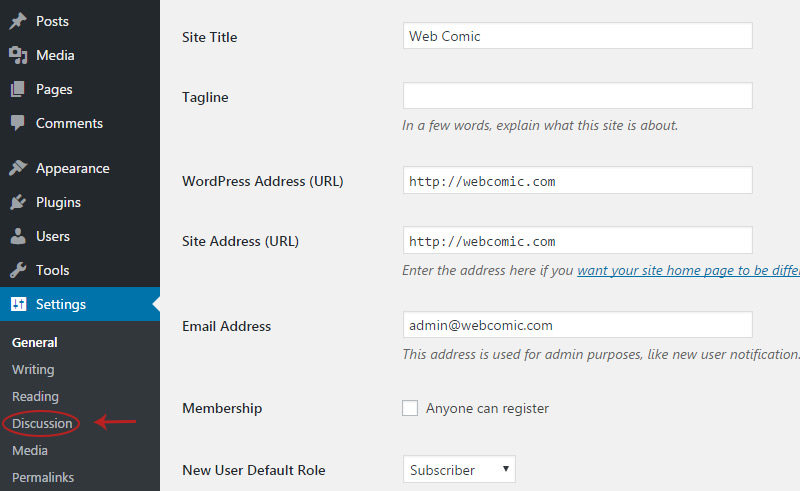
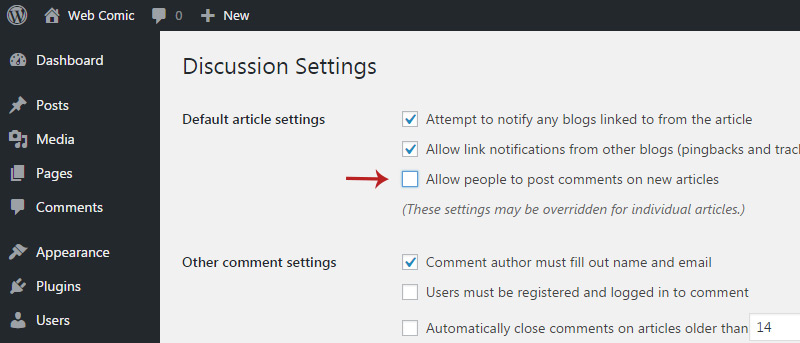
Now save changes and click the “Discussion” link under the settings menu.
Here you can change user comment settings. By default comments are enabled and anyone can post a comment.
If you want to completely disable comments you can uncheck the box in the following screenshot.
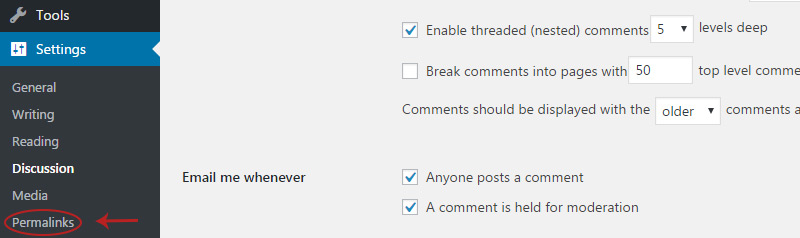
The next step is to change your site’s permalink structure.
This defines how your page URLs look. You can change this from the permalinks menu underneath the “Discussions” link.
I prefer to use the “post name” setting because it’s short and sweet. But many web comics use the month or day setting because this makes your site look more like an archive.
All your comic URLs could have the year/month and maybe the day if you want.
But each comic URL has a unique name too so you can publish multiple comics in the same month without any issue.
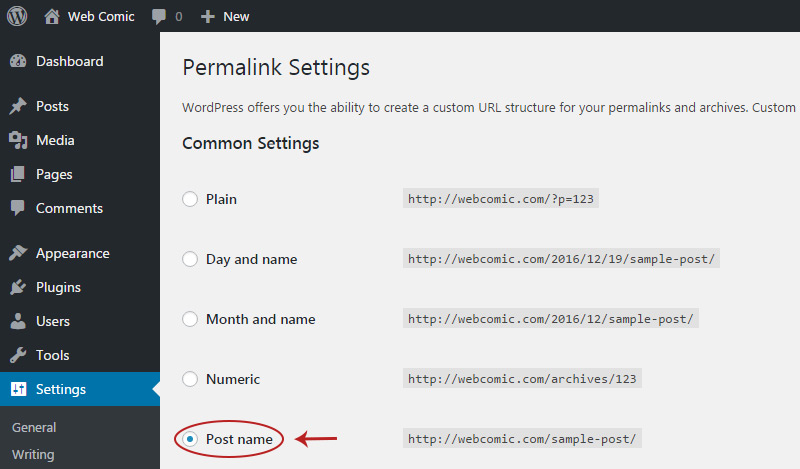
It doesn’t matter what permalink style you choose as long as it’s not the “plain” style.
Plain uses a numeric ID and it’s so damn ugly. It doesn’t look nice in Google and users who share links from your site won’t understand what the numbers mean.
I recommend either the month or day permalink structure for a webcomic site.
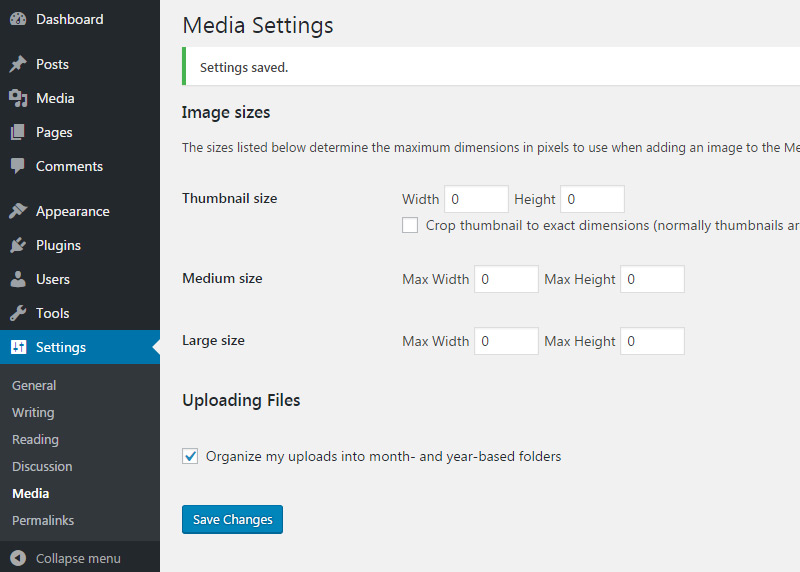
Lastly click the “Media” link to change how your comics are stored.
Whenever you upload media to WordPress it can be auto-cropped for smaller sizes. This doesn’t serve a purpose for a webcomic so I’d recommend changing all the values to 0 and un-checking the “crop thumbnail” box.
The main reason to keep these sizes would be for a magazine-style blog where you have featured images attached to each post.
If you want to leave this alone until you pick a theme that’s OK too. But if you know you don’t want any featured images then just clear these values.
But make sure the very bottom checkbox is checked. This will upload all your images into folders by month and year so you’ll have a more organized images folder.
These are all the main settings you should change but feel free to dive into all the menus and toy around. You can always change these values later too so nothing is permanent.
Now let’s move on and start customizing your site’s design.
Theming Your Website
Once you get WordPress installed you’ll have a blank slate to style for your webcomic.
There are two things to do for a fully customized site. First is to get a theme, and second is to install some handy plugins.
Let’s start with the theme.
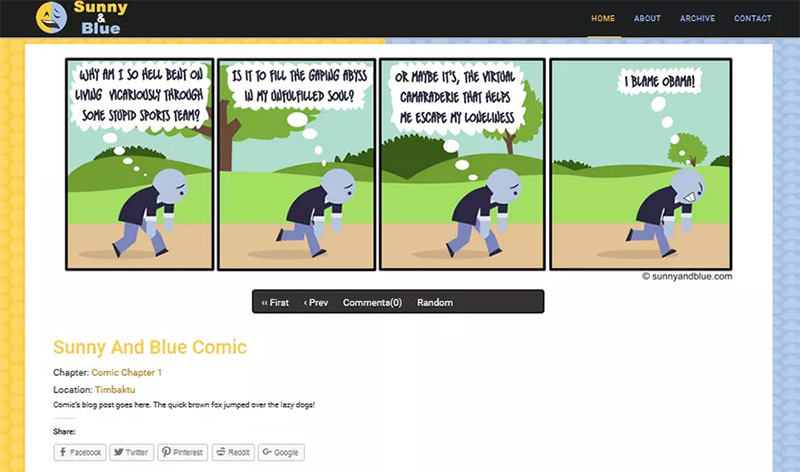
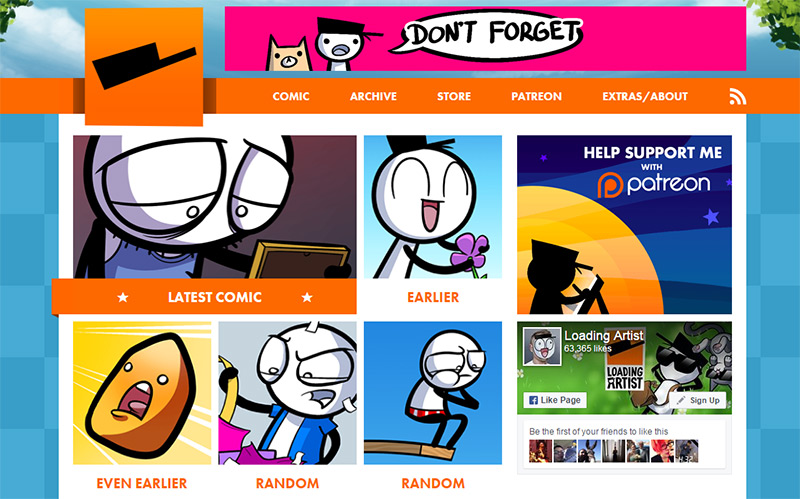
There are three popular web comic themes you can get for free. These are ComicPress, Panel, and the unique Sunny and Blue.
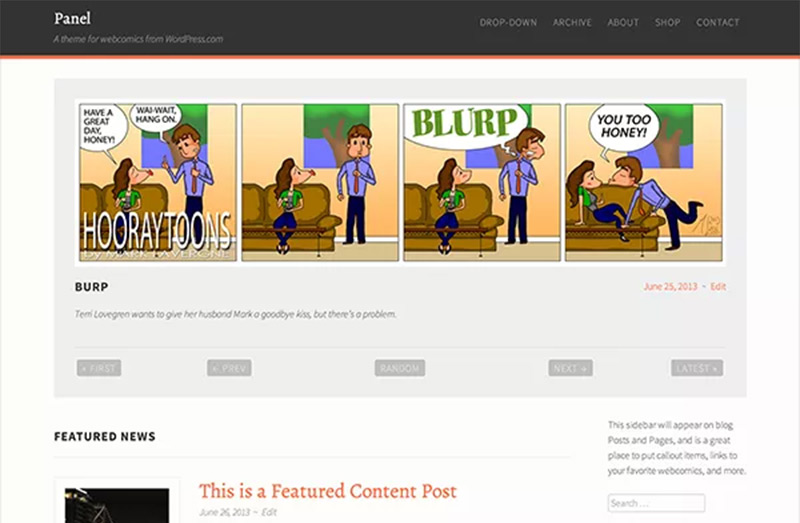
They all spotlight comic posts and they’re fantastic for a new webcomic site.
If you want something different try searching all the free themes on WordPress’ website. You can search by keywords like “minimalism” to find simple designs that’ll place focus on your comics.
You can also install free themes right from the WordPress dashboard without downloading anything.
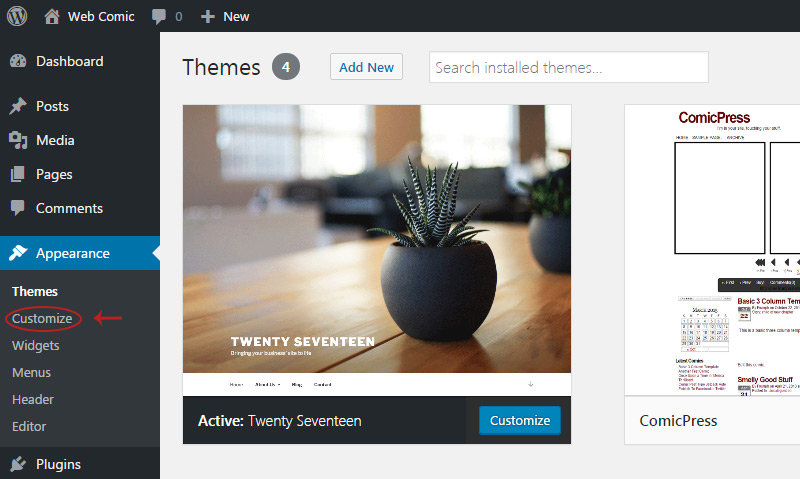
From your dashboard go to Appearance -> Themes.
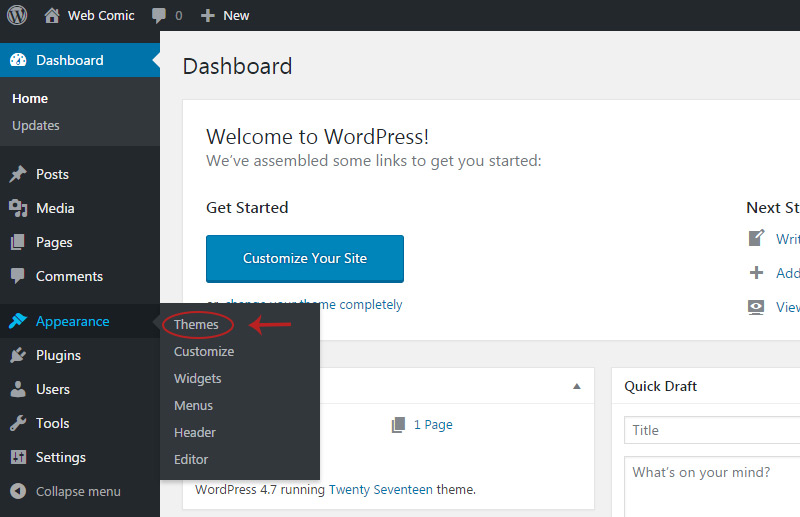
On this page click the “Add New” button at the very top.

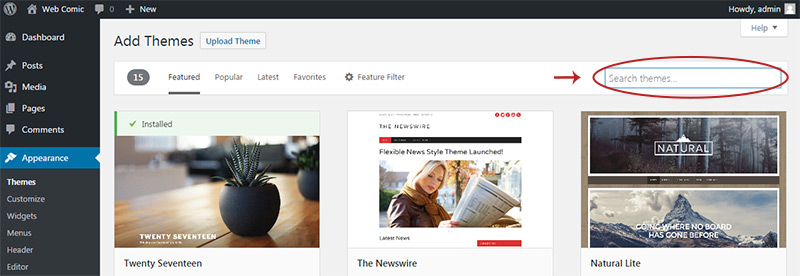
You’ll get a list of all the featured themes in the WordPress theme directory.
You can preview any of these themes if they catch your eye. But you can also search for the theme you want by using the search bar in the top-right corner.
Let’s say you want ComicPress. In this case you’ll enter “comicpress”(without quotes) and the theme should appear.
Now just hover the theme you should see a blue “install” button. Click that and let it install.
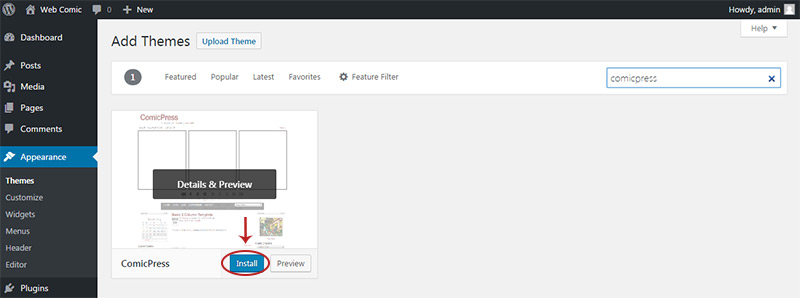
Once it’s done you can click “activate” to make it your active theme.
Every new theme requires some editing which you can do in the “customize” menu.
But this free theme is actually perfect for a new comic site because it’s bare bones and doesn’t need a whole lot of tinkering.
And remember you can try a bunch of different themes to see what you like the most.
Once you pick a theme it’s time to move onto some plugins that you should install.
Must-Have WP Plugins
To access your plugins list just click the “plugins” link in the menu underneath appearance.

You might notice that BlueHost automatically installs a few extra plugins that you really don’t need.
I’d suggest deleting every default plugin except maybe Akismet. That’s a free comment spam filter plugin created by WordPress and it’s useful if you want to allow user comments on your site.
But everything else is basically pointless, and if you disable comments you can delete Akismet too.
The ComicPress theme actually comes with a comic manager which makes it easy for you to publish new comics. But if you go with a different theme you’ll want to install a webcomic plugin.
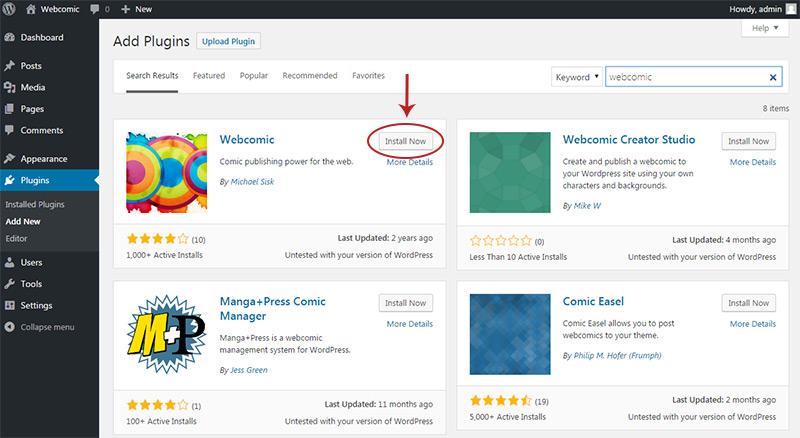
There are three great options to choose(all free):
In this guide I’ll show you how to work with the Webcomic plugin because it’s the most common choice.
The creator made a huge walkthrough guide covering everything you need to know about the plugin. It works for any theme so you could even use the default WordPress theme to publish comics.
I’ll dive into the config for this plugin a bit later. For now you can install it by going to the “plugins” page in your admin panel and clicking “add new” at the top.
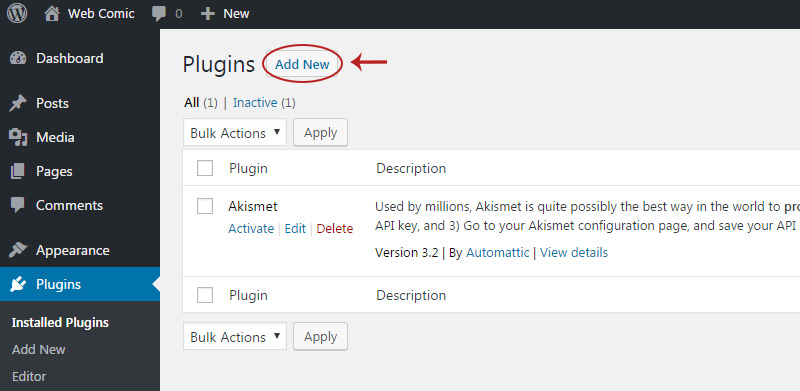
This works exactly the same as the themes page so you can search for webcomic by name and it should come up. Then just click install and you’re good to go.
A webcomic site is really simple so there’s not many plugins worth getting.
But there are a few staples I always recommend for WordPress sites. All of them are completely free and easy to install.
First is W3 Total Cache which caches your site to make it load faster. It does have a lot of settings but you don’t need to touch any of them.

Just go to the “add new” page and install w3 total cache. Once it’s activated it’ll automatically start caching all your pages which ultimately improves your site’s load time.
Next you’ll want an SEO plugin to make your comic Google-friendly. There’s a lot involved with SEO and the best hands-off plugin you can get is Yoast SEO.
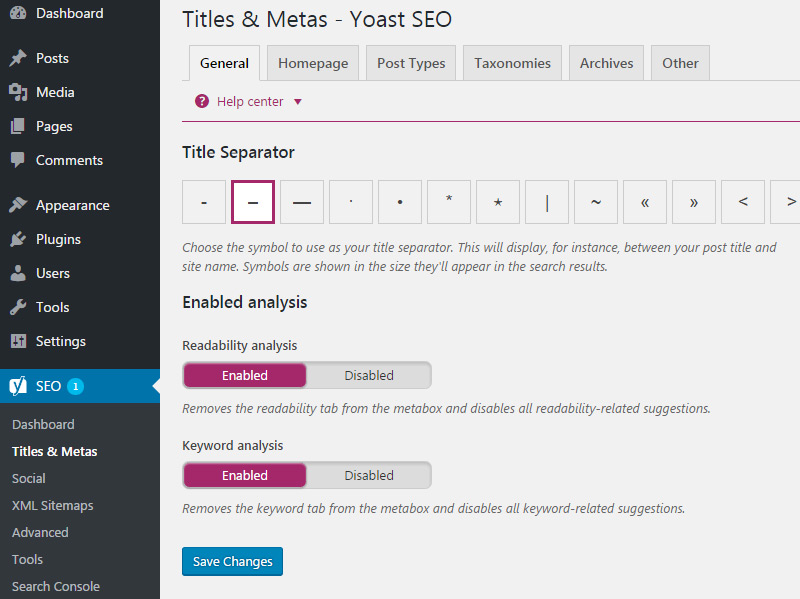
It’s completely free and it automatically handles page title tags, meta tags, and creates a sitemap for Google.
SEO is a huge topic so you may not bother with this stuff at first.
But as your webcomic grows you’ll naturally learn more about SEO and search rankings. With Yoast you can easily change the title and meta description of any page including archives.
Plus you can submit your Yoast sitemap to Google which helps your site rank quicker.
This is all part of a larger SEO effort so don’t worry about doing this stuff right away. Just get Yoast installed and worry about the details later.
And once you install Yoast I also recommend SO Hide SEO Bloat. Just search that on the “add new plugin” page and it should come up.

This removes a lot of excess bloat that Yoast adds to your dashboard so you’ll get all the SEO benefits without having to stare at the annoying extra menus.
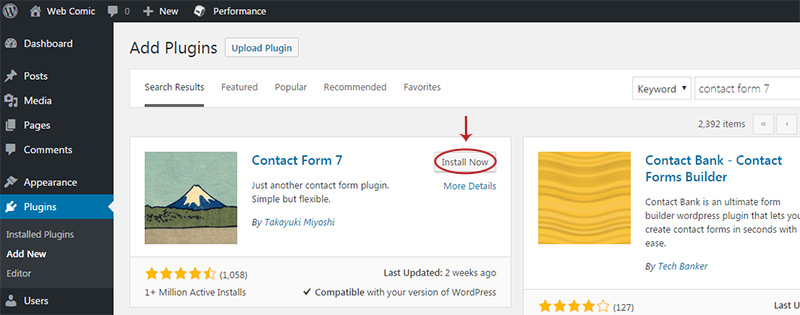
Lastly I’d recommend installing a contact form plugin. This isn’t mandatory, but I think it’s good to make yourself available by email.
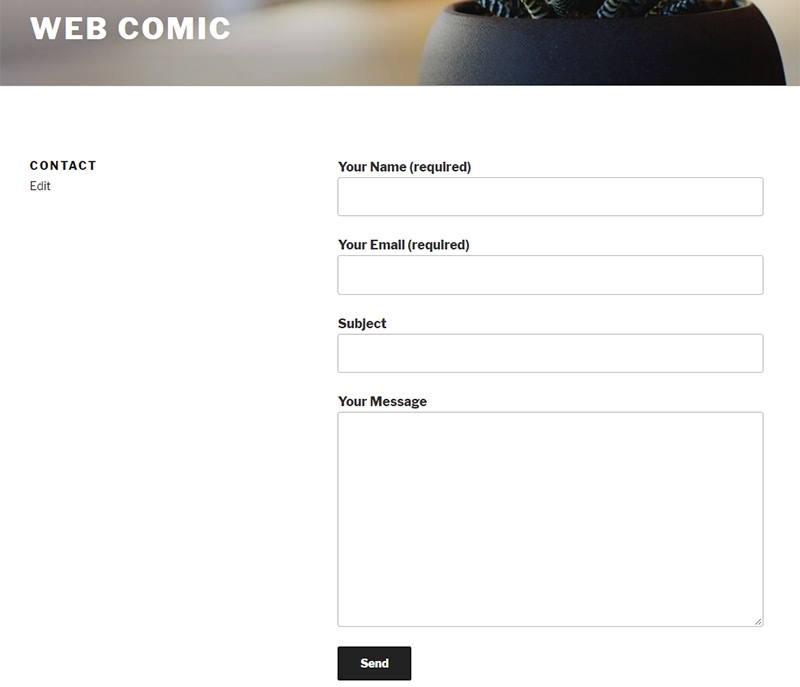
It’s easy to create a contact page and it’ll only take a few minutes with a plugin like Contact Form 7.
I like this plugin because it’s simple and doesn’t require any customization. You just install the plugin, activate it, and copy a bit of code into whatever page you want the form to appear.
Everything should be configured properly out of the box so you shouldn’t need to change anything.
But you will need to create a contact page and copy the shortcode. You’ll find this code on the Contact Form page in your admin panel.
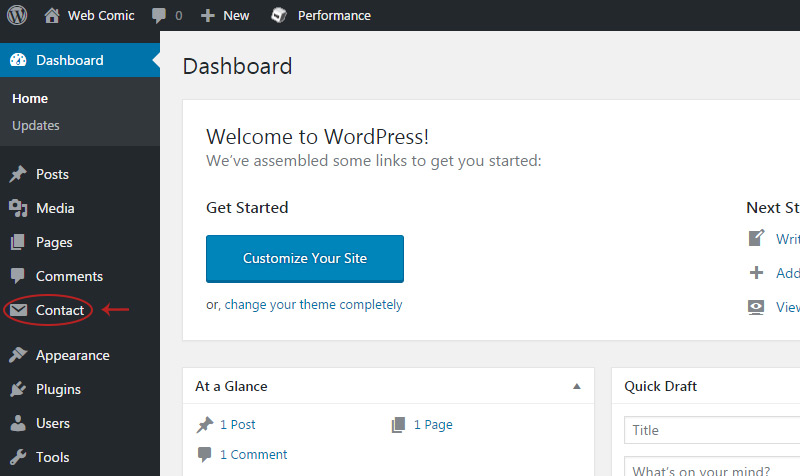
On this page you’ll see your default contact form. Next to it should be a long code inside square brackets [like this].
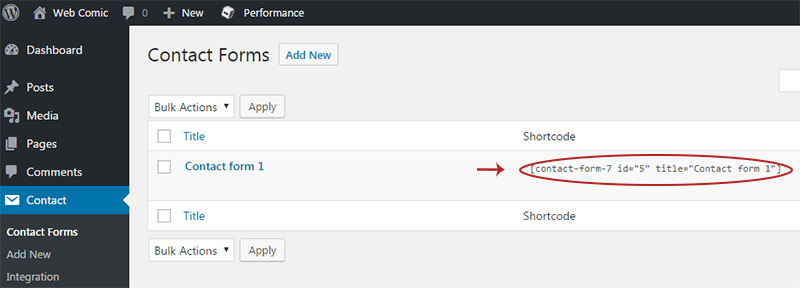
You’ll want to copy/paste this into the body text of a new page.
So copy the code and then hover the “pages” link, then click “add new” from the flyout menu.
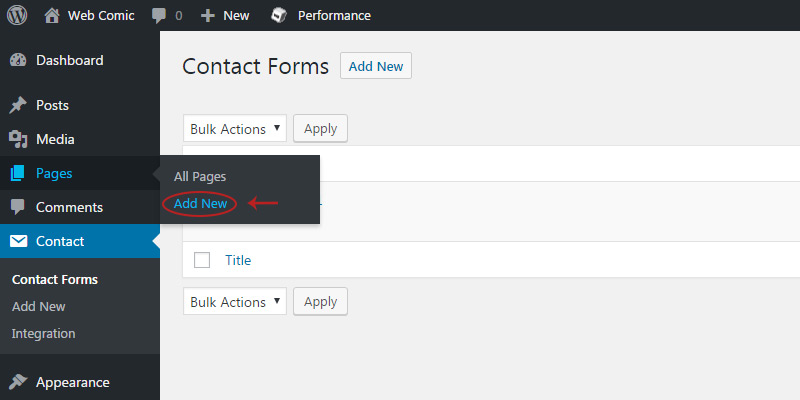
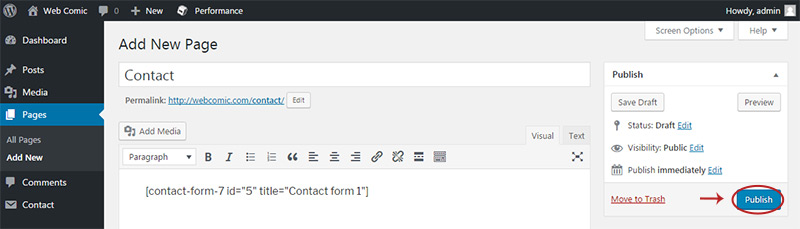
On this next page you can paste the code right into the body section. Then give the page a simple title like “Contact”.
Now hit the blue “publish” button to the right and it should be live.
Once it’s live you should have a simple yet elegant contact form that looks something like this.
These are the primary plugins I recommend for every site. But if you ever need more functionality on your site try searching for a plugin because there are a lot out there.
Using The Webcomic Plugin
So you have your new webcomic site installed with some custom settings. You also have a nice theme and some plugins to help it all run.
The last piece I want to cover is the Webcomic plugin and how it works.
As I mentioned there are others you can use, but I’d prefer to focus on this one for now. All the other plugins should work in a similar way so you if you tinker around you’ll have no problem with whatever comic plugin you prefer.
For this plugin make sure it’s installed by going to Plugins -> Add New. Then do a search for “webcomic”.
Once it’s installed click “activate”. It should take you to the plugins list and you’ll see a few new links in the admin menu.
For now just find the Webcomic plugin and click the “settings” link.
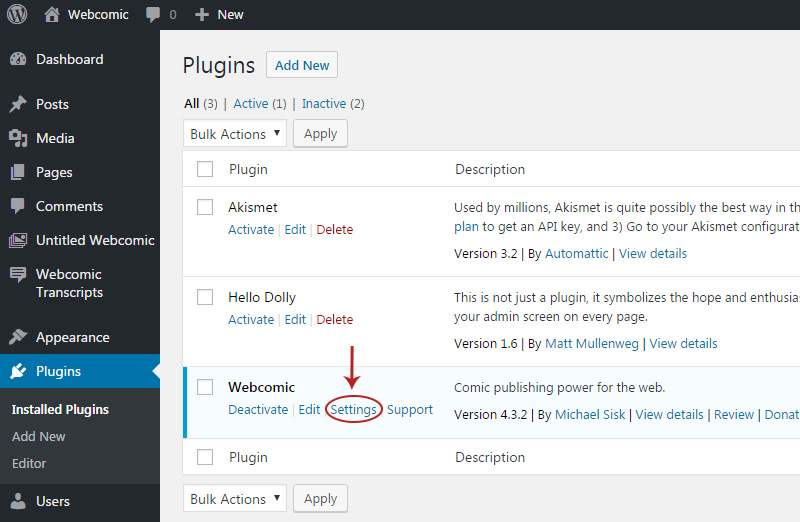
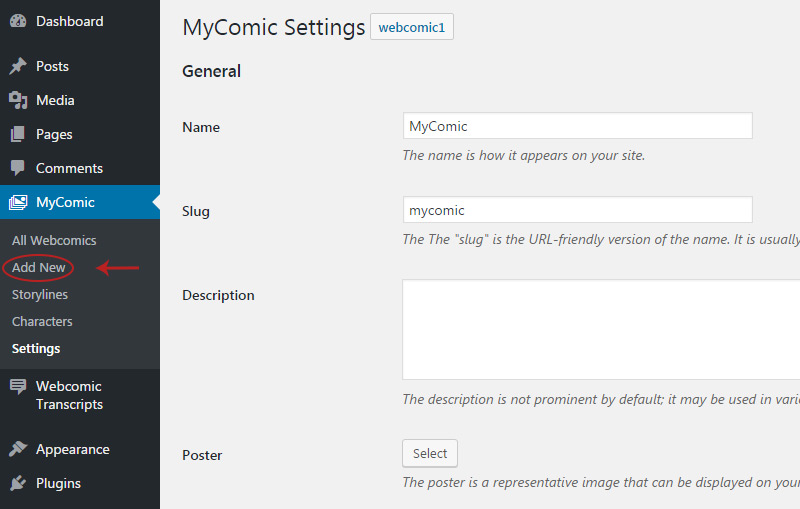
On this page you’ll see a list of all the current webcomics. By default there’s one with the name “untitled webcomic”.
If you click that link you’ll get a page full of settings you can change.
First update the comic name and slug to whatever you want. I’ll use MyComic for this example.
Then scroll down until you see the “Permalinks” section. These permalinks should be changed to match the name of your webcomic. Just remember you can’t use spaces for these links so only use letters, numbers and hyphens.
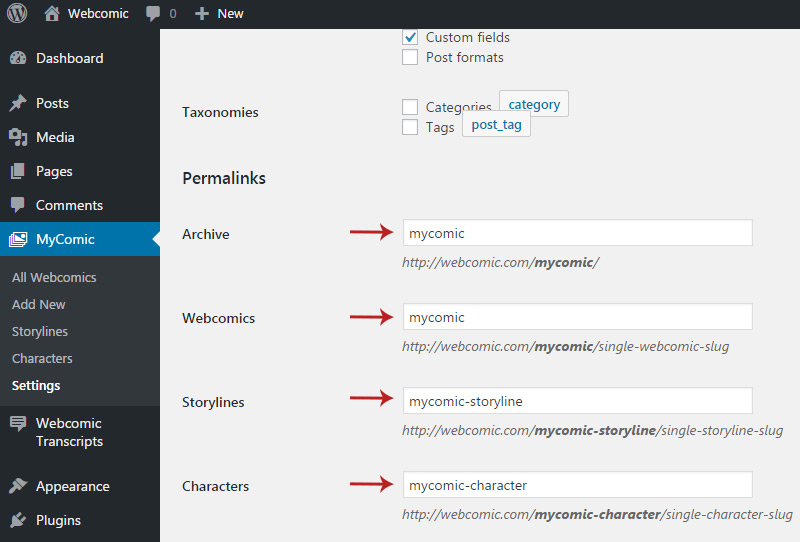
Click “save changes” at the bottom and you should be all set.
You’ll notice there are a lot of different options you can change. I absolutely recommend that you go through all the webcomic settings at some point just to see what’s available.
I usually disable the Transcripts feature because it’s a little excessive. But none of these settings are permanent so you can always change them later.
But for now let’s publish your first comic.
In the left menu find the “add new” link underneath your comic’s nav section.
Click this link and you’ll get an editor page. Enter a title for your new comic(again this can always be changed later).
Now click the “add media” button in the top-right corner.

You can select from images you already uploaded or you can add a new image from the “upload files” tab in the top-left corner.
Whenever you upload a file WordPress automatically crops it down to a smaller size. This is great for thumbnails on a blog, but for a webcomic you want to publish the fullsize image.
You can change this from the dropdown box in the bottom-right corner. It only appears when you select an image so make sure you upload something first.
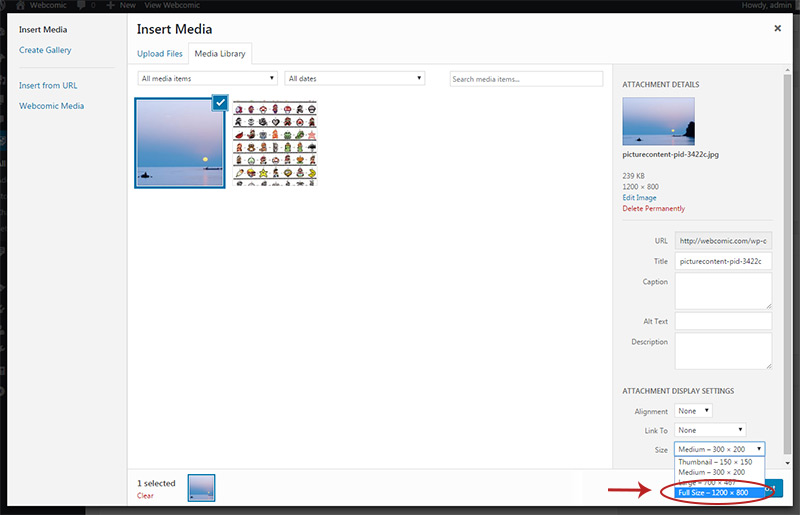
Select the fullsize option and then click the blue button labeled “insert into post”.
Now hit publish and your comic should look great with any WordPress theme. Pretty simple right?
On the editing page you probably noticed tons of extra boxes like the Webcomic Commerce and the Transcription box. These are mostly unnecessary and you can hide them by clicking the “screen options” link at the top of the page.
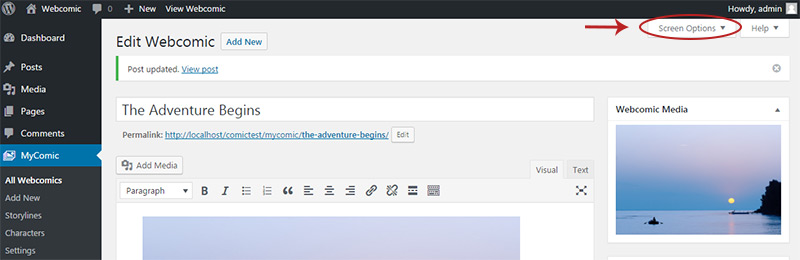
A small pane slides down with a bunch of checkboxes. To hide a panel just uncheck the box and it’ll automatically be removed.
I usually hide the characters and storyline boxes because they don’t serve a purpose unless you have many different comic series on your site.
From here it’s just a matter of tinkering and organizing your comics. I do realize the Webcomic plugin has tons of extra features and these might be off-putting.
So if you want to try either Comic Easel or the Manga+Press plugin they might be a tad simpler. In my experience Webcomic is the easiest plugin for a new user to pick up and learn.
But if you use a comic-specific theme like ComicPress or Sunny and Blue then you won’t even need a plugin. It’s all up to your preferences.
Try a few different plugins/themes to see what you like best.
And with that said I think it’s time to wrap up.
I genuinely hope this guide provides enough info to help you create an amazing webcomic website.
I’ve written this guide with complete beginners in mind, but I know WordPress can be a challenge when you’re brand new. If you think any part of this guide is confusing or if you want more detail on something get in touch and share your thoughts.
And best of luck with your new comic!


")


