


How To Make Your Own Art Portfolio Website: A Step-By-Step Guide
Every great artist needs a portfolio site. This is the best way to show off your work to the world and connect with new clients.
But setting up a website can be intimidating if you’ve never done it before. That’s why I created this guide: a how-to for artists who want to get their own site online without blowing money on a design agency.
I’ll teach you how to setup your own portfolio site using a free platform called WordPress. It’s the simplest way to get a site online fast and it’s currently powering over 29% of the web.
I’ve designed this guide for all types of artists, although the focus of this site is entertainment art so this guide is perfect for:
- Concept artists
- Storyboard artists
- Animators(2D & 3D)
- Character designers
- Background designers
- 3D modelers/riggers
- Illustrators & digital artists
If you follow this guide start to finish you should end with with your own kick-ass art portfolio site. And with WordPress you’ll find thousands of free resources in Google if you ever have questions along the way.
Launching Your Site: The Basics
If you’ve read this far then I don’t have to sell you on the value of a website. In this age it’s practically required to have a web presence, and especially so if you’re an artist hoping to stand out from the masses.
One way you can stand out is with a stronger presence than others. Build a website that really feels unique. A site that grabs attention and helps to sell your work right away.
A strong website also helps to improve your brand while building your name digitally. WordPress isn’t the only option, but it’s the most secure way to start and it’s got tons of free support online. The whole platform is 100% free so you can easily manage WordPress for life without paying a dime.
Now there are costs that come with launching a website. But these are pretty miniscule and they can amount to less than $10/mo. The two main costs are:
- Domain name(ie. yourname.com)
- Website hosting
The WordPress platform is free, but hosting a website is not free. Actually hosting is the probably the biggest expense since most domain names are super cheap.
In this guide I’ll teach you how to setup your site with BlueHost which offers a free domain name for one year after signup. I’ll cover more on that in the next section.
For now take a couple minutes minutes to look around the web and search for your favorite artists. Check out their websites. Do you notice anything you’d want to include in your own site?

There is no single best way to create a portfolio site. But there are certain design techniques that work best on portfolios, like featuring some of your work right on the homepage.
If you look into some other artist portfolios you’ll have a better understanding of what you want in your own website.
Later in this guide I’ll show you how to pick a theme that matches the design features you’re looking for. So it helps to have a list of features and know exactly what you want.
Although before we do that we’ve gotta get your site online. So let’s cover the whole setup process and take it step by step.
Register Your Website
I mentioned before that you’ll only need to buy two things for a website: your domain name and your web host.
You can get both of these from BlueHost so that’s usually what I recommend.
Note: it helps to have a domain idea ready in advance before starting.
Most artists just get their first name & last name as the .com address. So it might look something like johndoe.com. But if you have a common name then someone else might already own it. In that case you should try variations:
- Add your middle initial
- Use an alias/username
- Append a related word into your domain(ie. johndoeart.com)
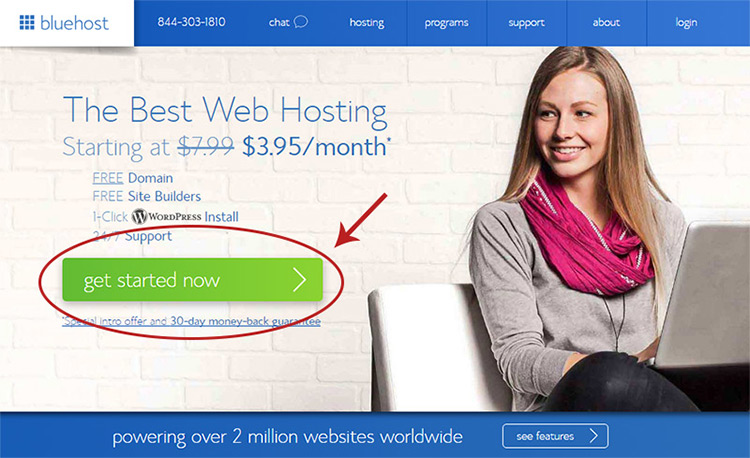
To get started visit the BlueHost signup page and click the “get started now” button.
From there you’ll need to pick your plan. I always suggest the cheapest plan because portfolio sites rarely get 1000s of visitors a day so you don’t need much power.
If you feel the server is too slow you can always upgrade in the future. But it’s best to start small and save money, so pick the “basic” plan from the left-hand side.
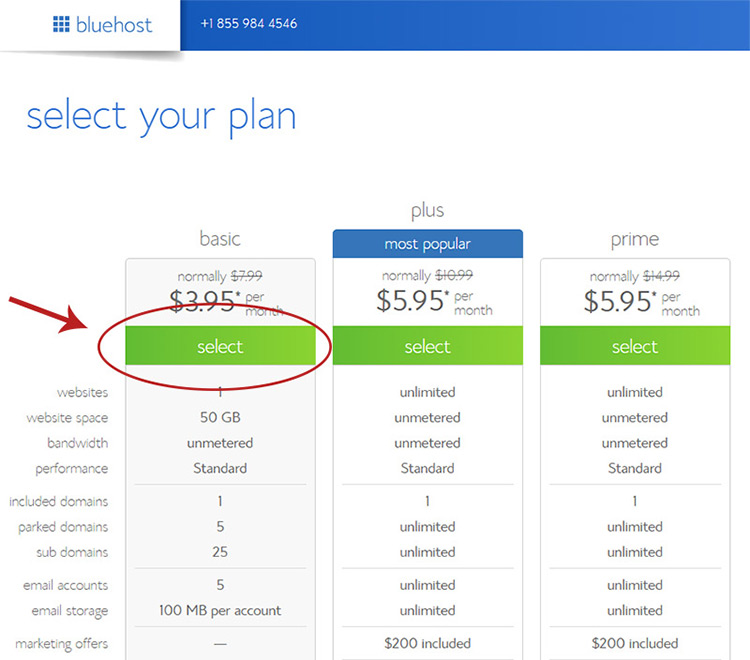
You’ll notice this plan comes with a free domain name and 5 free email addresses. I highly doubt you’ll need 5 emails but it’s handy to setup at least 1 address under your site name.
Now on the next page you should enter your domain name.
The left-hand box lets you register a totally new domain and you’ll get this for free courtesy of BlueHost for one year. Enter the domain you want and click “next”.
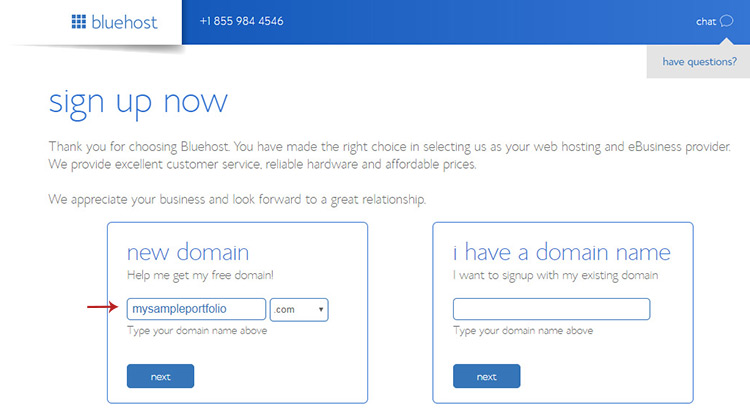
If somebody else owns the domain you’ll get an error message. That may happen but don’t get discouraged!
Just try an alternate domain and keep trying until you find one that’s available(shouldn’t take many tries).
Once you pick a domain that’s available you’ll be directed to the checkout page. Here you’ll add your payment details and you’ll probably want change a couple settings.
From the “package information” section you should change the recurring fee from 36 months to 12 months.
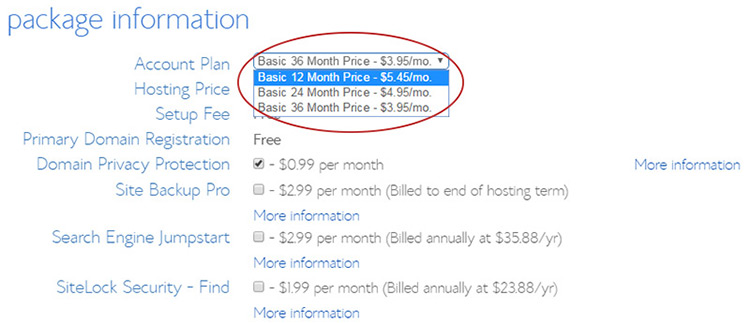
This means you’ll only pay upfront for one year’s worth of hosting rather than 3 years. This will slightly increase the total monthly price, but overall you’ll save a lot of money on this first payment.
Then underneath this section make sure “domain privacy” is checked. It does cost a little extra but this hides your personal information from a whois lookup. It’s kinda technical to explain exactly what that is, but I’ll try.
Basically the group that controls Internet domains requires contact information for every new domain. Without domain privacy that contact information is your information(address, phone number, email etc).
With domain privacy this contact info is replaced with BlueHost’s which uses their physical address & their email. This way your personal info stays hidden. That’s usually preferred by most people!
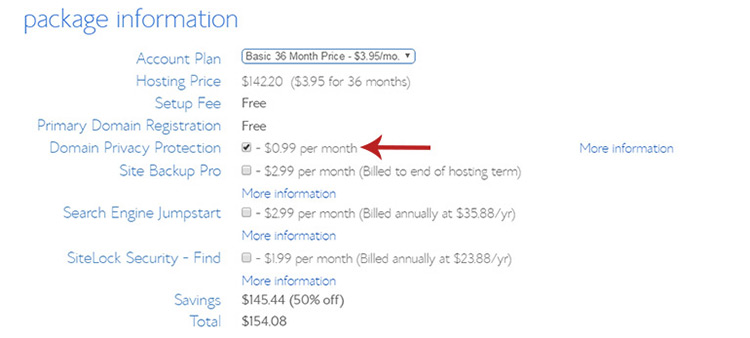
Also make sure to un-check the other preselected options(Site Backup Pro & SiteLock Security).
You don’t need either of these so there’s no reason to pay extra for them.
From here just enter your payment details and click “submit”. You’ll get a confirmation message saying your order is complete, and on the next page you’ll be asked to setup a BlueHost password.
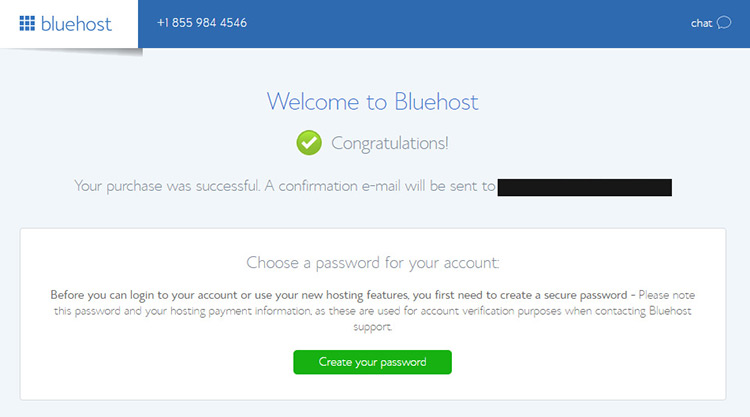
This password is used for your BlueHost account and your WordPress site. But you can always change the WordPress password later if you want.
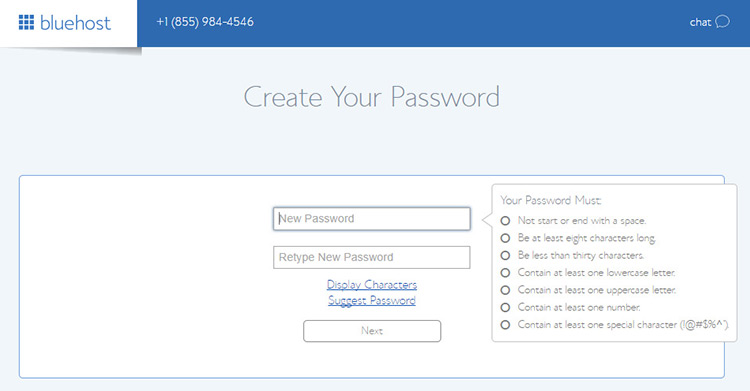
Once you enter this password you’ll be all set. Congrats!
This entire signup process is likely the hardest part. Once you’re past this stage you’re pretty much 60% done.
In fact, BlueHost has its own automated WordPress setup so you barely need to lift a finger to get it installed.
Installing WordPress
After you create your password you should click the “log in” button. You’ll be taken to the BlueHost onboarding page.
Quick note: if you closed the original window you can always login from the confirmation email sent by BlueHost. Check your inbox after signing up and you should find the email waiting for you.
So on the first page you’ll be offered a list of themes. You can pick any theme you want, or scroll down to the bottom and click “skip this step”.
I’ll skip it for now since we’ll be dealing with themes later on.

Whether you picked a theme or not doesn’t matter much anyways.
BlueHost will still auto-install your new WordPress site on the next page and it shouldn’t take more than a few seconds. Once it’s done you’ll get a confirmation page that looks like this:
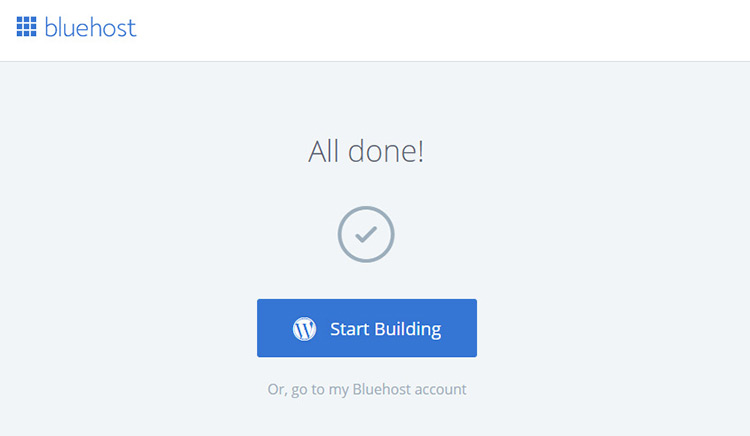
Now click “start building” to access your WordPress dashboard. Alternatively the text underneath leads to your BlueHost account which you can visit to change payment details or check your account status.
I’ll click the “start building” link and visit my new dashboard. Here’s what the startup page looks like.
If you want to go through BlueHost’s customizer you can choose the “business” link and follow those steps. But I recommend skipping this tool and following my guide instead.
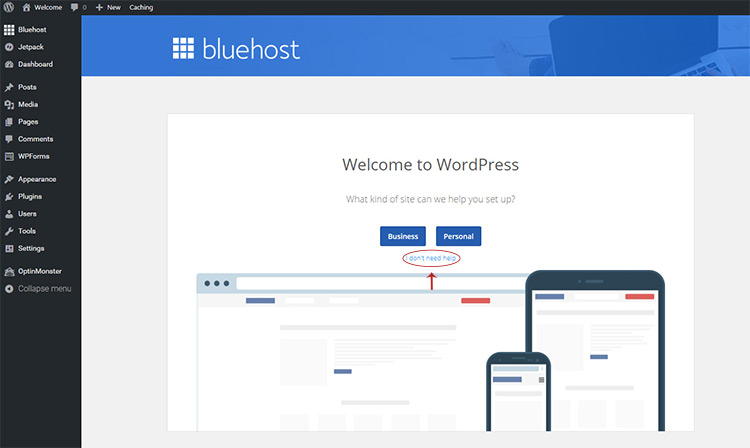
So underneath those buttons just click “I don’t need help” and I’ll take you the rest of the way.
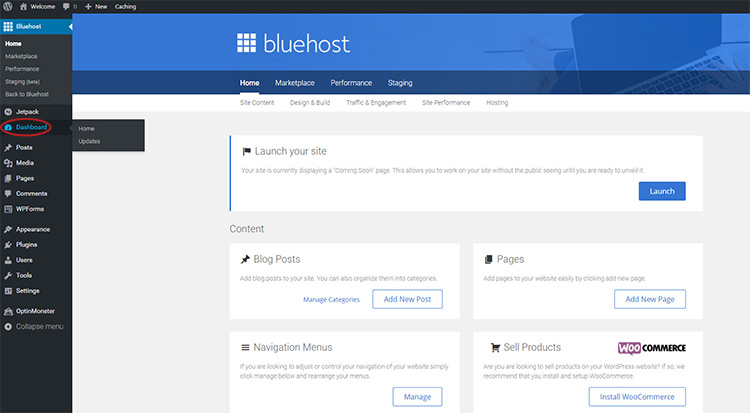
After this you’ll be directed to the custom BlueHost dashboard. This is a little different than the main dashboard.
It all runs on a custom plugin which you really don’t need, but there’s one feature I’d like to point out. Notice how it says “launch” right near the top?

By default your new website is in “coming soon” mode until you launch it live.
We can do that later once we spruce up the design a bit. Or we can disable the plugin to get it online right away.
I really like this optional feature because it prevents you from launching a totally empty website right off the bat. If you wish you can leave this and take your time customizing everything before launching your new portfolio.
I don’t think this is really necessary and it’s mostly a feature from the MOJO Marketplace plugin(explained below). I think it’s better to remove this plugin and just let your site be online, but I want you to make that choice!
For now you can access the main dashboard from the sidebar link titled “dashboard”.
This dashboard has a lot of extra features installed by default through BlueHost. If you have time you can play with some of these on your own. But for this guide I’d rather disable them all and start with a clean slate.
To do this click the “plugins” link in the sidebar. You’ll see a bunch of feature boxes near the top of the page but if you scroll down you’ll find a whole list of plugins.
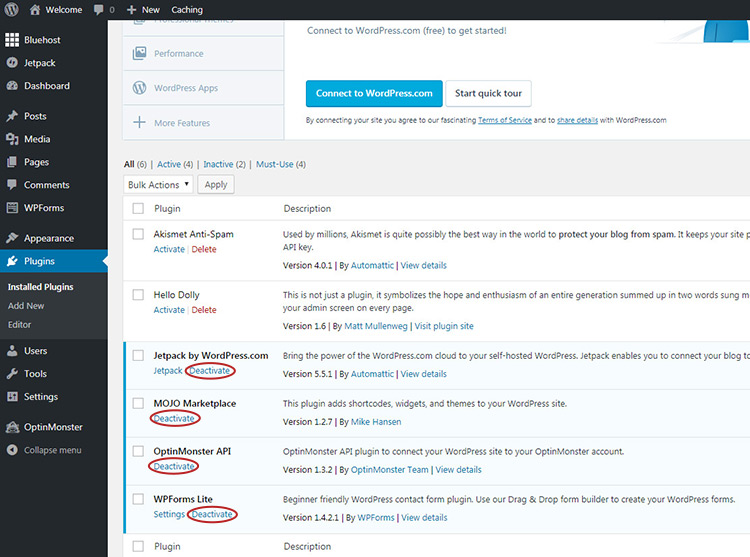
All the plugins with a light blue background are currently activated.
I personally recommend deactivating all of these plugins from the start.
Just note the “MOJO Marketplace” plugin controls the main BlueHost dashboard link at the very top. This is what keeps your site hidden until you choose to launch. So if you want to wait before launching your site disable every plugin except the Mojo plugin.
For my demo I’ve disabled everything and here’s what my page looks like now:
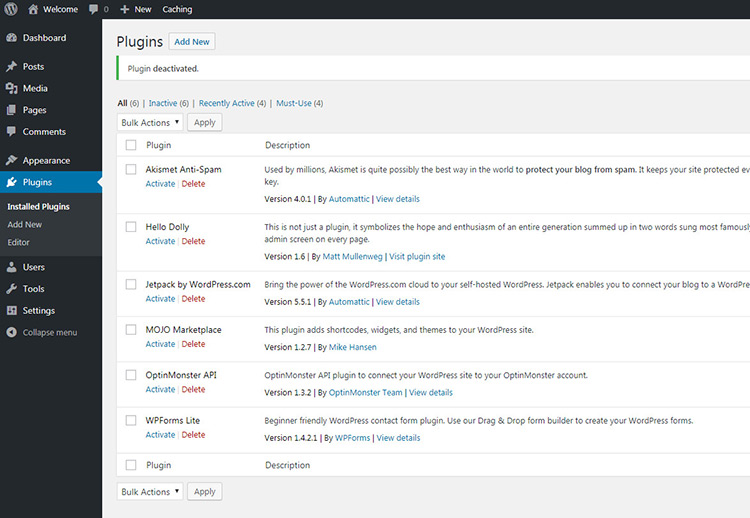
You can reactivate these plugins at any time if you wanna try them out. Or you can delete them completely. I won’t be using any of these plugins in this guide but feel free to leave them installed if you wanna tinker with ‘em in the future.
From this point onwards your site should be online. Bland, possibly even hidden, but online.
What we need to do is change some of the default settings and get this looking like a real portfolio. Then we’ll talk about theming and custom plugins to round it all out.
One-Time Custom Settings
To start making changes hover your mouse over the “settings” link in the lower-left corner, then click “general”.
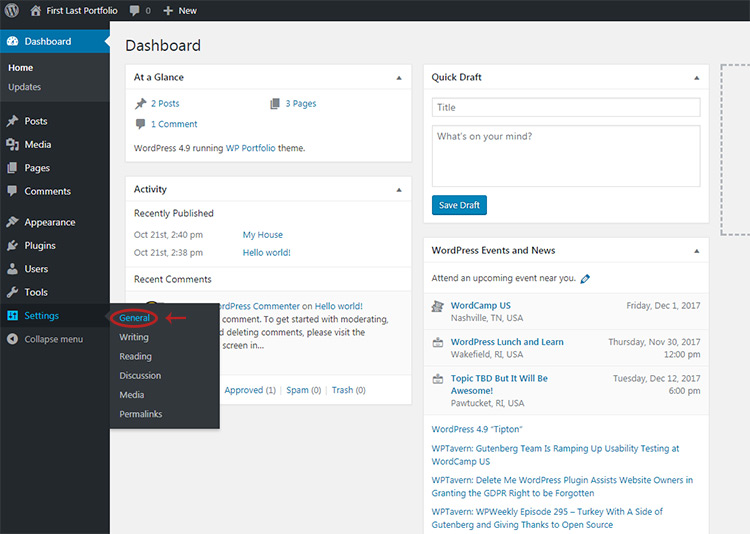
You’ll find a few settings that you definitely want to change right away:
- Site Title – the name of your site(ie. This site is Concept Art Empire)
- Tagline – the optional description of your site(this appears with your title)
You need a site title but you do not need a tagline.
For your title you can do something simple like “Yourname Concept Artist” or “Yourname Portfolio”. Whatever you want. This is easy to change anytime.
Just make sure you delete the tagline or replace it with something else. It looks awful to have a site online that reads “Just another WordPress site”.
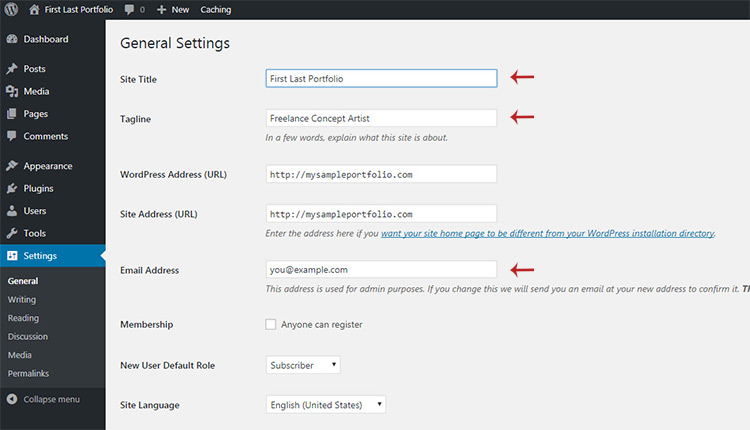
You might also change the main email address to your actual email. This way you’ll get emails whenever the site updates to a new version of WordPress, along with any other relevant system emails.
Lastly scroll down to the bottom and before you save any changes, have a look at the very last feature on “Endurance caching”.
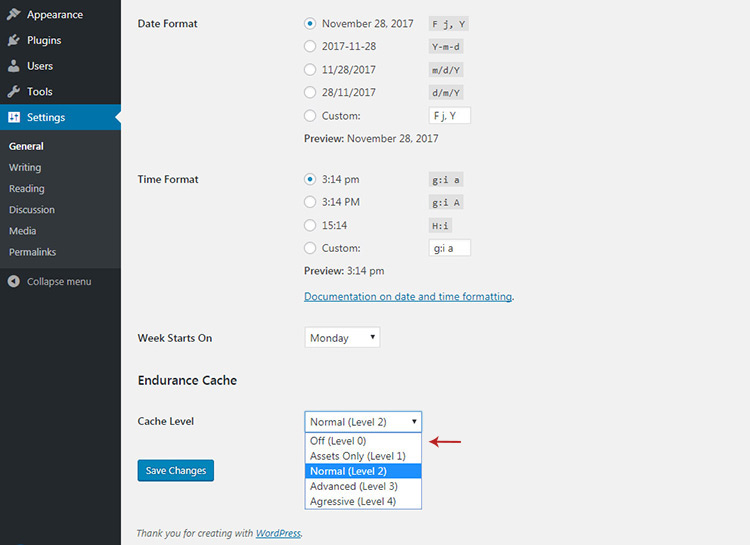
This is a default caching option setup by BlueHost and it’s great for new sites. But I’m gonna show you how to setup a better caching plugin later in this guide. So for now set this feature to Level 0(off).
Then click “save changes”.
The rest of these settings are optional but I highly recommend doing them. WordPress was built as a blogging platform so the default settings usually cater to blogs.
It won’t harm your site to leave the defaults. But making these changes will look nicer and give your portfolio a cleaner look.
Once you’re done with the site title & email click on the “Discussions” tab under the settings link.
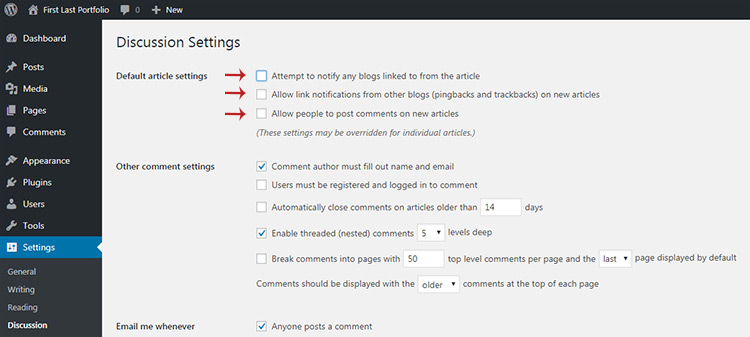
Here make sure the top 3 items are all unchecked.
The first two send & receive pingbacks from other blog posts, really they serve no purpose nowadays. The 3rd option lets anyone leave comments on your site.
If you want to run a blog with comments alongside your website then leave this open. But for most portfolios I’d uncheck comments because they’re mostly spam.
Once you uncheck these options scroll down to the bottom and click save. Then look back to the admin menu under settings and click “Permalinks”.
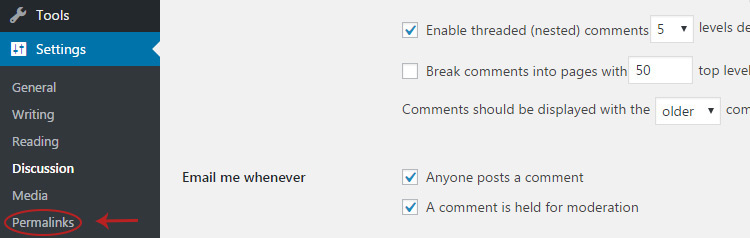
On this page you can change how your WordPress URLs look.
By default they’re hideous and using random number IDs.
I always prefer the “Post Name” option because it’s super clean and follows a natural-looking URL structure. It’s the same structure I use here on Concept Art Empire because the URLs are easier to read and more memorable.

So click that option & then click save at the bottom.
There’s one last thing to change by clicking the “Media” link in the settings menu(should be right above permalinks).
This page lets you set the default image thumbnail sizes for your website.
Most WordPress themes automatically crop & upload these sizes for every image you add to your site. But you can set them all to 0 and save a bit of space on your server.
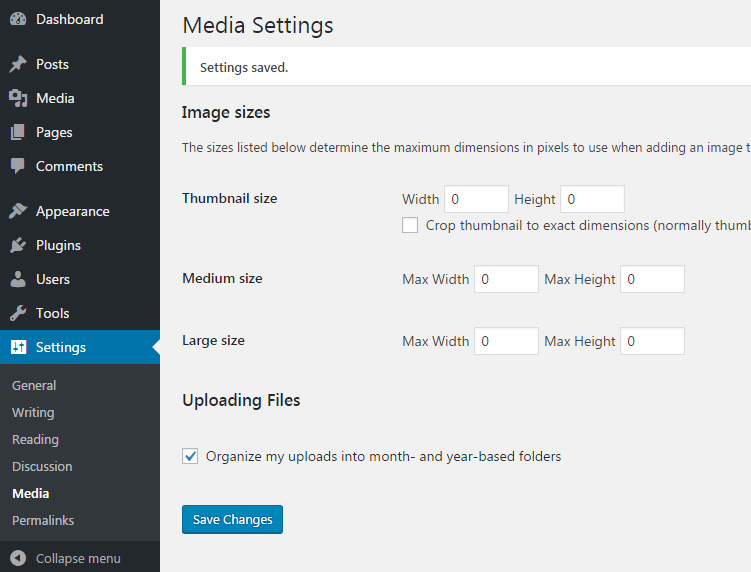
Since you’re using WordPress for an art portfolio it’s likely you’ll be uploading a lot of images. It helps to let your theme set the image crop sizes, not the main WordPress settings.
But keep in mind none of these settings are required. However they’ll simplify your life and make your new WordPress site feel much more like a portfolio.
The real magic comes with extra features(plugins) and a sweet design(themes). So let’s get into those and put a pretty bow on your awesome new website.
Picking A Theme
The design of your portfolio site is a big deal. It gives off a first impression to every client and that leaves an impression on your work.
You want a theme that looks professional enough to match your artistic quality. Many artists prefer minimalist themes with just black or white designs. This way the website fades into the background and brings focus where it belongs: onto your work.
If you’re looking for ideas take a peek at our post on portfolio design. It has a few design tips with examples from real-world art portfolios.
With WordPress you have two options: free themes or premium themes.
WordPress offers a ton of free themes in their online directory. Many are “freemium” themes where you can install the theme for free and use it forever, but it’s just a limited version of a premium theme.

Any portfolio theme will be fine and you can always change your theme later.
For some people it’ll be easier to go with a free theme like WP Portfolio when you’re getting started.
But if you want your site to really stand out you should get a premium theme. These premium designs are mostly created by professionals offering tons of extra features. And each premium theme is rarely used by too many people at once, so your portfolio site will be:
- More unique
- More professional
- More customizable
Whenever I want a quality premium theme I check ThemeForest. It’s a huge marketplace with thousands of pro designers who submit their themes for sale.
You can even add a filter to browse their library for just portfolio themes. Prices are set by the creator and range from $25-$60. But this is a one-time fee so if you find a theme you really like then you can run it forever.
The process of installing a theme is slightly different if you go premium. I’ll show you how to install both, starting first with free themes.
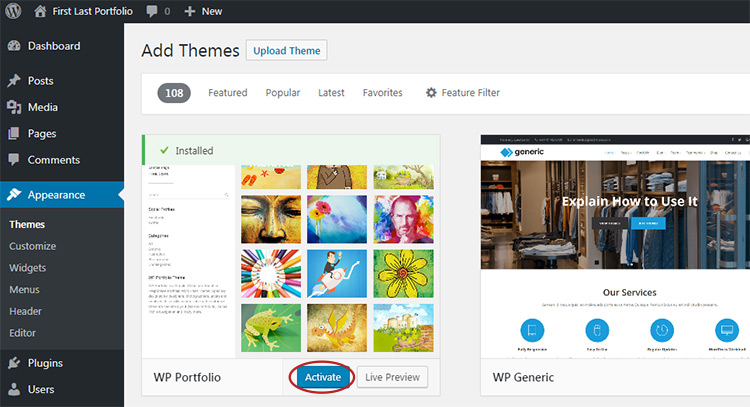
Click on the “themes” link in the admin sidebar and then click the “add new” button at the top.
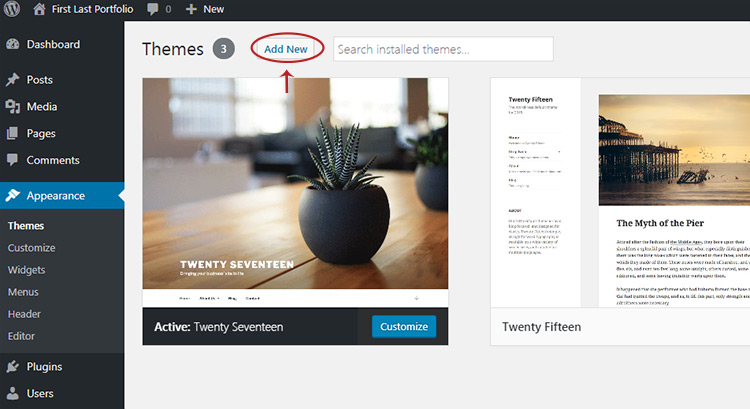
From here you can search for any theme you find in the WP themes directory. I recommend starting there because you can easily search by tags like “portfolio” or “personal”.
Once you find a theme(or a couple) then search for it by name in your WP dashboard. You should see it appear in the filtered list with a blue button labeled “install”.
I’ll search for the “WP Portfolio” theme which is a great choice for anyone.
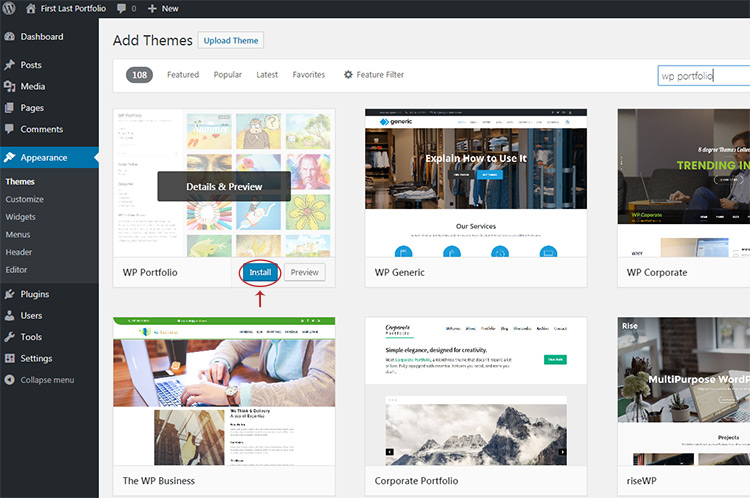
Click that to automatically download & install the theme to your site. Once it’s finished you’ll see a blue button that reads “activate”.
Click it to activate your theme live.
From here you can customize your theme’s colors, style, and whatever other features come with the theme. Each design has different customizable features and some themes are more malleable than others.
I mentioned before that premium themes usually offer the most customization, so that’s my preference. But not everyone wants to spend money on a design right away. Totally fine!
But if you do go with a premium theme you’ll install it a slightly different way.
When you buy from ThemeForest you get a downloadable .zip with your theme inside. Download that to your computer and then go into WordPress, click “themes” in the sidebar and click “add new” at the top.
Instead of searching for a theme you should instead click the button at the top labeled “upload theme”.

This reveals an upload form which you can click to browse your computer for the ThemeForest .zip file. Just upload that to your new WordPress site and presto! Your premium theme is installed.
To activate it you can just visit the themes page from the sidebar and then click “activate” on the new theme.
Again you’ll find all customization options right in the sidebar and some premium themes even have their own menu items.
Learning the WP backend takes time but you really can’t break anything. Take a peek at this customization guide if you’re not sure where to start. BlueHost’s default Mojo plugin may also be useful for complete beginners.
But really, the more you play around with settings the more you’ll learn and get comfortable with WordPress.
Best(Free) Plugins For Your Site
By default WordPress is pretty boring. And that’s a good thing!
It’s like a blank slate you can mold to suit your needs.
Yet a blank slate leaves a lot to be desired. And every new WP site can benefit from a few staple plugins.
These work like add-ons which insert extra functionality into your site, all with a few clicks.
Most portfolio sites are pretty simple so you won’t need many extra features. But there are 4 free plugins I absolutely recommend for every WordPress portfolio site:
- Yoast SEO – a powerful SEO plugin
- Hide SEO Bloat – removes excessive Yoast bloat from your dashboard
- W3 Total Cache – simple caching to speed up your page speed
- Contact Form 7 – best way to add a contact form into your site
Pretty much every plugin you’ll ever need for your site is free.
When it comes to WP themes I always prefer premium designs. But for plugins you can get everything you need with just the free options.
Installing a plugin is similar to installing a free theme. You just click the “plugins” link in the navigation menu, then click “Add New” at the top of the page.
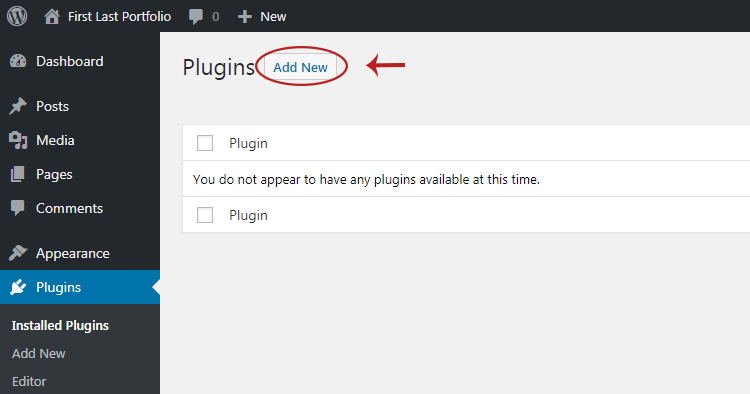
On this new page you can search for whatever plugin you want by name.
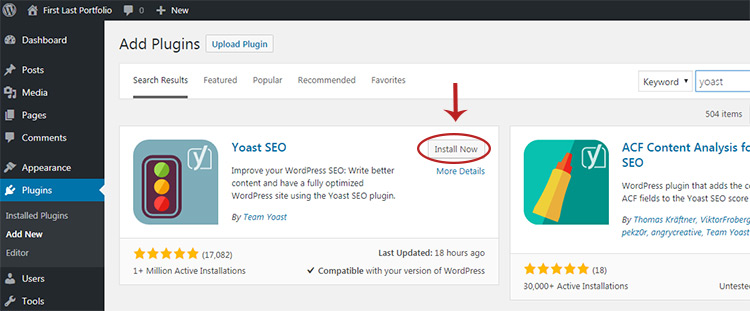
For example, to install the Yoast SEO plugin just search for “yoast”. It should be the very first option in the list.
Then click “install” to immediately download & install the plugin files. Easy!
Once it’s done you can activate it right away, or search for a different plugin to install that.
I recommend installing all 4 of the plugins I listed above. They’re all free so if you search for them by name they should be easy to find.
You don’t need to know much about how these plugins work, although I will explain a little about each one.
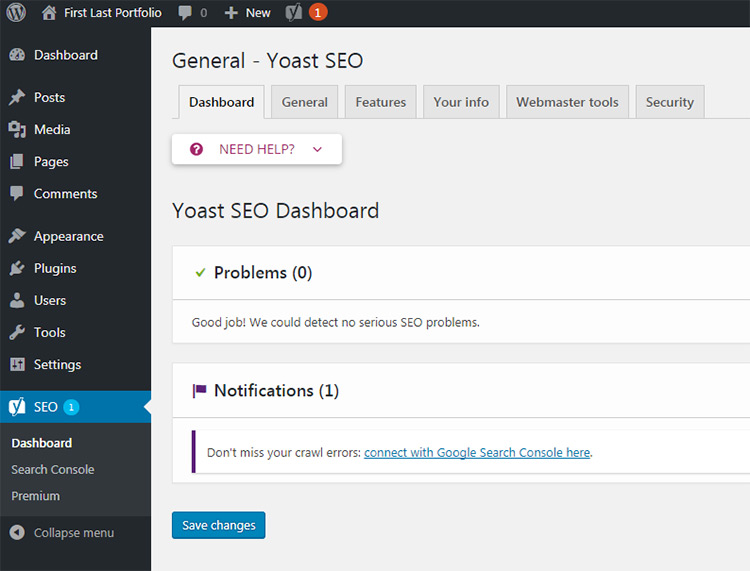
Yoast SEO pretty much defaults with the best settings. However it’s a very detailed plugin and it’s not some ultimate SEO quick-fix. But it works a lot better than the default WordPress SEO settings.
One problem with Yoast is all the extra bloat it throws into your dashboard.
To get rid of this we’ll use the Hide SEO Bloat plugin. It keeps all the core Yoast features while removing the annoying buttons and extra widgets that you don’t need.
If you wanna learn more about Yoast check out this guide covering the dashboard and all of its main features.
One other plugin you can set & forget is W3 Total Cache. This uses a bunch of caching technologies that help your pages load faster. Once it’s activated you can just leave it alone; the default settings are perfectly fine for most websites.
Please note: W3 Total replaces the default Endurance Caching setup by default with BlueHost.
If you’d rather use the BlueHost caching then go to Settings -> General, scroll to the very bottom and set the caching to Level 2. If you want to use W3 Total then visit Settings -> General and make sure the caching is set to Level 0.
You shouldn’t run both at the same time so make sure to use just one or the other.
Lastly is the contact form plugin, and this is a bit trickier to setup. But it’s still not too difficult if you follow these steps.
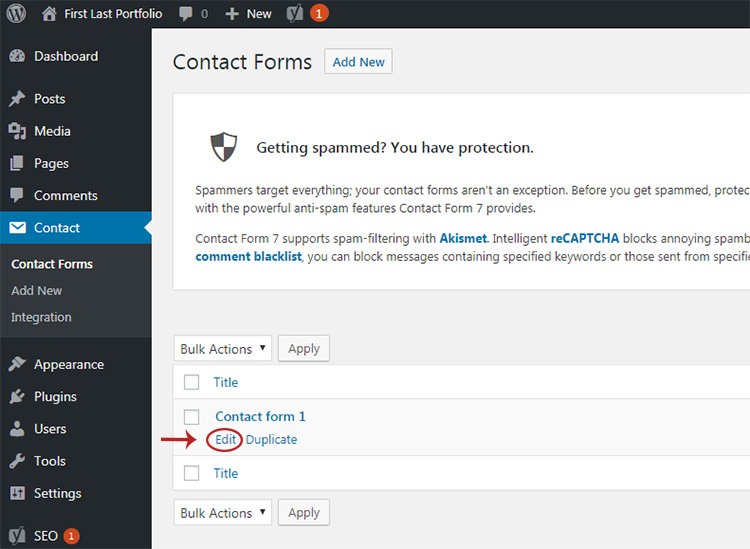
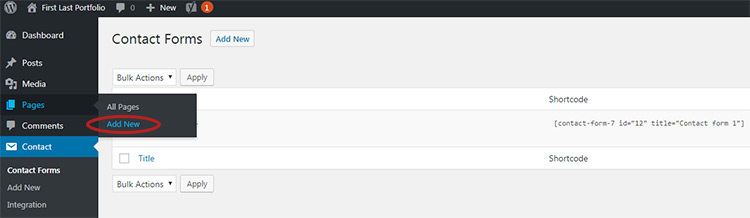
First install & activate Contact Form 7. You’ll find a new menu item labeled “Contact”. Click that to find a default contact form you can use for your site.
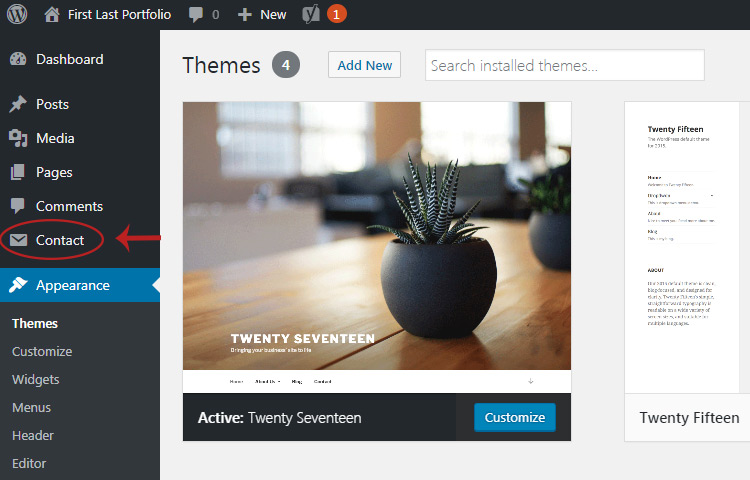
On the main Contact page hover the “Contact form 1” area to see a small edit link. Click that.
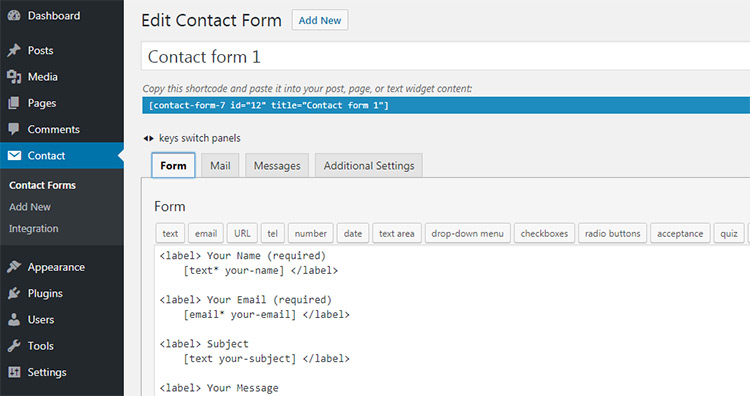
The default form message should be OK but you may want to change some of the email settings. Click the tab labeled “Mail” at the top.
From here you can change the replyto field, the specific email address for the contact form, and the title of the message.
I like to give my message titles a custom prefix so I can clearly see which messages came through the contact form. The template I use for this site is CAE Contact: “[your-subject]”
But for your portfolio site you can do anything you want. You can have the subject just be [your-subject] which defaults to whatever the person writes in the subject field.
One reason I like to add a prefix is so I can whitelist emails. Sometimes I’ll find messages in my spam folder by accident, so I whitelist all messages that start with “CAE Contact:” so I always receive them.
And yes, sometimes they are spam. But I wanna be the one to decide that!
Either way you can always change these settings later so none of this is permanent.
For now save any changes you made, or if you didn’t make any changes then click on the “Contact” link in the menu again. From this page copy the entire Shortcode that you see between square brackets.
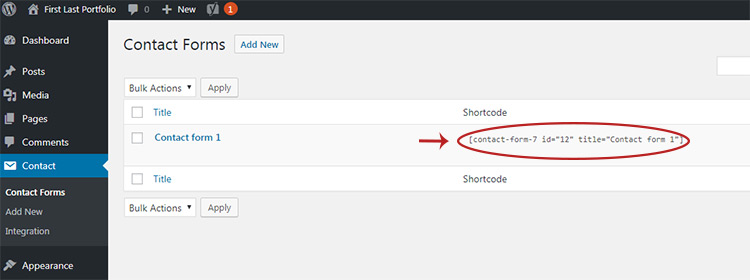
You need to paste this code wherever you want the contact form to appear. Usually this is on a contact page.
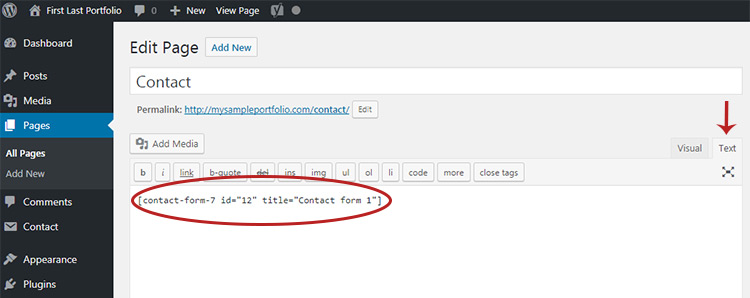
So hover the “pages” link in the left-hand sidebar, then in the flyout menu click “Add New”.
On this page enter a title of Contact at the very top. Then make sure you click the little tab labeled “text” in the top-right corner of the large textbox.
Inside the text box just paste your contact form code. Easy!
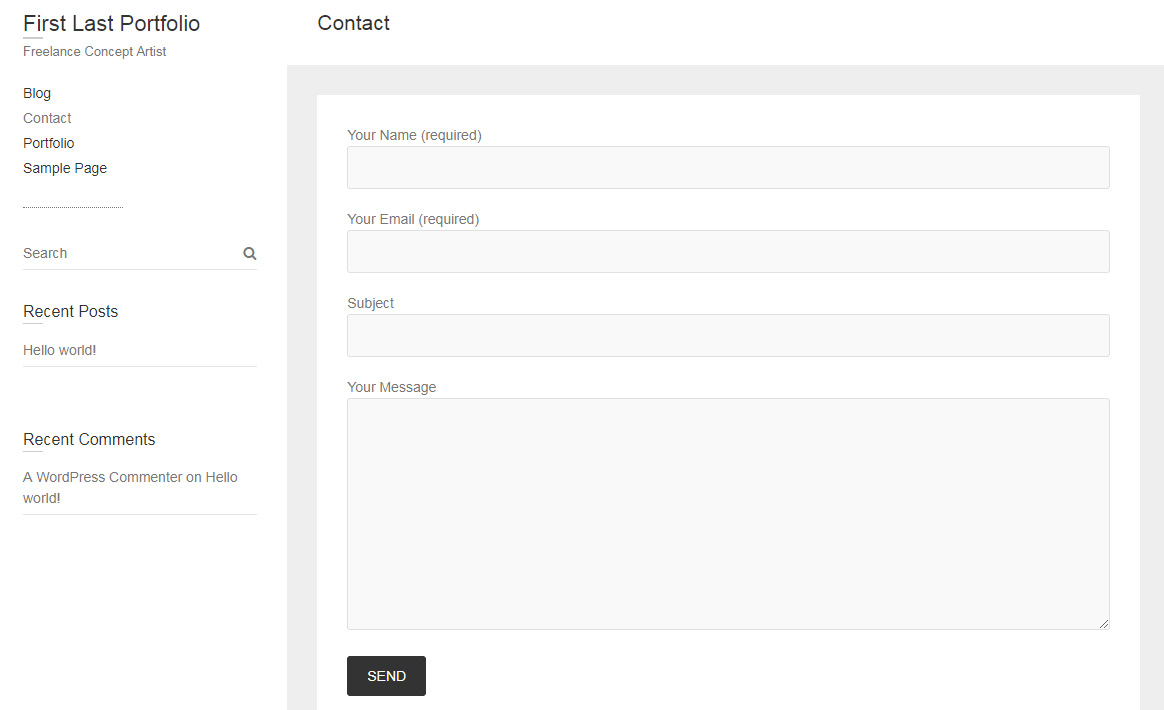
If you want to add a few paragraphs above the form you can tell people how often you check email, whether you’re available for hire, or any other pertinent info.
Once you click the blue “publish” button you can view the contact form live on your site. Super simple. And you can always go back to edit this page in the future.
Now aside from these 4 plugins there is another one you might want: a portfolio gallery.
If you’re using a premium portfolio theme you’ll have a built-in portfolio feature, no plugin needed. That’s the beauty of premium themes!
But with a free theme you’ll need to add this functionality yourself. With a gallery plugin you can add slideshows and galleries to make your portfolio images much easier to browse.
By far the most popular choice for a free plugin is the Huge-IT Portfolio Gallery. It’s a free plugin with an optional premium upgrade, but the free version is more than enough.
You install this plugin the same way as all the others: by clicking “add new” on the plugins page and searching by name. It’ll take a little practice to learn how to use this plugin. But I’ll share a quick overview on the setup & some portfolio management tips in the next(and final) section of this guide.
Managing Your Portfolio
None of the free WordPress themes come with a portfolio gallery feature.
This is one good reason to go with a premium portfolio theme, but not everyone wants to spend money right away. So it makes sense to stick with free stuff like a portfolio plugin.
Let me show you a common way to add portfolio items to your new website, 100% free.
I’ll show you how to do this using the free Huge-IT Portfolio plugin.
Once installed you’ll find a new item in the side menu labeled “Huge-IT Portfolio”. Click that to manage your portfolio items.
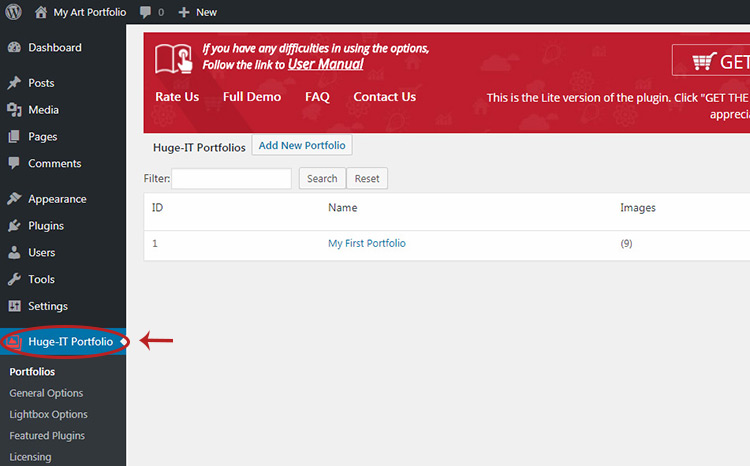
By default you’ll find one main portfolio already configured. You can use this plugin to create many different portfolio galleries, a useful feature if you do many different types of art & want them on different pages.
For now let’s just copy the default shortcode which should look like [huge_it_portfolio id=”1″]
We’ll add this onto a new blank portfolio page to see how it looks.
Hover “Pages” and in the flyout click “Add New”. Give this page any title you want, I’ll choose “Portfolio”.
Make sure the “text” tab is selected and then paste the code into the body.
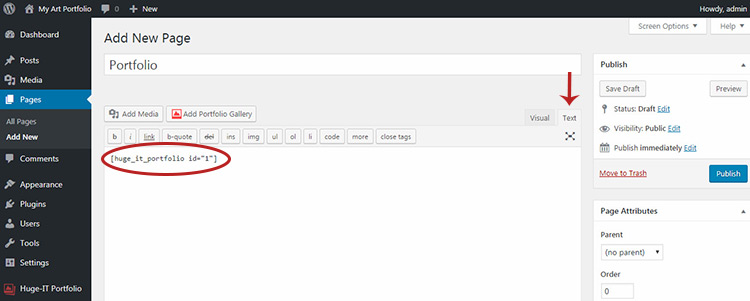
Click publish and then click the blue URL link underneath the title box. This lets you see the page live so you can preview how it looks.
By default it’ll have a bunch of random work inside the portfolio. You can easily change this from the settings page, but take a minute to click some of these items to see how the default portfolio works on the frontend.
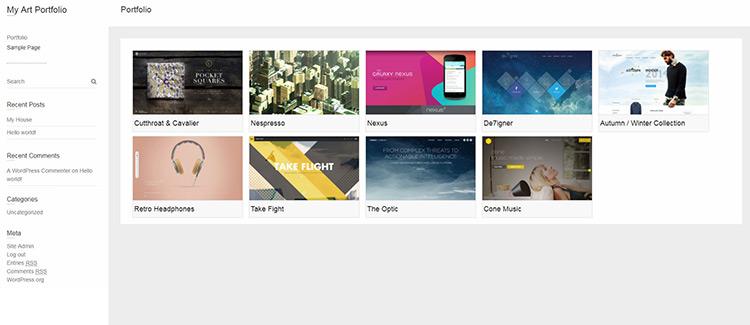
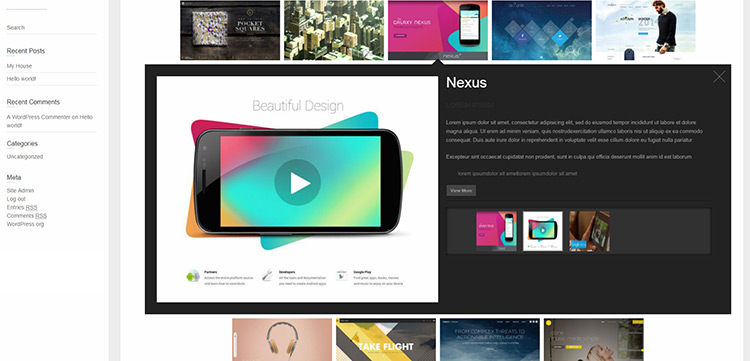
When you click a portfolio item you’ll get a modal window including a few related thumbnails for the project.
This format lets you create project-based items where you can include many images along with a description of the work you did, who it was for, and even buttons linking to other websites.
But this isn’t the only format you can use.
Back in the WordPress admin panel click the Huge-IT link in the sidebar. Then click the “My First Portfolio” link to edit the settings.
From this page look in the top-right corner where it says “select the view”. There’s about 9 options to pick from so you can test ‘em all if you want.
For a simpler slideshow view click the Lightbox-Gallery option.
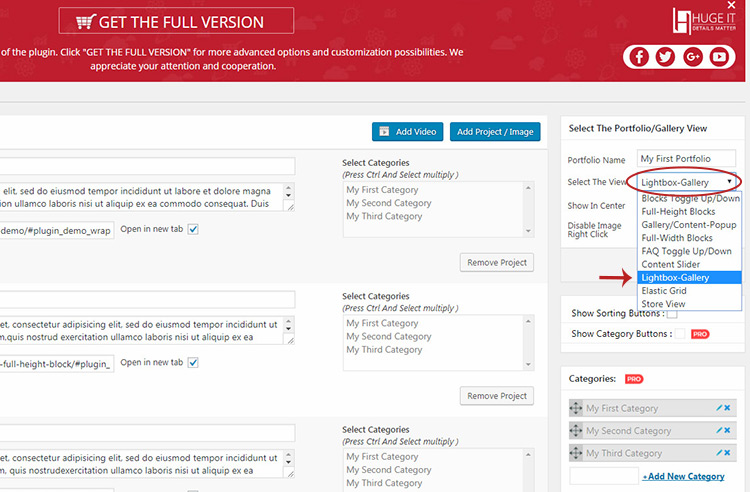
You’ll probably notice a few options are for the pro version only… kinda lame, I know.
But if you’re running a free theme and don’t wanna spend extra money this is still the best plugin out there.
Click the blue save button and test your portfolio page again. You’ll see all the portfolio thumbnails are now fitted with a new modal slideshow.
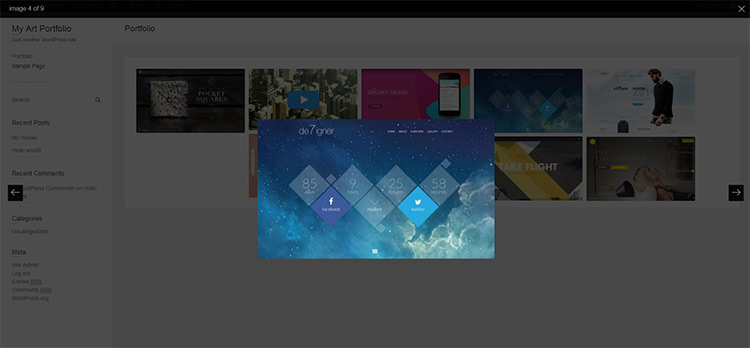
This is probably closer to what you’ll want for a typical art portfolio site. But this slideshow style doesn’t include any of the details for each project.
I actually like the “Elastic Grid” option which you’ll find in the dropdown menu just underneath Lightbox-Gallery. Try that setup and see if it can fit with your artwork a little better.
From here you can upload new images, rearrange the grid, and basically play with the plugin to your liking. Even 15-20 minutes should be enough to really learn how it works.
The last thing I wanna show you is how to move this entire portfolio onto your homepage.
It’s a little tricky but you only need to do this one time. After that any changes you make to the portfolio gallery will auto-update on the homepage.
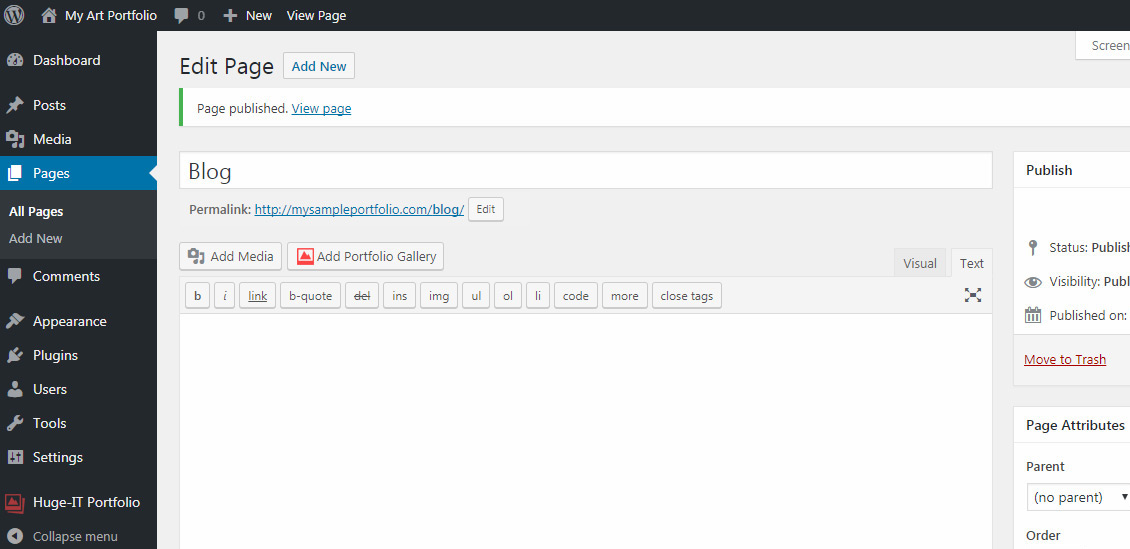
To start hover the Pages link and click “Add New”. Give this page a title of Blog, leave the content blank and click publish.
We need this page as a replacement for the blog page. Even if you do not want a blog you still need to make a blank page to replace it.
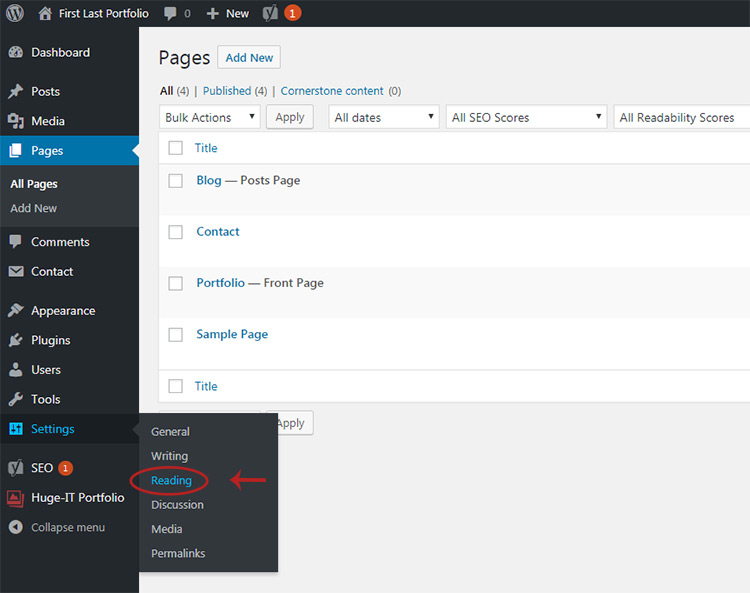
Now hover the “settings” link and in the flyout menu click “Reading”.
At the very top click the radio button for “A static page”. You’ll see two dropdowns: one to choose your front page and another to choose your blog page.
For the front page use the portfolio page you created. And for the blog page use the new page we just created. So your setup should look kinda like this:
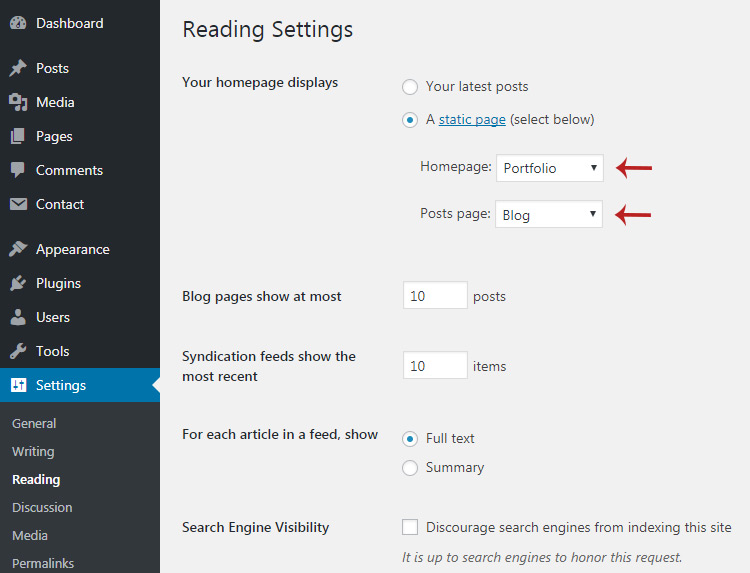
Save the changes and now visit your site’s homepage. You should see your portfolio in all its glory.
The more you play with the Huge-IT plugin the more you’ll learn how it works. It’s really pretty simple and I guarantee anyone can figure it out with some practice.
But if you want a portfolio with some more detail consider looking into premium portfolio themes. Most of them come with custom features just like Huge-IT but they don’t require extra plugins.
Or try looking into some other plugins for WordPress slideshows & galleries. You never know if you’ll find other stuff you like.
Just be willing to experiment and try different things. And make sure you study other artist portfolio sites! You can learn a lot about what you want just by seeing it on other websites.
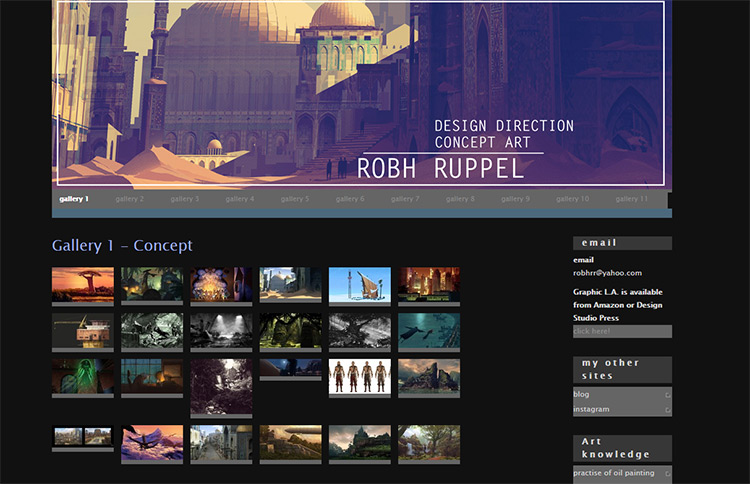
Take a few of my favorite examples like Robh Ruppel, Kekai Kotaki and Thierry Doizon.
They each have completely different styles for their websites and for their galleries.
And that’s what really makes a portfolio website stand out.
Well, that and kickass artwork.
Hopefully this guide offers enough for everyone to go from start to finish with a brand new art portfolio launch. If you follow these steps you should be able to get something up within a few hours and have your site ready in a day.
If you’re lost or confused don’t be afraid to search Google for answers. WordPress is the #1 most popular website management system so there’s thousands of tutorials on every possible question you can imagine.
All the free tutorials online + this guide should be enough for anyone get their own WordPress portfolio website online & running smoothly.


")


