


Introduction To Thumbnailing And Quick Sketching
Thumbnail sketching is a vital step in the creative process. This is especially true of visual arts like illustration, concept art, and even graphic design.
But how should you go about creating thumbnails?
And what value do they add to the overall creative process? I want to share some tips on thumbnailing for artists explaining how this initial step offers rapid idea generation and helps artists nail down new ideas quicker.
Why Bother Thumbnailing?
It’s hard to get this into some people’s heads, but thumbnailing is one of the most important steps in the creative process. Thumbnailing and eventually picking an idea defines what you’ll be doing in every other stage of a project.
By fleshing out thumbnails first you can eliminate ideas that you don’t like. You’ll also stumble onto small elements, features, curves, lines, and perspectives that you do like.
In essence it’s like window shopping and trying on lots of clothes to find the right outfit. If you’re a costume designer this metaphor may be taken quite literally.
If you skip thumbnailing and dive right into a piece you’ll be left cleaning up lots of things along the way. The initial idea may be really cool, but you’ll likely end up refining certain concepts, revamping others, and spending excess time refining some ideas to be clearer.
Thumbnailing helps you avoid these pitfalls and it’s really simple to learn. If you know how to sketch then you have the technical skills to thumbnail. All that’s left is the technique for rapidly approaching new ideas.
If you have an hour of time for a background video while drawing, check out this FZD video where Feng Zhu covers the importance of thumbnailing.
So why exactly should you bother thumbnailing? A few great reasons:
- Allows quick iteration over unique ideas
- Forces you to think about what you’re creating
- Freedom to design without worrying about technique
By removing restrictions on rendering and attention to detail you can put down ideas much faster. This shifts your focus onto the ideas themselves, rather than making them look pretty.
If you’re trying to solve a creative problem then thumbnailing can also help you avoid artist block.
Reduce Overthinking
The goal of thumbnailing is to put down concepts on paper. Try different designs as they come into your head. Attempt different perspectives, tones, locations, sizes, and features without overthinking too much.
These rough sketches are not meant to be finished concepts. They don’t even have to represent finished concepts, but more like ideas leading towards a finished concept. You want to sketch with no pressure and complete freedom.
Many artists will ask “how long does it take to complete a thumbnail”? It’s not easy to answer and depends greatly on the idea you want to put down. But I’d limit yourself to somewhere between 3-10 minutes per thumbnail.
Once you find something you really love and want to flesh it out, that’s when you might move on from thumbnailing into further exploration and detailed rendering.
But the less you’re thinking about the amount of time being spent, the better you’ll feel and the more fun you’ll have just getting ideas down.
If you ever feel stuck I recommend you pull ideas from reference photos. Take a break and browse inspiration galleries to find various elements that you like in other pieces.
From here it’ll become much easier to put down ideas without thinking too much.
Note that you do want to be thinking about your thumbnails a little, but not overthinking. You want to consider new ideas for each new thumbnail but try not to limit your ideas or criticize too quickly.
You generally want a unique direction for each thumbnail, or at least a vague idea in mind. Iterating on the same idea over and over won’t yield great results. This is why studying photos and other pieces of artwork can break habitual patterns and help you recognize new ideas.
Simplifying Values
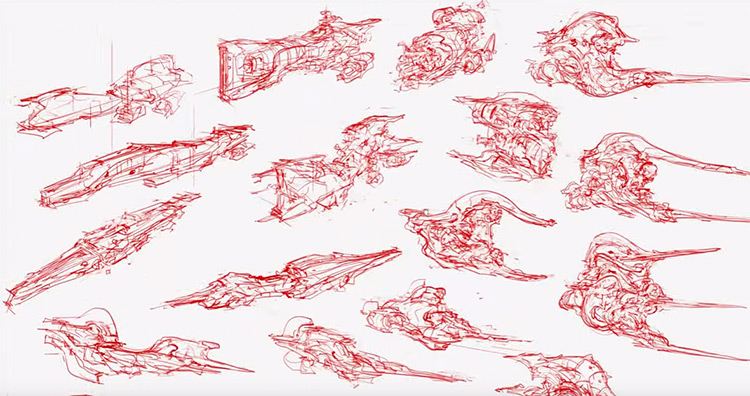
One big recommendation for thumbnailing is to limit the amount of tones you use in a sketch.
With only a few grayscale colors you’ll end up with basic silhouettes that remove details from your drawings. It may seem counter-intuitive but you want to simplify your work in the beginning.
When you worry too much about the details you’re prone to go too far in-depth with the work. This is true of artists from all backgrounds and skill levels.
But thumbnails are not meant to be finished pieces. They’re not meant to be super detailed, but rather just detailed enough to convey your idea.
Think more in terms of outlines and shapes. The outline defines how the concept will look, feel, and fit into 3D space. With a simpler set of values you’re left thinking more in terms of shape and positioning.
So how many values should you use? This is entirely up to you and your level of detail. Some artists can work with 2-3 while others prefer 7+ values. It’s totally acceptable to use a full palette of colors, but when first starting your thumbnailing process you’ll find more ideas quicker if you limit your palette.
Take a look at this informative post offering more detail on what’s possible with thumbnailing.
Level of Detail
This is a tricky area of thumbnailing because everyone has their own answer. I can’t tell you exactly how much detail you need for a thumbnail. Some artists get by with scribbles. Others prefer to render a bit and infer shadows/lighting with tone.

If you’re looking for a direction then I say trust your gut. If you really need some detail to help you see the thumbnail better then put in the extra time. If you can get by with scribbles and still understand your work, then that’s a great strategy to get new ideas quickly.
Detail is up to the artist because these initial thumbnails are made solely for you. As the artist you’ll be using these thumbnails for your own personal advantage. Nobody else needs to see them, so truly make them your own and use as much detail as needed to help you find a great design.
There’s a nice Tuts+ tutorial covering how to thumbnail in Photoshop. If you’re new to digital painting and concept art I highly recommend following that tutorial for some pragmatic techniques.
And if you’re looking for tips on rendering I’ve found How To Render by Scott Robertson to be the tome of practical advice.
Thumbnailing Setup
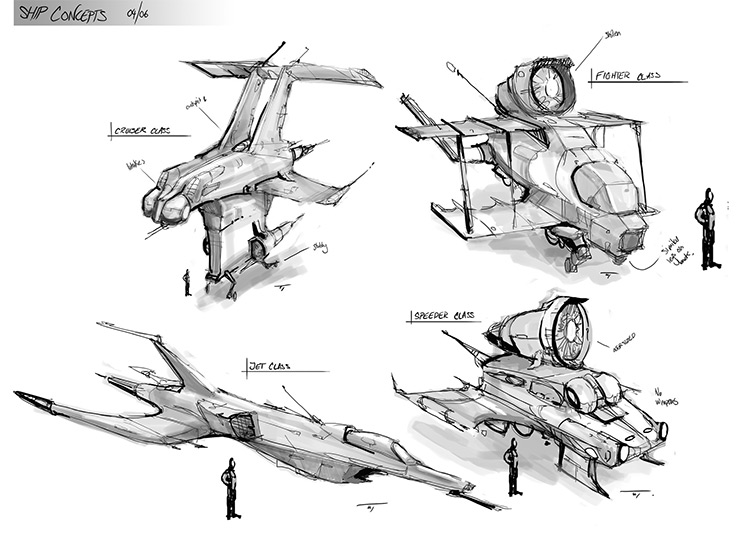
Depending what you’re drawing you may start thumbnails with a box or series of boxes on a page. This is a great method for environment sketches but may be too limiting for characters or props.
Since you know the goal is to convey ideas, just start drawing whatever comes to mind. Be prepared to reject the vast majority of your work. In fact, you may fill a sheet and not really love a single concept.
This is normal and just part of the process. You shouldn’t feel discouraged or worried that you’re on the wrong path. It’s just a matter of getting ideas down and moving with the designs that feel right.
Some artists may prefer the traditional route of pencil and paper. This might be an easy way to start since you can take a sketchbook anywhere. Also pens/pencils only draw in one color so you’re forced to work with a limited palette.
One thing you should always keep in mind is the overall composition. It can be easy to get lost in thought daydreaming while sketching mindlessly. This isn’t terrible, but not really the goal of thumbnailing. Some brainwork is required to think of new concepts.
The artistic composition will define many aspects of your concept. Perspective is critical to deliver an idea that makes sense to you and your client/art director.
If you look up composition guidelines you’ll find recommendations like the rule of thirds or the golden ratio. These are both great and worth keeping in mind, but far from required for a powerful thumbnail.
Cleanup & Further Steps
The number of sketches you create will depend on your project and requirements. A good average to shoot for is between 5-20 different concepts.
As you practice you’ll find it easier to come up with ideas that you love. This comes naturally from building your skills as an artist, observing items in the real world, and building your visual library.
Thumbnail practice also helps you recognize ideas that you love. This seems obvious but it’s good to refine your eye for aesthetics that meet your personal style, or that meet the requirements of your current project.
Once you find one(or a couple) thumbnails that you like it’s time to flesh them out. You can stay in grayscale or add color. Neither is wrong and you can always add more detail as you advance in the drawing.

Also deviating from your initial thumbnail is completely OK. You may find that only some aspects of your thumbnail really meet your objective. Refining a sketch makes you look at the details, so you want to pay attention to these details as you refine. If they don’t look right then make alterations.
Your chosen thumbnail does not need to be a final blueprint for the work. It’s more like a set of guidelines that you chose to follow, and these guidelines will help tremendously throughout every further layer of refinement.
Thumbnails are truly versatile and a must-have in your concept art workflow.
This post is primarily about the early stage of thumbnailing to come up with unique ideas. But thumbnails can even be used in final pieces of concept art to showcase different perspectives, stances, clothes, and alternate styles for props.
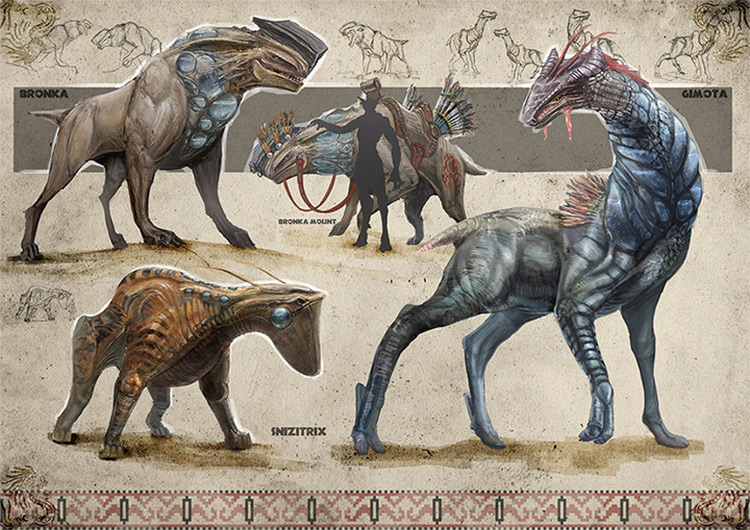
The example above is from FZD’s 1st term student work and includes multiple thumbnails with a closeup of the face, plus a see-through anatomical view of muscles and bones.
Don’t think of thumbnailing as a skill you can pickup whenever you please. It’s vital to every stage of concept art and most every other form of art/illustration.
It’s a great idea to start with a few thumbnails for every major project you tackle whether commercial or personal. This will ingrain the habit of thumbnailing into your mind so that it becomes a necessity for any new project.
And much like everything else in art, the more you practice the better you’ll get.
")


