

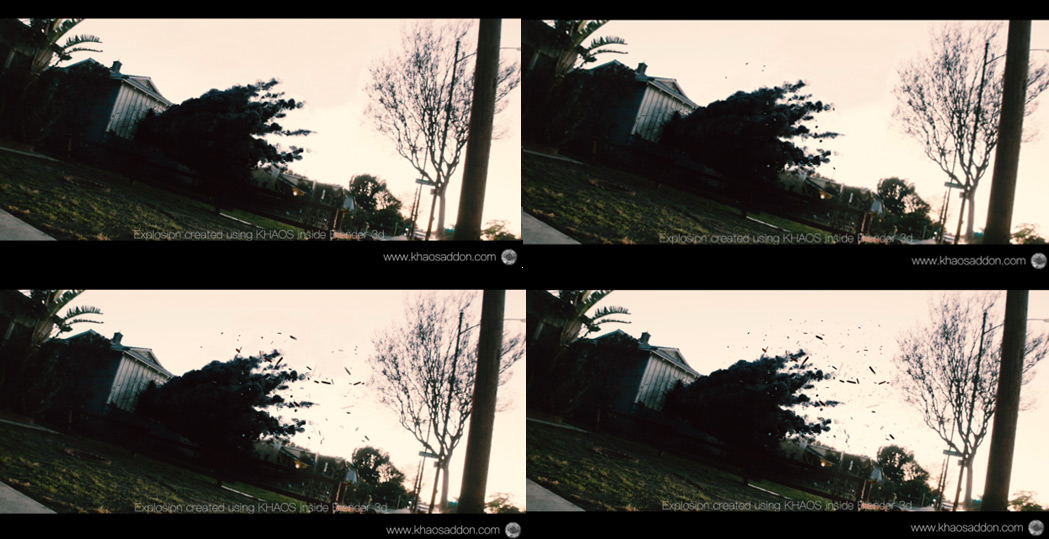
8 Tips For Better Explosion Simulations in Blender 3D
For this post I’ll share a handful of explosion techniques you can apply to your 3D workflow for better VFX & 3D assets.
Specifically I’ll be focusing on tips from my own workflow, and tips that use my KHAOS Simulator plugin for Blender. As long as you have a semi-strong background in the software you should be able to apply these to your workflow right away. Let’s dive in!
1. “Shape” Your Explosion
You can do this with several KHAOS operators to create a unique look with multiple particle fuel systems.
Every simulation requires experimentation to get the look that you desire.
The process is not as simple as pushing and pulling geometry like one does in standard 3D modeling. Explosions in the real world have a lot of random variation and systems within them. They don’t just blast out equally and uniformly in every direction.
Because of this quality, one thing you should try to avoid is using only one particle system to get a desired look to a sim.
To recreate more realistic randomness you can use several fuel particle systems blasting particles in multiple directions to “shape” the initial fuel cells.
By doing this, the simulation won’t be as uniform and will appear more realistic. You can even create secondary and tertiary blasts making it seem like the first blast set off a chain reaction.
The more concentrated parts of the fuel particle field will burn out slower, and the less concentrated parts will burn out faster. This helps create a unique shape to your explosion too.
You can also vary the lifetime of different particle systems as well to create interesting results. With the Khaos add-on for Blender you can add a variety of preset particle fuel systems to your scene to “Build your fuel system”, making it easier to add multiple fuel systems of different styles and variations with a few clicks.
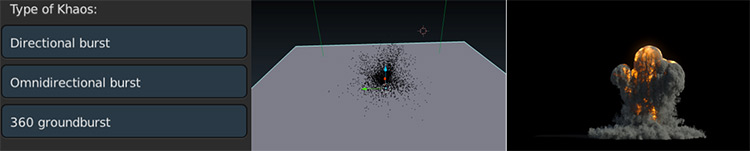
The KHAOS omnidirectional operator throws fuel in every direction, while the 360 groundburst operator throws fuel up and out with a degree of control and the directional operator throws fuel in only one direction.
You can combine these operators to create a unique look to an explosion or simply create your own particle system for a simulation.
2. Increase Domain Resolution Divisions
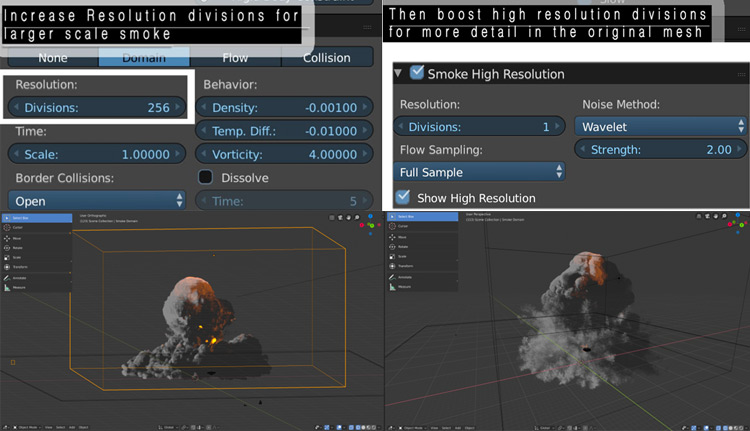
Use this technique for a larger scale looking explosion. Then bake with more high-resolution divisions once you like the general look and movement of your simulation to get more detail.
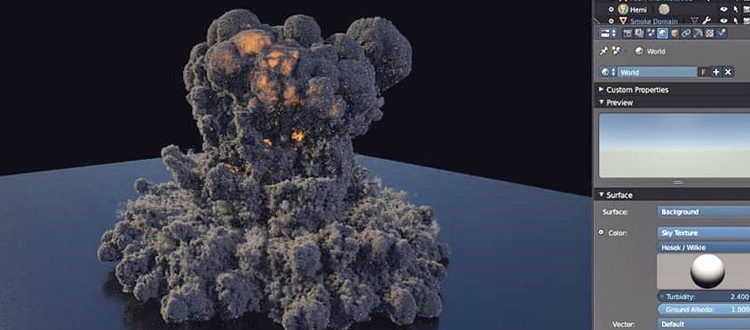
One of the main inputs that controls the way smoke is simulated in Blender is the size of the smoke domain.
The smoke domain resolution size controls the number of cells (Also called voxels) computing the smoke movement inside of the domain cube.
The more cells you add, the more detailed the smoke/fire movement can be simulated inside of the domain cube.
Adding more domain resolution divisions to your domain cube does several things.
First it increases the visible resolution of your smoke. Second, it gives the simulation a larger scale look (Meaning given the original particle system you add the smoke movement and interaction will look like it belongs in a bigger environment).
All this said, domain resolution divisions aren’t the only things that ultimately controls the resolution of the smoke.
To increase the visible resolution of a simulation without changing the original movement of the smoke/fire you can utilize the smoke high resolution divisions.
The smoke high resolution divisions attribute adds additional smaller scale details to the original smoke mesh using noise patterns over the original mesh (You can increase the strength of this noise but I usually keep mine at 1.5).
Keep high resolution off until you like the behavior of your simulation and then re-simulate with high resolution once you like the behavior.
In short, use a small number of domain resolution divisions to recreate smaller scale sims like a candle, and a larger number of domain resolution divisions to create larger scale fire and smoke explosions.
Experiment with domain resolution divisions with the high resolution checkbox off, and once you like the behavior of your simulation crank up divisions accordingly to add more detail.
The largest scale smoke simulations I have simulated at 400 domain resolution divisions and 2 high resolution divisions.
3. Build Debris Fields For Variation
Explosions contain a lot of elements in the real world.
Whether you are going for photorealism or not, it is important to consider whether or not you want to add more debris to your blast to give a more violent and chaotic look.
With my Khaos add-on for Blender you can add various debris fields to your scene with one click.
That said, you can also model debris in 3d and link them to a particle system yourself for a similar result.
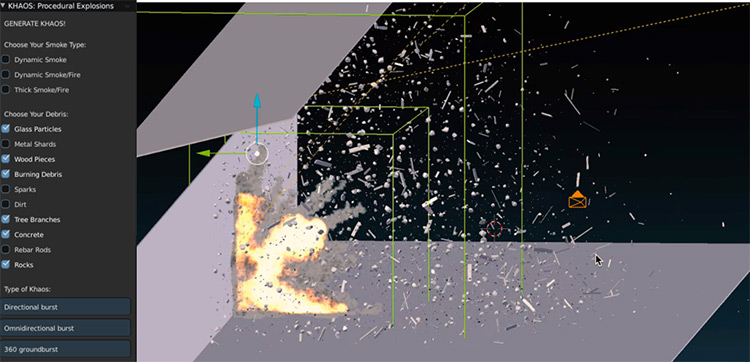
Some options for awesome debris you can add include glass, rocks, dirt pieces, wood, and metal shrapnel.
Quicktip: Render your debris systems separately so you can composite them with more control.
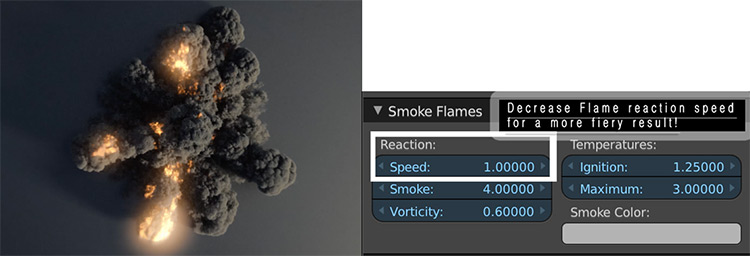
4. Slow Down “Smoke Flames Reaction Speed”
This gives for a slower “gasoline style” effect with burning flames.
Particles can burn out fairly quickly when creating fiery blasts. While this can be great if you are trying to create a sudden explosion, you may want to create a slower burning look with lingering flames in some scenarios.
To do this you can either drastically increase the number of fuel particles in your simulation, or simply decrease the “smoke flames reaction speed” in the domain cube settings so that it burns slower.
This technique, along with the use of lots of concentrated particles, can help create a fierier gasoline style explosion.
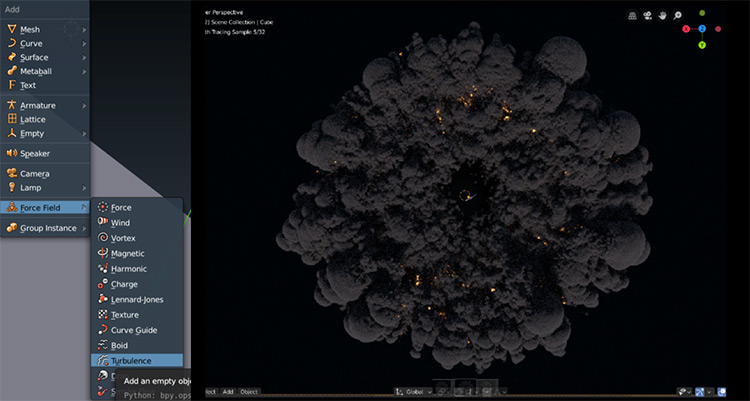
5. Add Turbulence Fields for Small Bubbles
Or use the KHAOS add-on turbulence mix fuel operator for more detailed bumps in your simulation.
One key to larger looking smoke simulation is smaller scale detail and bubbles within the mesh.
To recreate this look in blender you can add turbulence fields with a small amount of noise variation to push and pull the smoke in random directions over the course of the blast.
I recommend keeping the strength from 10 – 20 on the turbulence but it depends on your simulation.
Under the KHAOS add-on settings in Blender you can easily add a more custom turbulence using the “mix fuel” operator too.
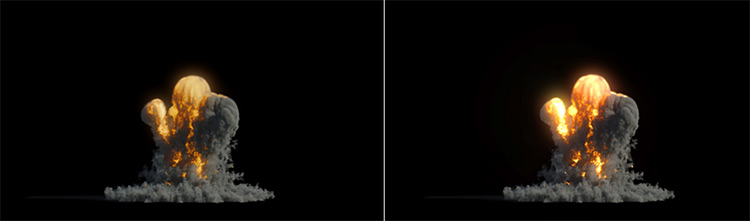
6. Composite With Glow & Motion Blur
Most of the time this will give you a far better result.
When rendering fire explosions in Blender you will often get a result that is “too solid and blobby” to confidently add to a scene.
The reason for this is that you often need to add glow and motion blur to blend the pixels in a more realistic manner.
You can also keyframe the glow or glare over the course of the explosion so that it starts incredibly bright and then dies down as the flames burn out.
Although this does take more work, this method can offer that finishing touch to make your explosion look ready for a Hollywood blockbuster.
7. Render Settings, Lighting & Materials
An entire article could be written on each of these subjects.
That said, in this short piece I will give a few tips that you can apply right away in your work.
First of all: I almost always export my simulations in the OpenEXR file format for more range in compositing.
In addition to this I also render most things with the RGBA setting so that an alpha channel is in the output animation files, just in case I want to change the background later.
I also recommend under the “light paths” tab that you increase the volume bounces to 6 or more. If you don’t do this, light won’t bounce around the volumetric smoke as realistically.
Make the volume sampling step size around 0.01 for more detailed smoke and then lose the maximum steps to around 260 so that the renders don’t take too long.
And remember to play with the smoke material density and flame brightness, color, and contrast as well.
If you have a great looking sim in preview and aren’t getting a good render, well chances are you can adjust a few material settings and get it looking right.
Finally choose your samples between 24 and 64 depending on how much noise you can handle (usually I keep mine around 30) and make sure you have a few lights in the scene edge that’ll light your smoke and bring it out from the background.
8. Experiment and Rebake
A lot.
It’s no secret that simulations can take some time.
That said, they can be so satisfying when you get them right!
Keep resetting that cache and see what cool explosion styles you can create. Experiment with the density of the smoke, the temperature, the vorticity, scale, and the ignition speed to get different smoke and fire behaviors.
Over time you will start understanding the physics within the software and you’ll be able to control the seemingly random chaos of the simulation more effectively.
And if you want to see more examples of the KHAOS add-on check out this Instagram page. It features tons of real Blender projects built using the plugin and shows just how much you can do with explosions.
Or if you want to learn more about KHAOS and what else it can do in Blender just have a peek at the main website.
Author: Brad Hamilton
Brad Hamilton is a cinematographer based in Los Angeles. I have been using Blender for many years now in creating 3D VFX for films. I am one of the creators of a particle based add-on called KHAOS that lets 3D & VFX artists streamline the creation of explosion effects inside Blender.
")


")


