

How To Make An Art Blog: A Complete Step-By-Step Beginner’s Guide
Artists have to much to offer by sharing their knowledge on a blog.
Tutorials, videos, and tips all help aspiring artists learn faster. And beginning artists can even share their journey in a blog to become an inspiration for others.
All of this is possible with an art blog. Once you get a blog online & running it’s really quite fun!
The toughest part is actually launching your blog and getting it configured properly.
My goal here is to help you get from A to Z with a brand new blog. I’ll show you how to get a domain + web hosting, install WordPress, customize your blog’s design, and how to edit the default settings to create a blog you’re truly proud of.
So let’s dive and and see what the process looks like.
Starting An Art Blog: The Basics
You probably already know what blogging is so I’ll save you my rant on how much it rocks.
But there aren’t very many artists in the blogging world. So are is one area that truly feels lacking on the web.
Whether you specialize in digital art, watercolors, characters, animation… all of it deserves more coverage online.
A blog is the perfect conduit to share your knowledge with the world and help other artists learn from your experience. But the key to starting a great blog is to be different from others.
Fill a void that doesn’t exist yet. Or do something better than other websites out there.
Or even use your blog as a marketing tool to help sell yourself & your work.
No wrong ways to blog, just opportunities. And in the art space there is a lot of opportunity.
To setup a blog you have two options: a free platform like Tumblr or a paid web host running WordPress(also free).
If you’re serious about blogging then you really should go with a web host(even a cheap one) because the value is at least 10x better.
With something like Tumblr you’d be limited to their platform and their themes.
With a hosted WordPress site you control your site’s branding, design, and content structure. You can choose your blog’s .com name and you have more room to monetize your blog too.
Now, why WordPress?
It currently powers 29.7% of all websites online. Not just blogs, all websites monitored by W3Techs.
That’s a sample size of over 10 million websites… and 30% of them use WordPress!
Hopefully that says a lot but I’ll share my reasons for using WordPress:
- WordPress is free forever
- Most WordPress plugins & themes are free
- It has the largest support community with the most help guides online(for free!)
Even if you’ve never used WordPress before it’ll still be the easiest option to pick up & learn for blogging.
You can find tons of free videos, guides, and articles on practically every aspect of the WordPress dashboard. It’s the de-facto blogging solution and I don’t think anyone could suggest anything else for launching an art blog.
By now you’re probably wondering one thing: what does the whole process look like to get a blog online?
First you need a domain and web hosting. These are the only two things you should pay for. Free hosting is worse than a Tumblr blog and free domain names don’t really exist.
However once you get your domain & web host you’ll be 50% of the way done.
From there I’ll show you how to customize your WordPress blog with the best settings right out of the box. Then I’ll help you install a new theme and some free plugins for extra functionality.
Lastly I’ll share some tips about blogging that you can take with you into your journey running a new art blog.
So without further ado let’s get it on!
Get Your Domain & Hosting
Before moving forward please some time and think of a few names for your blog.
The domain is important and it should match your blog’s name too, so it helps if you can think of names you really like.
Your domain will be the .com address for your blog. You might use something under your own name if you want to combine this blog with a portfolio site, in which case I recommend following our portfolio setup guide instead.
But if you want to build a standalone blog then you’ll want a great domain.
Concept Art Empire’s domain is just conceptartempire.com. Simple and very clear.
Try to think of 2-3 names for your art blog that might have a .com available.
You can check to see if it’s available by entering the domain into your browser to see if a website loads. Or you can use a domain tester like Namechk.
Once you have at least 2-3 ideas for your blog’s name then let’s register with BlueHost.
This is the only host I recommend for anyone launching a new blog or website.
Their support team is superb and for everything you get it’s one of the most affordable options.
When you sign up you get 5 free email address and a free domain name for your first year of hosting. So you’re already saving money if you go with their basic plan.
It also comes with a few built-in custom installers so it makes WordPress a breeze to setup.
To get started visit their main signup page and click the “get started” button.
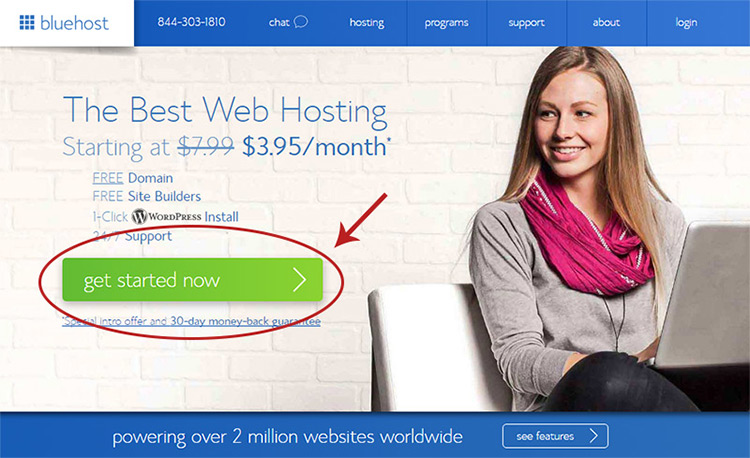
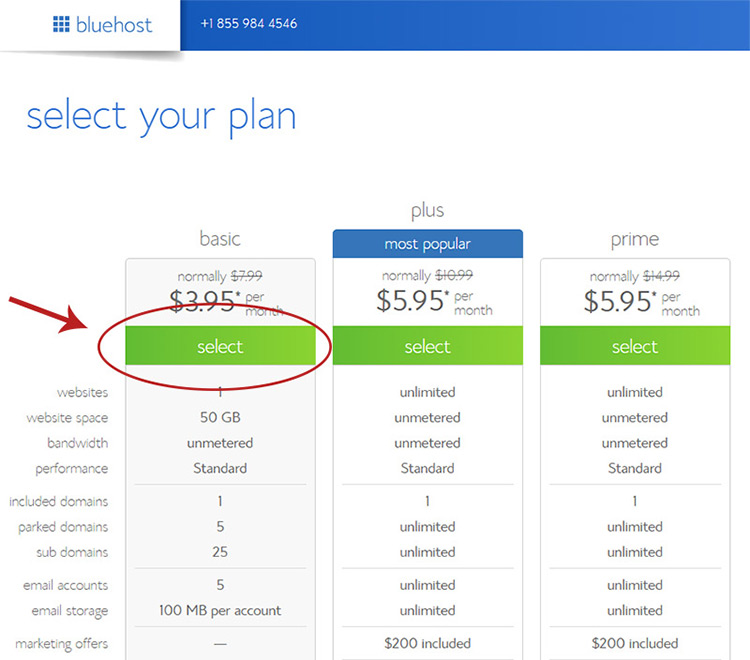
From here you’ll find three plans to pick from.
I highly recommend the “basic” plan because it’s the cheapest and comes with everything you need.
And if you’re launching a new art blog you have no idea how it’ll do in the first year. There’s always time to upgrade your web hosting later so for now stick to basic.
On the next page you’ll enter the domain name you’d like to register.
If you enter one and BlueHost says it’s already taken then you’ll have to try another.
This is why it’s crucial to have a few ideas because you never know if your top pick has already been registered by someone else.
All you do is enter your domain(without the .com) into the box on the left-hand side. Then click “next” and if it works you’ll move onto the checkout screen.

If you do get an error message don’t worry!
Just try a different domain until you find one that’s available.
You could also choose a .net address but I really recommend searching through names until you find a .com that’s available.
So on the final checkout screen there’s a few things we want to change.
First look for “Package information” and the first option should be your account plan. Change the default 36 months down to 12 months.
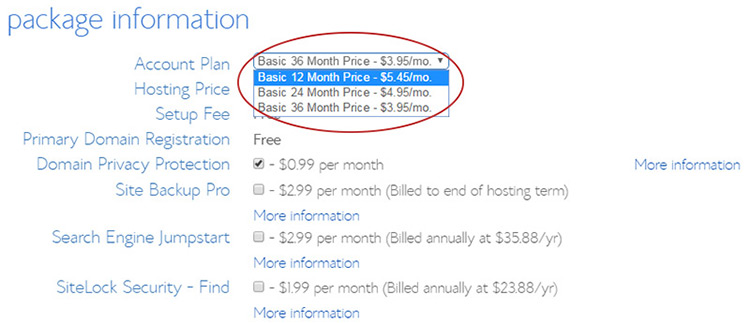
This winds up being a little pricier per month but you’re paying way less upfront.
Underneath this section look for “domain privacy” and make sure it’s checked. This will keep your personal information out of the Whois database, an international register of contact info for all domains.
By default every new domain name needs a contact name & contact details. It’s just how the Internet domain system works.
With domain privacy your blog’s domain will only show BlueHost’s contact details instead of your personal details.
Most artists value their privacy so that’s why I suggest domain privacy right from the start.
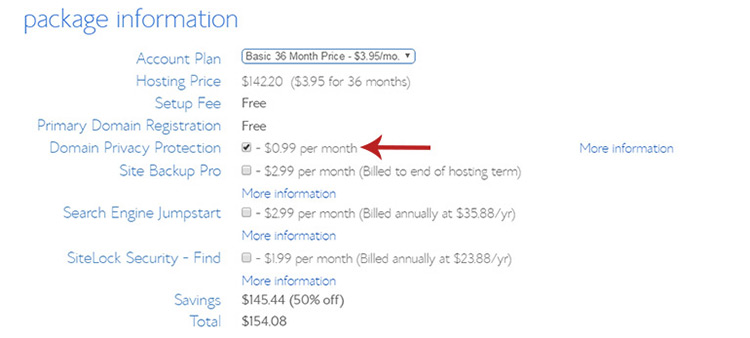
After that make sure to uncheck all the other options. You won’t need anything else and the other stuff is mostly extras that you won’t ever use.
Once you’ve made those changes just scroll down and enter your payment details. Click “submit” and let it all load.
You should wind up on a confirmation page saying your new order is complete. Hurrah!
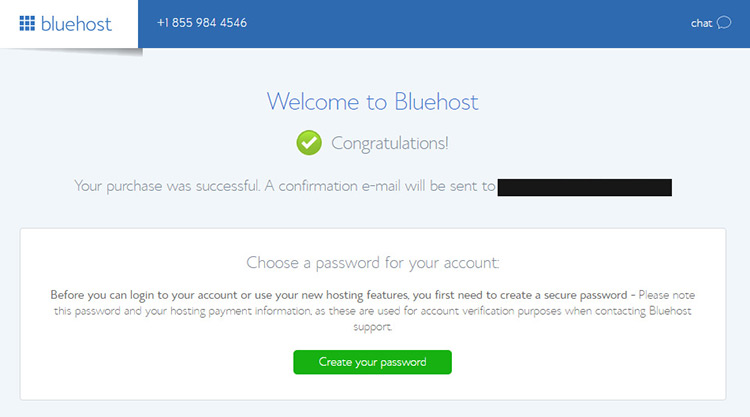
Now the final step before we get into WordPress is to set your new BlueHost account password.
This is the password you’ll use to log into BlueHost for contacting support, checking your server health, checking invoices, etc.
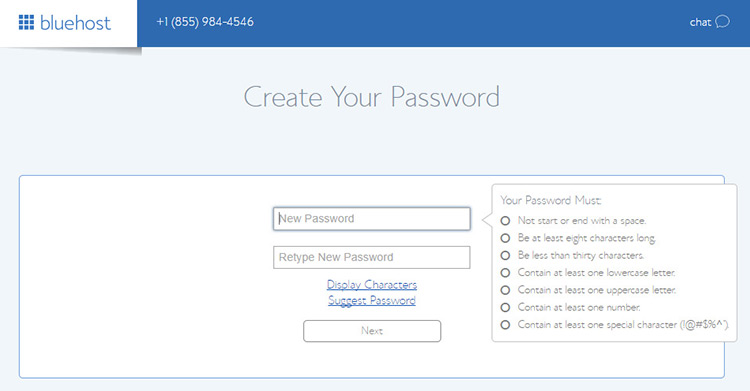
Once you do that you’re all set to move onto WordPress.
Typically the WordPress install is a tricky process. But thanks to BlueHost it’s probably the simplest part.
Just another reason why I always say new bloggers should go with BlueHost.
Install WordPress
After the password input screen you’ll land on a page with a “log in” button.
Click that to access the BlueHost onboarding process(don’t worry, it’s easy).
If you find yourself lost somewhere during this process you can always check your inbox for the email that BlueHost sent to your email address. That should have a link that’ll take you right back to the WP setup.
On the very first page it’ll ask you to pick a theme for your new blog.
I suggest skipping this for now because we’ll look at themes a bit later in this guide. So just scroll to the bottom and click “skip”.

On the next page you’ll see an install link.
If you click that link BlueHost will automatically install a brand-spankin’ new copy of WordPress on your server.
It usually takes anywhere from 15-60 seconds to complete. But with a 1-click install it’s hard to complain about any time spent waiting.
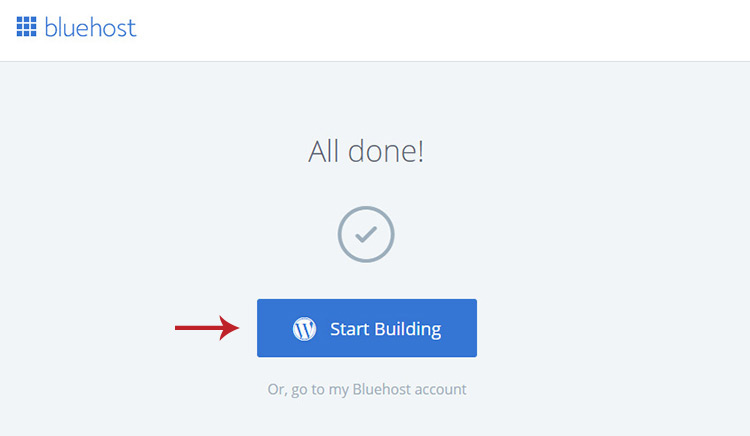
Once it’s done you’ll see a big blue “start building” button.
Click that to access your WordPress dashboard. It’ll come with quite a few default plugins installed by BlueHost, however we can get rid of those to clean up the interface a bit.
Right away you’ll see a startup screen that looks kinda like this:
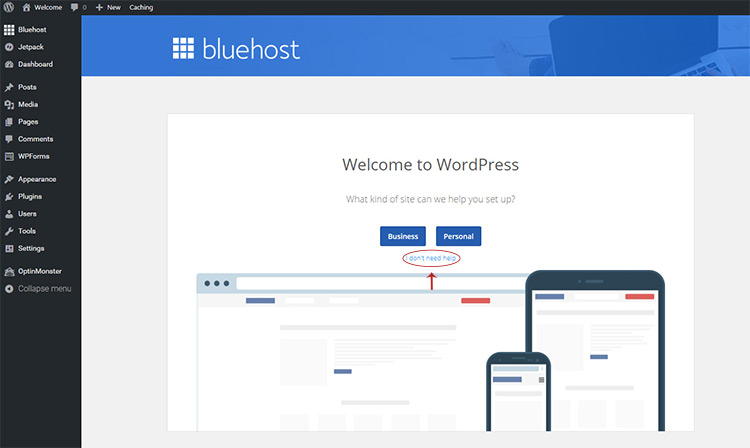
You’ll have two options for an auto-optimization feature: business or personal.
I suggest not clicking either and instead clicking the “I don’t need help” link underneath.
My goal with this guide is to help you setup the cleanest art blog from scratch so you probably don’t need BlueHost’s auto-setup.
Once you click “I don’t need help” you’ll get into the main dashboard. Right away you should notice a small blue button labeled “Launch”.

This is part of a plugin installed by BlueHost to help new webmasters edit their site before putting it online.
I personally suggest disabling the plugin which will immediately put your site online, then you can edit as you go.
There are better plugins for adding a “coming soon” page to your site and those are probably easier to use too.
So click on the “plugins” link in the left-hand menu and look for all the plugins with a light blue background. You’ll want to deactivate all of them because none of them are totally worth using.
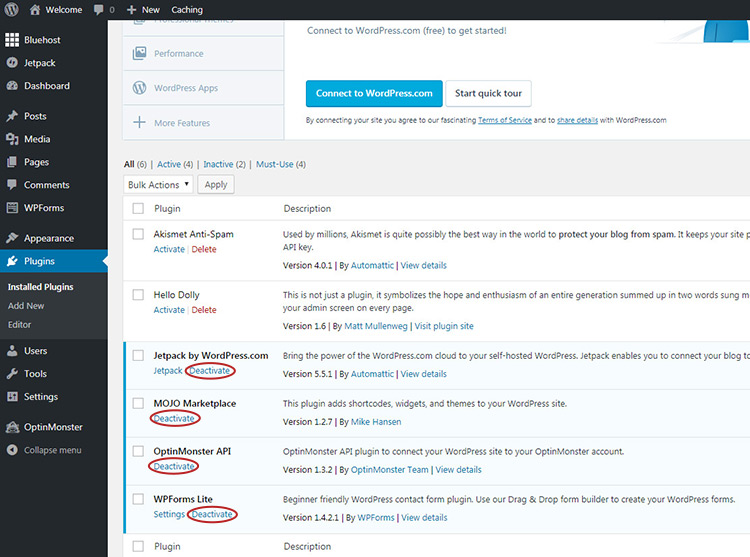
The MOJO Marketplace plugin is the one that adds your custom launch page. I don’t think it’s worth keeping any so you can even delete all 4 of those plugins if you want.
Same with “Hello Dolly” since that just adds a small quote into your dashboard, it basically does nothing.
Really the only plugin you may want to keep is Akismet which helps to filter spam comments. If you want comments on your blog then keep Akismet.
Just note that Akismet requires an API key which you get from WordPress. It’s totally free but will take about 5-10 minutes to setup.
Check out this guide for more details, or just wait ‘till later in this guide where I’ll show you how to setup the Akismet plugin step-by-step.
With or without Akismet we can start moving forward with the rest of the setup.
First you can check if your site is online by visiting the URL in your browser, although it can take up to 24-48 hours to fully become visible to the world.
That means now is the perfect time to dive into your WP settings page and make a few changes to get your blog looking sharp.
Tweak Your Blog Settings
Find the “settings” link in the bottom part of your WP admin menu.
Hover that link. You should see a flyout menu with more links.
Click “general” at the top.

Right off the bat you’ll see a couple settings you probably want to change.
Most notably the site name and tagline which are used all throughout your blog.
By default your site name should match whatever your blog name is. So that you might leave alone.
But the tagline doesn’t need to be anything if you want it blank. Just make sure to delete the default because it starts with “just another WordPress blog”.
That’ll look pretty bad as a tagline on your super-unique art blog.
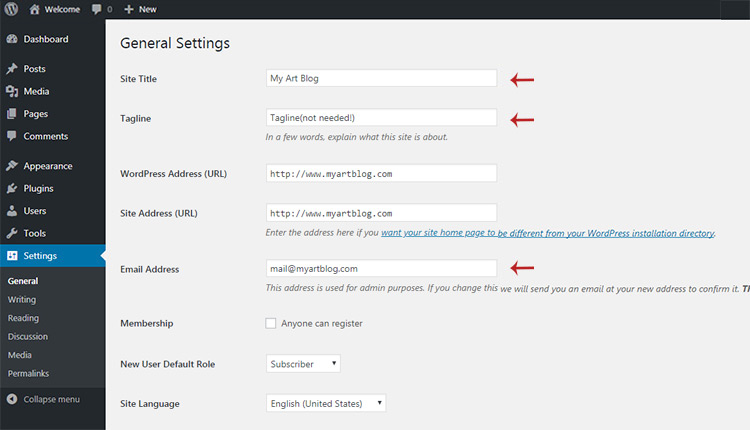
Also look just underneath those fields to find your admin email address.
You’ll want to make sure that’s a good email to reach you with blog updates. It’s the main administration email so it’s basically the global contact for your blog if anything happens like automatic WordPress updates.
Now scroll to the very bottom and before saving look for the “Cache Level” setting.
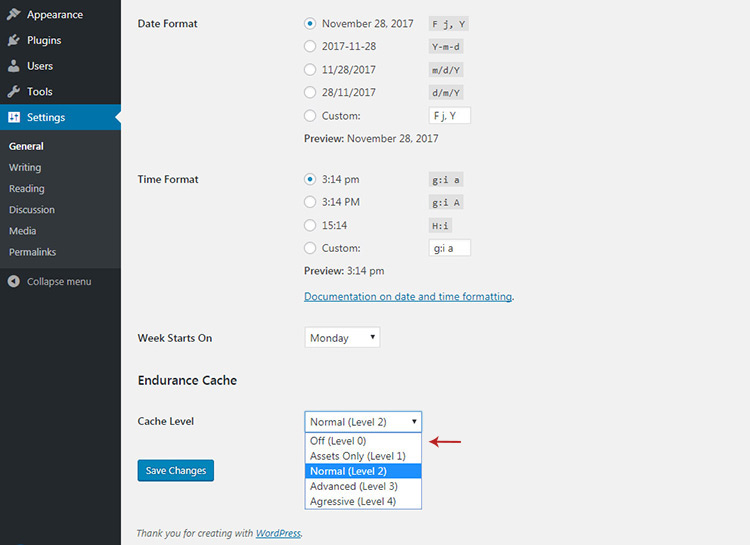
By default BlueHost installs a custom caching setup.
This is great but I prefer using the W3 Total Cache plugin instead.
So I suggest changing the cache level from 2 to 0 and then hit save.
Once that’s done have a look at the settings menu again but this time click the “Discussions” link.
On this page you can change how comments work on your blog and which criteria need to be met for comments.
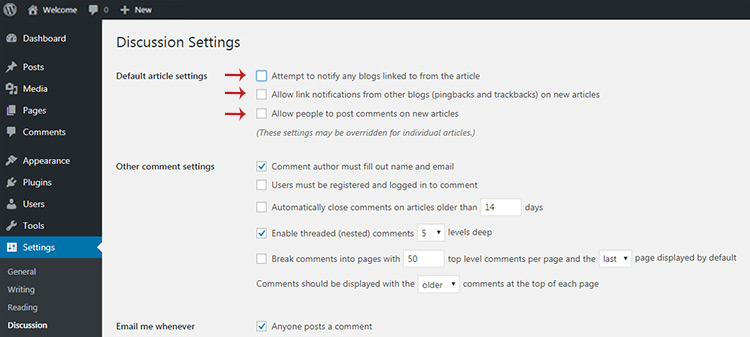
The top 3 options are crucial for changing your blog’s behavior. I’ll explain them quickly:
- The first option attempts to ping other blogs that you link to your blog. It’s OK to leave it checked but I like to uncheck because it’s not necessary.
- The second option displays pings from other blogs linking to you. Again it’s OK to leave it but I always uncheck this because it’s just annoying.
- Lastly is the option to allow comments on your blog. If you want to let people comment then make sure it’s checked, otherwise uncheck.
All the other options on this page should be fine by default.
However they’re pretty straightforward so read through the other items in case you want to check(or uncheck) anything.
Once you’re done scroll to the bottom and click “save”.
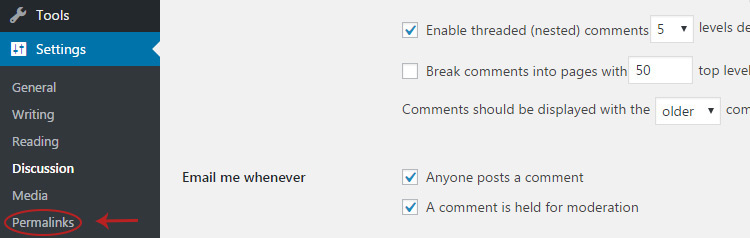
Then look towards the settings menu again and find “permalinks”.
By default all your WordPress links will look really ugly. They’re just ID numbers and probably the worst possible link style.
You should pick basically any other link style from this list other than plain.
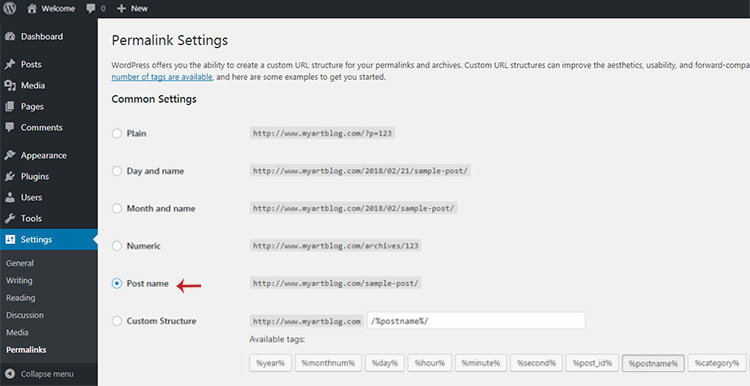
I recommend “Post Name” because it keeps your URLs short and sweet. That’s exactly what I look for in great links: short and easy to digest.
You’ll notice this link style on Concept Art Empire if you look at our links.
Once you select a URL style just click “save” and it should update automatically.
Now the last thing we want to do is reset the default photo sizes. Look back under settings and click “media”.
On this page you’ll see three image sizes: thumbnail, medium, and large.
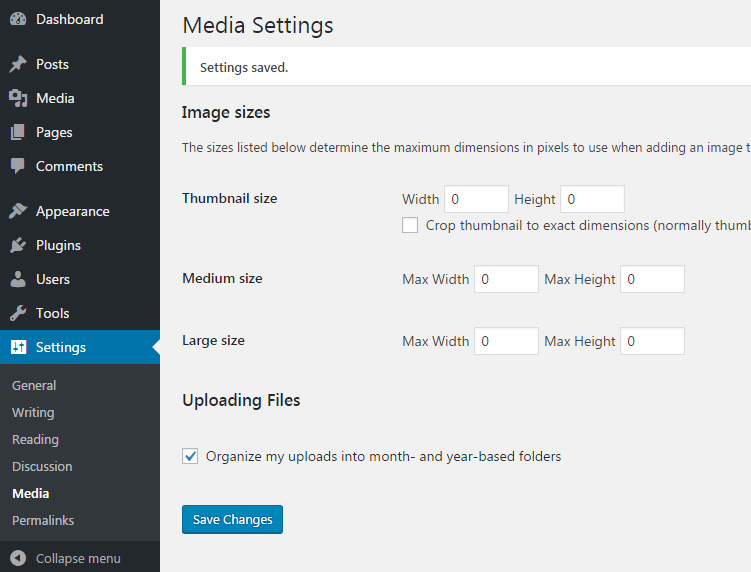
Set all of them to 0 and click save.
This forces WordPress to change your thumbnail sizes based on whatever theme you install.
You’ll save a lot of space on your server by limiting how many image sizes get cropped.
That’s the primary goal of updating those thumbnail settings, although you can leave them alone and your blog will function just fine.
With that said we’re all done here! Let’s move onto your blog’s design.
Find A Great Blog Theme
Almost everyone judges a book by its cover at first glance. It’s human nature.
That’s why your blog’s design is crucially important. People gather a first impression within the first 1-2 seconds of landing on your website.
You want to make that first impression a good one.
With WordPress you have two options for theming: free and premium.
If you’re just getting started I really suggest doing a free theme. You can always upgrade later to a premium option if you want, but it’s not necessary for a brand new site.
Check out the free WP themes directory and try searching for blog themes.
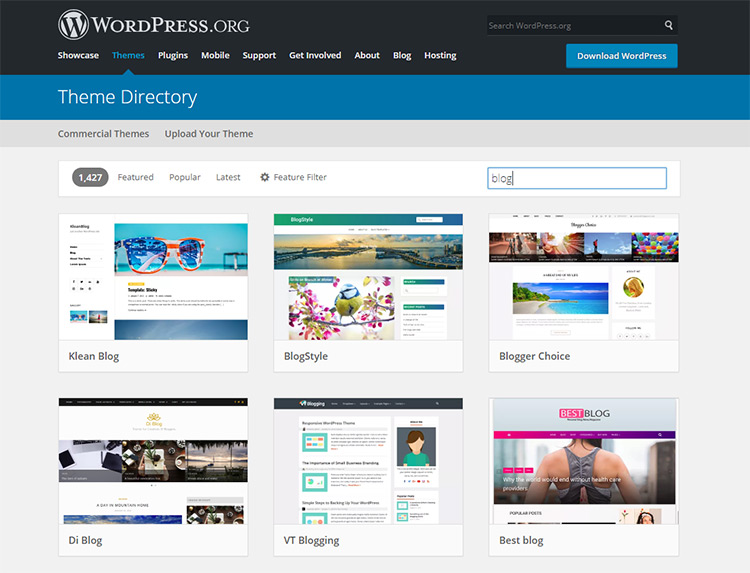
There are thousands of free themes out there with plenty to dig through. You can spend hours looking at themes—and in many cases that might be a good idea to make sure you really like the one you pick.
But theme installation is basically the same across the board so once you know how to do it you’ll never forget.
Just click the “Appearance” link in your WordPress admin panel menu. This will take you to the themes page with a list of all the currently installed themes.
On this page you’ll find a small “Add New” button near the top.

Click that to go to the install page.
WordPress is really awesome because it can automatically find, download, install & activate a theme with just a few clicks.
You don’t need any technical know-how to install WP themes.
For example let’s say I want to use the Clean Blogging theme.
Visit the “add new” page in the WordPress dashboard from the “appearance” themes page. Then do a search for “clean blogging”. It should appear automatically as the first result.
Then hover that theme to click the blue “install” button.
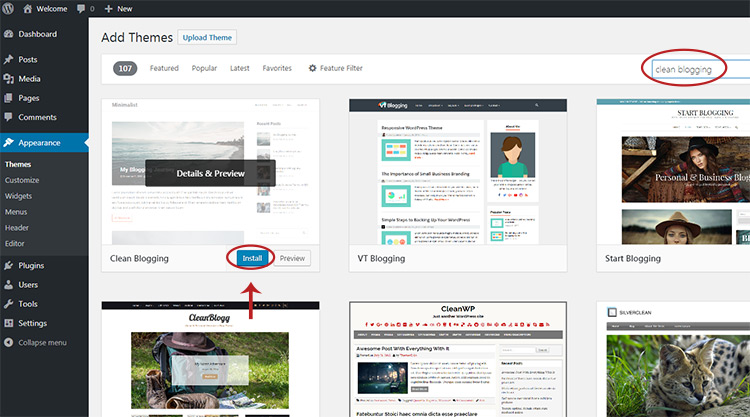
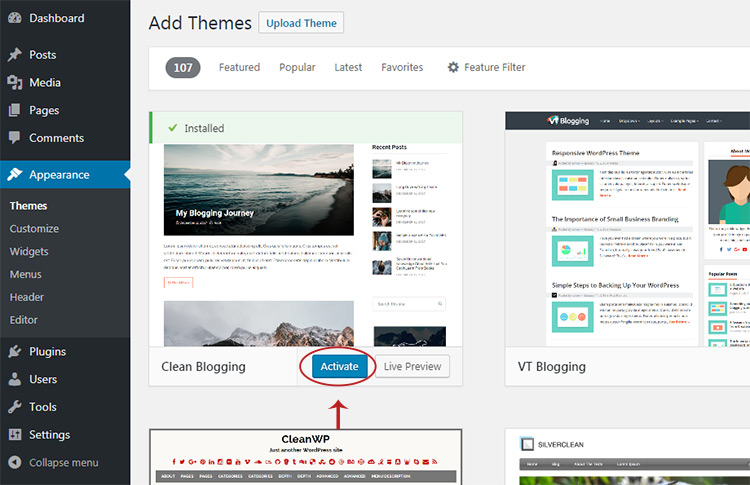
It’ll take a few seconds to download & install but once it’s done that blue button should read “activate”.
So clicking that link will now make the theme live on the blog all from this one page. Pretty cool!
Most WordPress themes support some customization settings but they’re all totally different based on the theme.
It depends on the theme’s creator and how many features they support. The best way to learn the customization menu is to go in and try stuff because there isn’t really a one-size-fits-all guide to customization.
But if you’re not sure where to start with theming here are my suggestions. These are all free themes that can work well on an art blog:
Super easy to launch a great design and there are so many choices to pick from.
Spend as much time as you need to find a theme you like and get it up. You can always go back and tweak settings or change the colors/layout/logo design for the theme. So don’t worry too much about the nitty-gritty stuff for now.
Plus your blog is brand new so you don’t have to worry much about screwing it up.
Nobody will see it until you start publishing content anyway. Take as much time as you need for installing & getting a theme you like, then let’s move onto plugins.
Add Some Useful Plugins
The basic WordPress install doesn’t come with much. But this gives you a clean starting point to add new features with plugins.
The WP community has thousands of free plugins covering a wide array of great features.

Everything listed in that plugin directory is totally free so you won’t be paying a cent for anything.
Feel free to search around and see if anything grabs your attention.
But there are four plugins that I always recommend for new bloggers and they’re certainly useful on art blogs.
- Yoast SEO offers an all-in-one SEO plugin
- Clean Up SEO removes the excess bloat from Yoast(this helps a lot)
- W3 Total Cache is the plugin I mentioned earlier for better caching
- Contact Form 7 is a free contact form plugin so your readers can contact you without publicly sharing your email address
The process of installing a plugin looks almost exactly the same as installing a new theme.
You click on the “plugins” link in the sidebar and then look for the “add new” button near the top of the page.
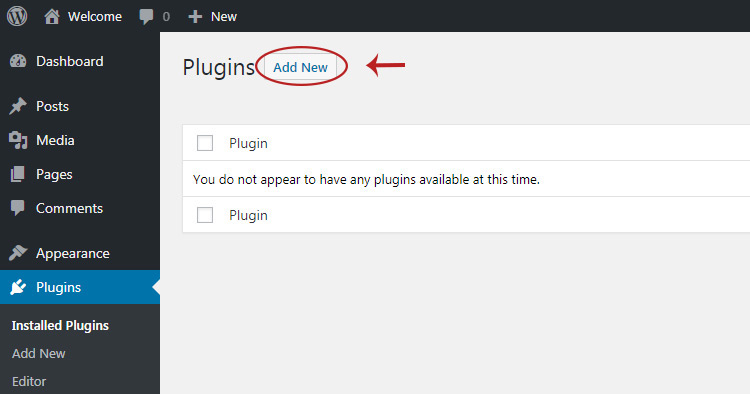
You’ll see in the screen above that I actually deleted all my other plugins so right now my site is empty.
But you may still have some plugins in your site, just deactivated. That’s totally okay.
Deactivated plugins have a light grey background while active plugins are colored light blue. That’s an easy way to tell at a glance which plugins you currently have running on your blog.
Now on the “add new” page look for the search bar and type the name of all 4 plugins listed above.
They’ll appear just like on the themes page. Then you can click the “install” button to add them onto your site.
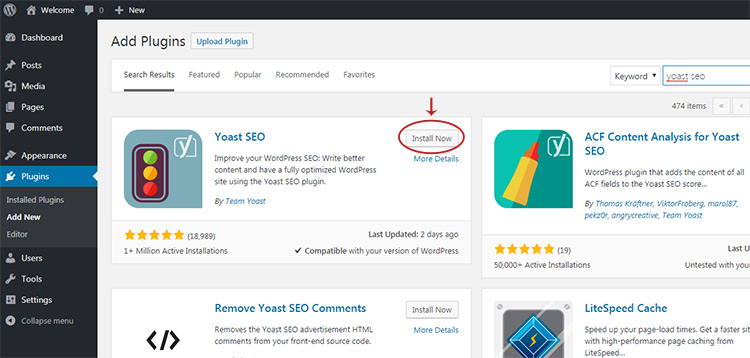
I also recommend activating all 4 plugins right away.
Yoast, Yoast Bloat & W3 Total will automatically activate with the best settings possible. You can always go through Yoast to change some of the SEO settings for different pages or archives, but the default is more than enough.
And if you don’t understand basic SEO settings like noindex then you may end up doing more harm than good.
If you want to learn some basic SEO for your blog then check out this awesome guide to learning Yoast. Everything in the plugin is totally free and honestly pretty simple to understand.
So if you follow that guide and learn what you’re doing you shouldn’t run into any trouble.
One other thing to mention is that W3 Total should not run alongside BlueHost’s caching.
Remember that setting we turned off earlier when we set Caching Level to “0” in the settings menu?
It’s worth double-checking just to make sure that really is disabled.
You’ll find that in Settings -> General towards the very bottom of the page. Make sure it’s set to “Level 0” if you want to use W3 Total.
Caching is a complex topic and it’s not worth explaining here. Suffice it to say W3 Total is superb right out of the box and it’ll really help to speed up your website.
But you can research caching on your own if you want to learn how it works.
The Contact Form 7 plugin is a little tricky to setup but I’ll show you how to do that before we get to Akismet.
Once you activate the plugin you should see a “Contact” link in the sidebar kinda like this:
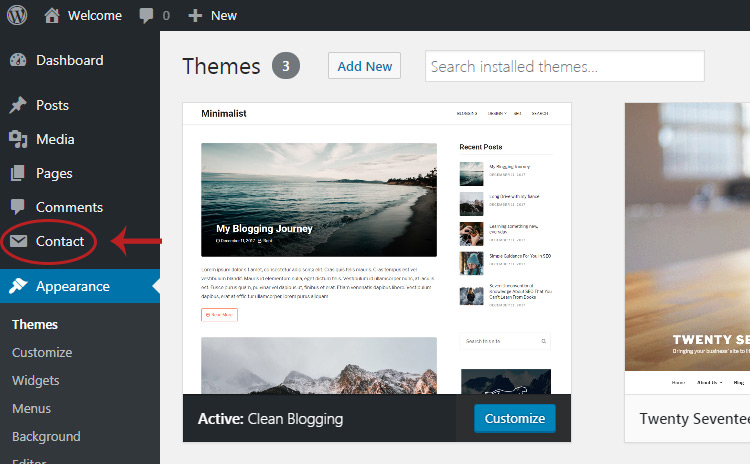
Click that link to see a list of all contact forms.
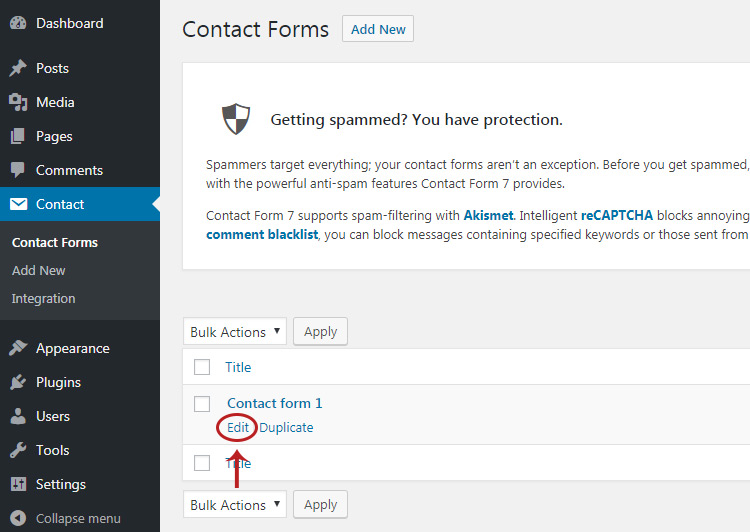
By default you get one form and that’s probably all you’ll need. If you do need more forms you can make them on this page.
For now hover “Contact form 1” and you’ll see an edit link underneath. Click it.
On this page you can edit the form’s design and the overall content you receive whenever someone emails you from your blog.
It’s pretty easy to mess up stuff in here but I’ll guide you through one quick customization.
Click the “Mail” tab at the top and look for the “Subject” field which should be 3rd down.
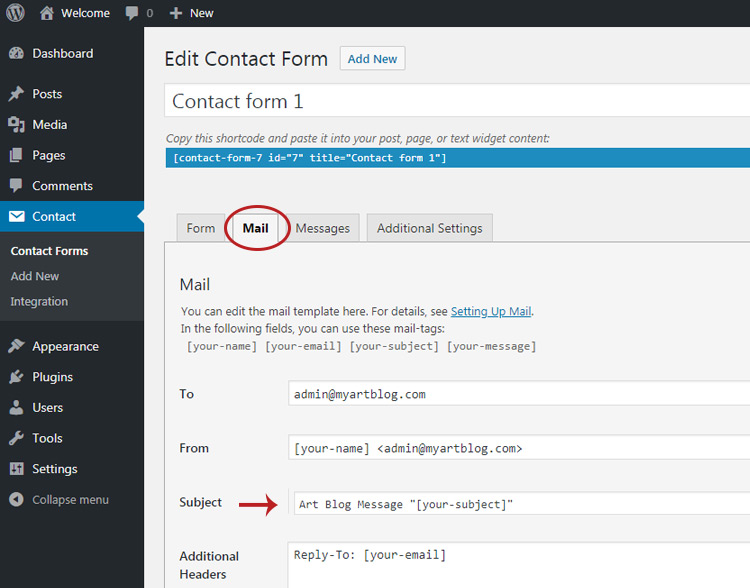
I like to change my email subjects so they’re easier to find in my inbox. That way I know which emails were sent directly to me vs which ones came through my contact form.
To do that I change the subject so it has a small prefix before the sender’s subject. Here’s a basic subject template you can copy & paste into that field:
Art Blog Message “[your-subject]”
Just change the text “Art Blog” to the name of your blog.
This way you’ll always see emails with a prefix “Art Blog Message” and the user’s subject will appear inside the quotes. That’s why you see square brackets with [your-subject] because it’s a dynamic field(it’s OK if you don’t understand what that means!)
So if you change the subject line click “save” in the top-right corner. Then look up towards the top of the page and you’ll see a long blue strip with a small code.
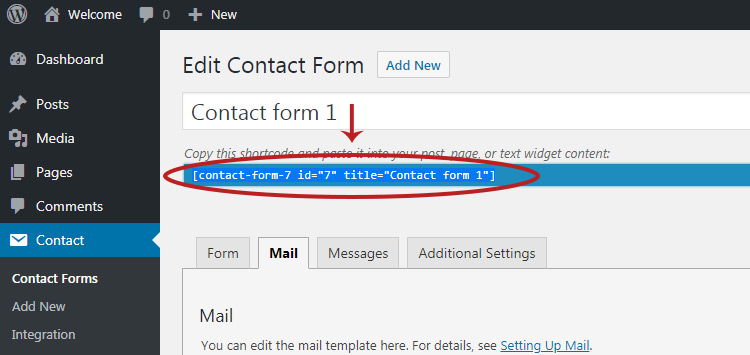
If you click once on the blue strip it’ll auto-highlight the code for you.
Then you can CTRL+C or CMD+C to copy it and add that into a new contact page.
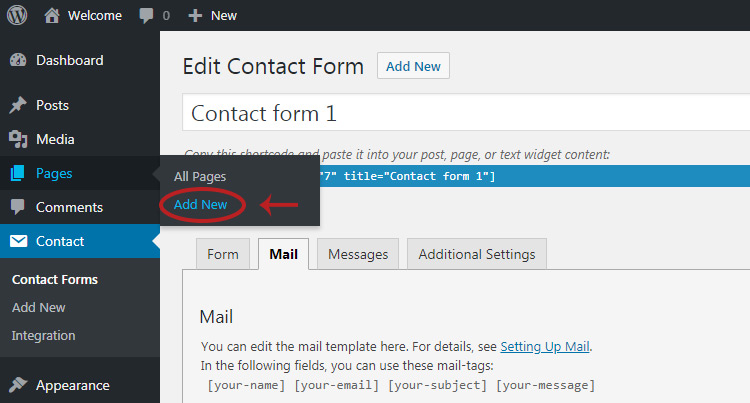
To do that make sure you’ve copied the code first. Then look towards the side menu and hover “Pages” for the flyout menu, then click “Add new”.
On this new page you’ll see a lot of stuff. Don’t worry! This will all become more familiar as you use WordPress.
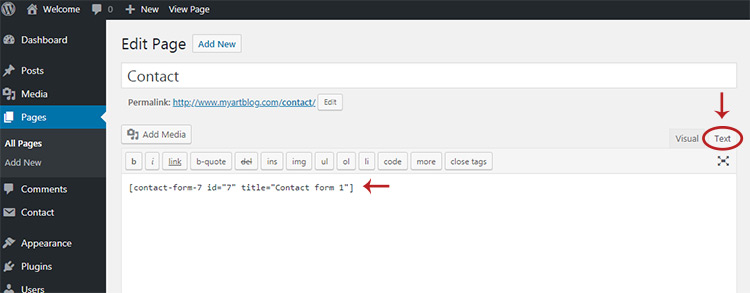
Click in the top title field and enter “Contact” without quotes.
Then look lower on the page for the big text box.
In the upper-right corner of that big text box you’ll find 2 tabs. By default you’ll see the “Visual” tab selected but I suggest clicking “Text” just for this page. Then paste that code inside the text box.
Altogether it’ll look something like this once you’re done:
Now just click “Publish” and your new contact page will go live.
To see the page you can click the hyperlink underneath the title field at the top.
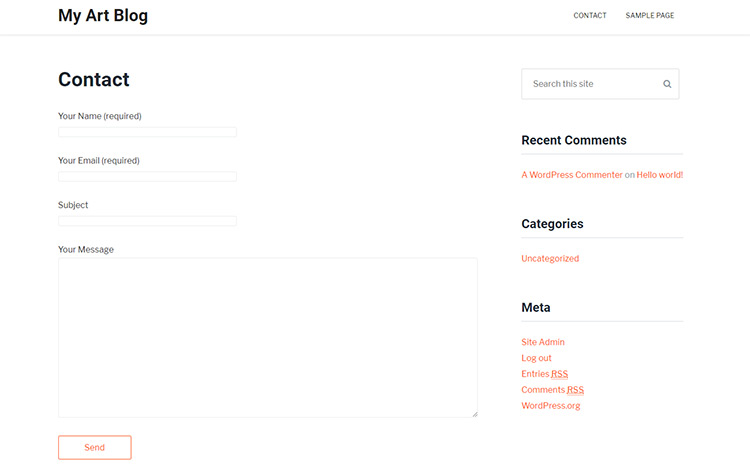
The default contact form style should be OK for most blogs. If you want to customize it you can read through this guide but it gets into some CSS code that you probably won’t like or want to learn.
All 4 of my “main” suggested plugins should look good and be active on your site.
You might want to make some basic customizations under Appearance -> Customize but that will take a bit of time.
Definitely feel free to spend some time playing around in there ‘till your blog looks good enough to start publishing content.
But before we wrap this up I’d like to cover the Akismet plugin to help you fight spam in post comments.
Note: if you don’t want comments on your blog you can skip the next section.
Akismet Plugin Setup
Akismet gets installed with every new WordPress site.
Akismet is owned & supported by the same people who created WordPress(Automattic). So as you can tell it’s heavily linked with the WP ecosystem.
To get started with this plugin make sure it’s installed. If you deleted it you can click “add new” on the plugins page and search for Akismet.
Then once it’s in your plugins list click “activate”.
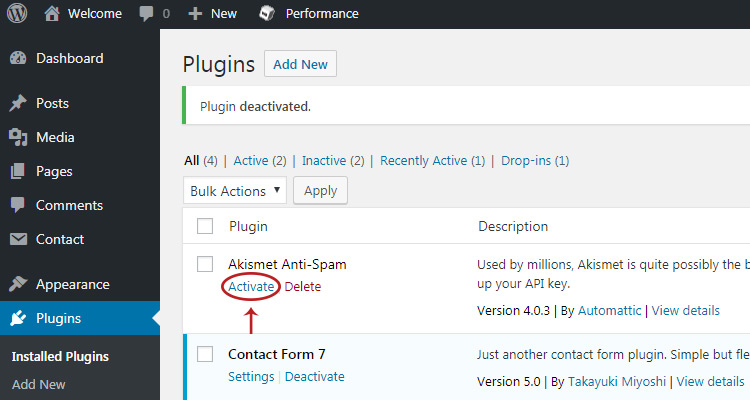
That should turn the plugin background light blue and you’ll see a notice to confirm your Akismet activation.
To do that click the “settings” link underneath the Akismet link on the plugin page.
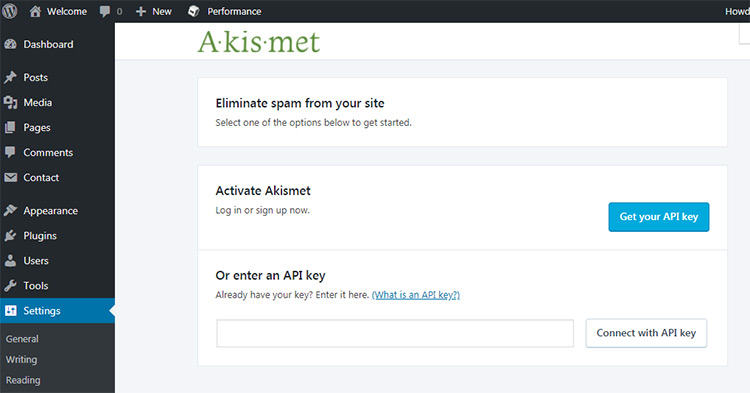
It’ll take you to a new page where you can sign up for an API key.
Click the “get your API key” button to open Akismet’s website in a new window. You’ll need to sign up for a free account to get the plugin working properly.
Thankfully it all runs through the WordPress website and it’s totally free.
On Akismet’s main WordPress page click “sign up”.
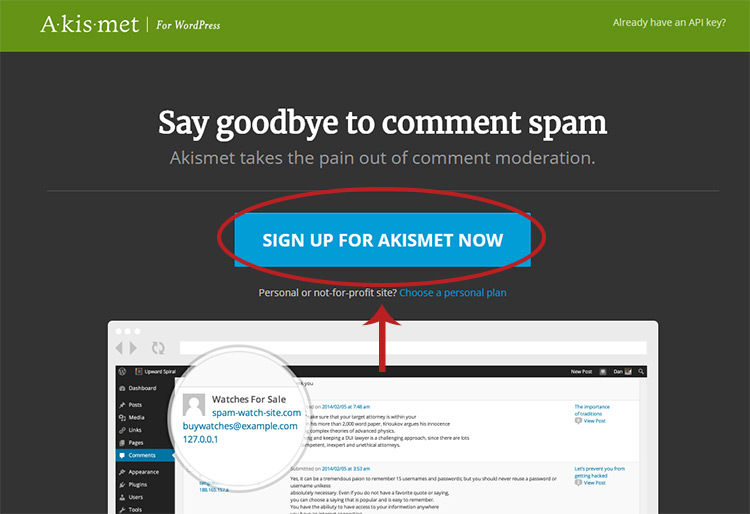
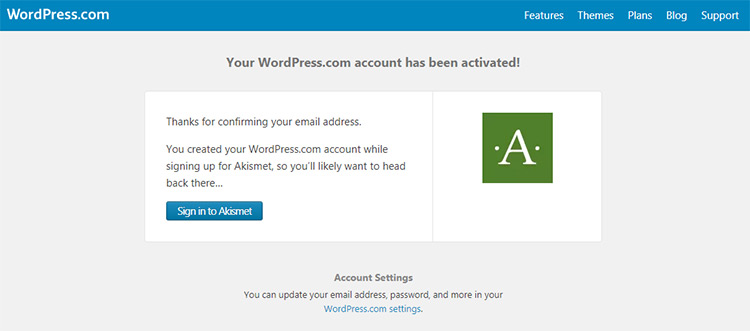
That’ll bring you to the main WordPress website. If you already have a WordPress.com account you can log in using that.
Otherwise create a new account(it’s free).
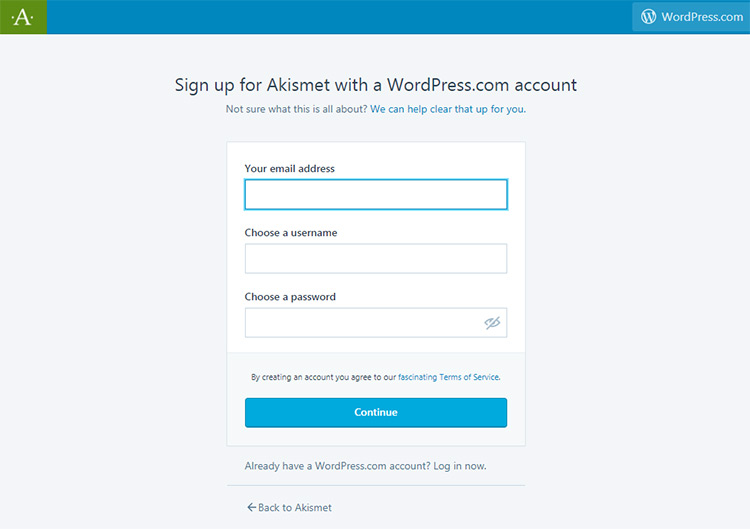
From there you may need to confirm your email address to validate the account but it shouldn’t take more than 1-2 minutes, usually no more than 30 seconds to get the confirmation email.
From there you’ll be directed to a page that lets you log into the Akismet site.
If you don’t get a login screen then just go here and click “get API key” again.
You should already be logged in so it’ll take you to a new page where you enter your credentials.
You’ll want the “Personal” license for Akismet which you can get for free. It does have some limitations but nothing you’ll ever hit for a small-to-midsized blog.
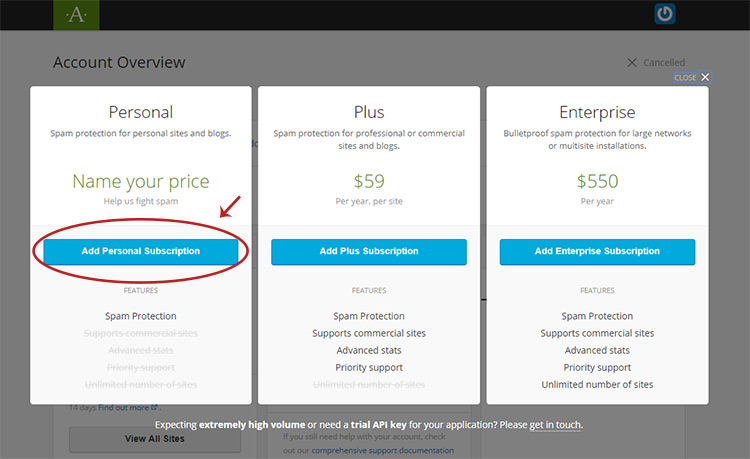
If the donation defaults to a set amount just bring it down to $0. Then click “subscribe underneath that field.
You still get the personal license without spending any money so it’s perfectly OK to get this totally free.
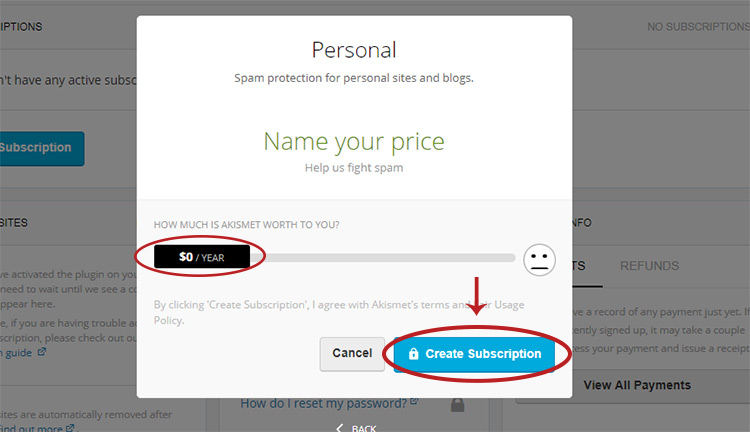
It’ll take a second for the page to load but once it’s done you should get a confirmation message. Click “OK” and you’ll see your Akismet dashboard.
From there look for the “add site” link.
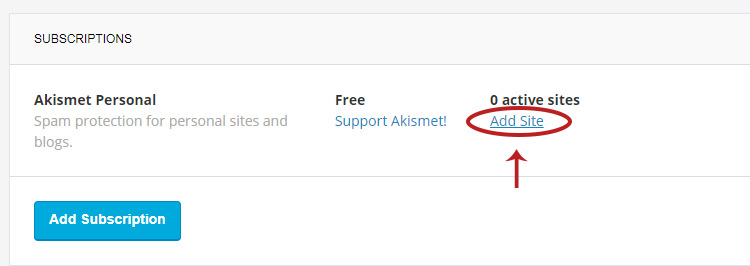
Click it and enter your domain name in the pop-up window. Then click “add”.
You’ll get a new popup confirming your API key. Finally done!
Well, almost.
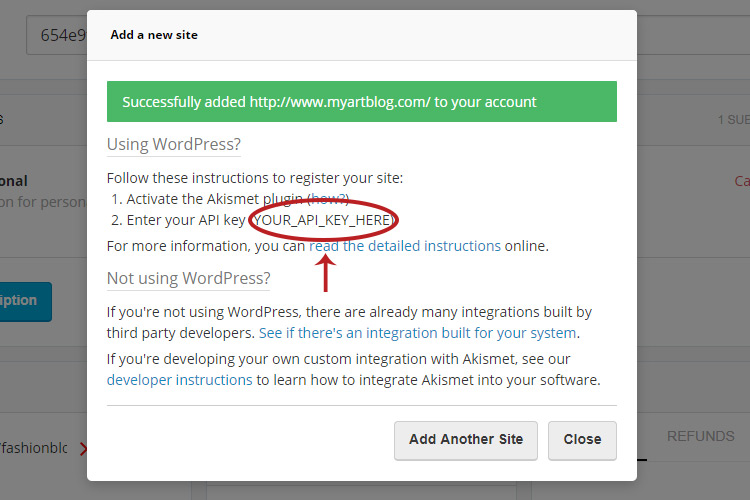
Copy that API key and bring it back to your Akismet page in your WordPress admin panel.
Then paste that API key into the field and click “Connect with API key”.
Note: if you ever need to find your API key again just log into Akismet and go to your main account. It should be right at the top of the page.
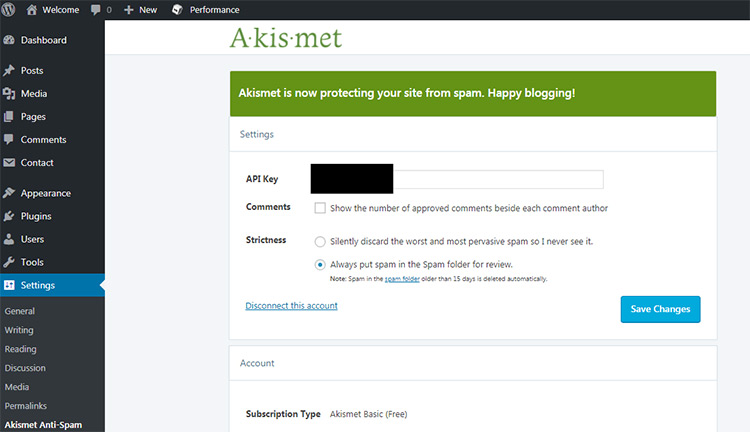
Once you see the green message at the top of the page you’re all set! Your blog is officially being protected from spam comments.
Now you can publish content with user comments enabled and never worry about spam.
Just make sure to check the Akismet spam filter every so often. Sometimes it’ll flag genuine comments as spam so it’s always nice to whitelist those.
Tips To Grow Your Art Blog
By this point you’ve got a blog online and it should be ready for some awesome art posts.
The only thing left is to publish lots of great content and build your audience.
A lot easier said than done!
The good news is that once you get your blog online you don’t need to do it again. So once you complete this guide you’ll be ready to start blogging and really make a name for yourself in the art world.
My final tips are simply to build great content and create a brand for your art blog.
This ultimately comes down to adding value into people’s lives.
Write tutorials on how to get started with oil paints or how to setup Photoshop for concept art paintings.

Remember there is no single “right” way to blog.
It’s more about finding an angle that hasn’t been covered and doing it better than everyone else.
I’d argue a blog’s success comes down to four key points:
- Fantastic content
- Branding
- Building a loyal audience
- Connecting with other bloggers
The more you write the more comfortable you’ll get with the process.
And the more you share your stuff the more likely people are to see it.
There’s millions of artists in the world all with one goal: to improve their artwork.
If you can make a blog that’ll inspire, educate, and encourage artists to push themselves & improve then you’ll see a lot of success as an art blogger.


")


