

Texture Maps: The Ultimate Guide For 3D Artists
Textures add another dimension to your 3D art and can really make or break how your final piece looks. But it takes a lot of practice to get the best results from your texture maps.
But what exactly are texture maps?
Texture maps are applied to the surfaces of 3D models to create repeating textures, patterns, or special visual effects. These can be used for defining specific details like skin, hair, clothing, or really anything else.
There are an awful lot of texture maps(we will go into 13 in this article alone) and some of them have convoluted names that can get real confusing.
The first thing you need to know about your model is what software it’ll be used with. This determines if you’ll use texture maps for PBR or non-PBR materials.
PBR stands for physical based rendering. It’s been used since the 1980’s and was developed for rendering incredibly photorealistic textures. PBR uses accurate lighting models to achieve this goal and is slowly becoming the standard for all materials.
Current software that uses PBR textures include Unreal Engine 4, Unity, V-ray, Substance Painter, jMonkeyEngine, and will be included in Blender v2.8.
Other software uses a non-PBR workflow for textures. You can also get incredibly realistic results from these non-PBR textures, but you have a lot more settings and maps you have to use to achieve the results.
Some people prefer these textures for their greater flexibility and the ability to make more abstract textures.
If you don’t intend to move your model into a PBR engine for a game and to just render it for promotional shots then non-PBR texture maps work fine.
Examples of software that use a non-PBR workflow are Maya and 3ds Max(without V-Ray), along with Modo.
Be aware that whether you’re using a PBR texture workflow or not, you still need to have your model UV unwrapped so that the textures behave the way you want them to.
PBR Texturing
PBR texture workflows tend to be standardized across whatever software you use.
There are ten different types of maps that are used in PBR:
- Albedo
- Normal
- Roughness
- Metalness
- Specular
- Height
- Opacity
- Ambient occlusion
- Refraction
- Self-illumination
These maps add together to create the final material as it will appear on your model in your scene.
It’s important to know what each of these maps does individually so you know what you’re tweaking in your settings when hunting for that optimal result.
Albedo
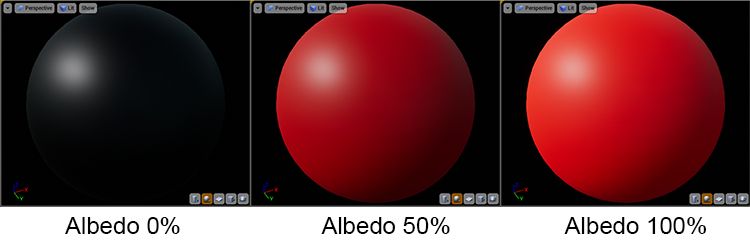
Albedo maps are the basis of your entire material.
They are either a single color or a flat light image of the pattern you want to work with (for example bricks).
It’s important if you’re working with a detailed texture that the lighting is flat. You do not want any shadows displayed as your lighting may be different than the source photograph.
This will cause inconsistency in your texture’s lighting and make it look unrealistic.
The main point of the albedo texture is to define the color of your texture. Although it does have some secondary uses as well. In metal textures it defines the color of reflections on the material.
Normal
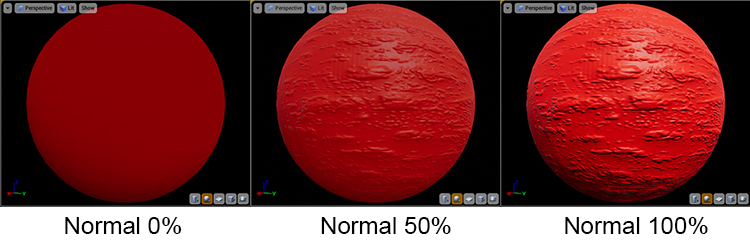
Normal maps are important to give your textures depth.
This uses complex calculations to fake the way light interacts with the surface of material to fake smaller bumps and dents.
It’s important to note that a normal map will not change your base geometry (see height maps later in this article).
So once you go past a certain viewing angle it can lose the effect, especially on larger or more exaggerated raises or dips.
The base color of a normal map is a light purple, this is the “bottom” of the normal map that represents the surface of your polygonal mesh.
From there RGB values are used to produce cracks, bumps, or pores in your model. The R, G, and B values are equal to the X, Y, and Z coordinates on you base mesh.
Seams are an important thing to consider if you’re using normal maps.
Due to the way normal maps affect how lighting interacts with your model they can make seams very obvious. Do your best to keep them hidden.
Roughness/Glossiness
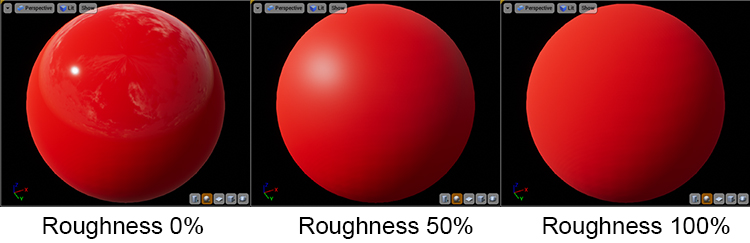
Roughness(also called glossiness or microsurface scattering) is a semi self-explanatory map. They define how light is scattered across the surface of your model.
This starts at a value of zero where your model will not scatter light at all, making the reflections and lighting much sharper and brighter on your material.
On the other side if you turn roughness up to full the light will be scattered around your material more. This makes lighting and reflections spread further around the model, but appear much dimmer.
These settings are very important as different materials in real life obviously have very different roughness. For example wood may have a higher roughness value as it is not a very reflective surface, whereas polished chrome would sit on the other side of this scale.
These maps are grayscale with white being maximum roughness and black being a smooth glossy surface.
Metalness
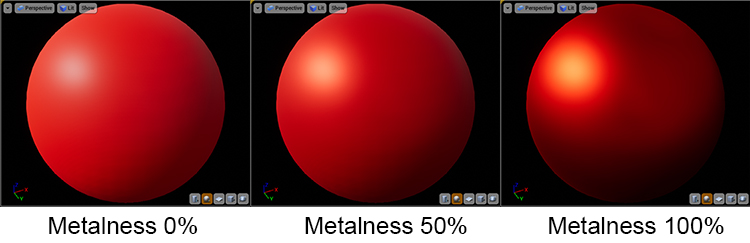
Metalness is another map that is fairly self-explanatory. It’s used to define if your material (or part of it) is bare metal.
Metal maps are also grayscale, but best practice is to only use white and black values and do the variations in between using your roughness maps.
Black in the metalness map means that part of the map will use the albedo map as the diffuse color (the color the texture shows when it’s hit with light).
White will instead use the albedo color to define the color and brightness of your reflections, and set the materials diffuse color to black. The diffuse color is no longer needed in this instance because all the colour and detail of that part of the material will now be coming from the reflections, thus turning it to black.
The advantage of metalness maps is their ease of use for simulating real world materials.
However the way they tie in with the albedo can be limiting in rare situations. There is an alternative however…
Specular
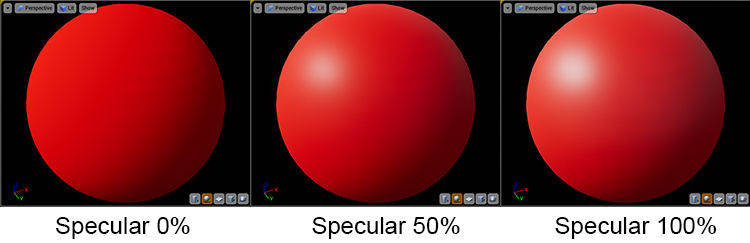
In PBR textures you can sometimes chose to use a specular map instead of a metalness map.
Specular maps in PBR can use full RGB color, and affect how you design your albedo (or how it is rendered out of your desired texturing package).
If you want to make a brass material using a metal map you would paint that section of the map a brass color in the albedo so the reflections make the material appear brass.
However if you use a specular map instead, the brass section of your albedo would be pure black, and you would paint the brass detail onto the specular map for the same result.
The advantage of this is you can use the specular map to also affect the way reflections are handled on non-metallic materials, allowing for more flexibility and control.
The drawback to this is the added layer of complexity this flexibility adds. It can be more difficult to precisely dial in your desired result. Usually metalness maps look just as good if not better in certain conditions.
It’s basically personal preference.
Height
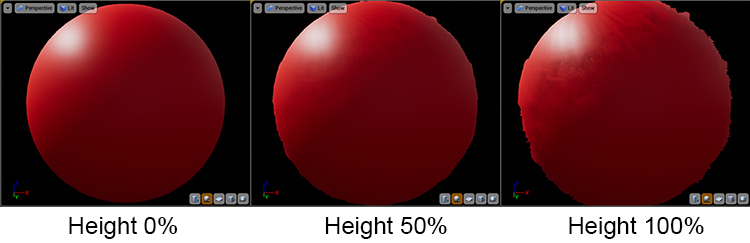
Height maps are similar to normal maps in that they are used to add smaller details into your base mesh.
The big difference between the two is that instead of faking the bumps and dips like a normal map, height maps will tessellate your mesh (increase the poly count) and actually add the data to the 3D mesh.
This is especially noticeable in the above image on the outer edge of the sphere, where you can see the mesh sticking out where the ridges are.
If you take a look back at the normal map you will see the edge is still perfectly round, breaking the illusion of depth.
Height maps are another grayscale map with black representing the bottom of the mesh and pure white being the highest peaks, with shades of gray representing everything in between.
The advantage of height maps is the incredible detail they add that always looks correct at all angles and lighting conditions. But due to the need to tessellate the model it can cause a slowdown in your games or render times.
For this reason normal maps are usually preferred.
Opacity
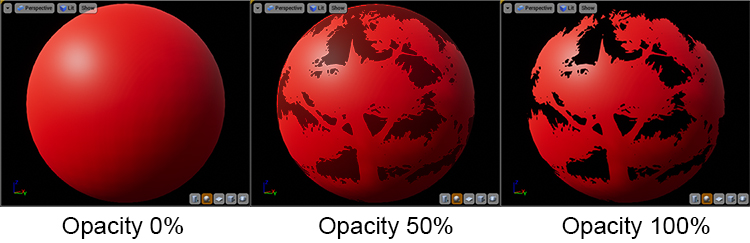
Opacity is an important map type as it allows you to make parts of your material transparent.
This is important if you are making glass or low poly tree branches.
The above image shows how it can be used in trees.
You can make an entire bunch of leaves on a single polygonal plane and make the excess of the polygon disappear using an opacity map. You can then layer these polygons to make realistic trees that require little computational performance.
Opacity maps are grayscale. White is fully opaque and black is transparent. The shades of grey are the various levels of translucency between them.
If your material is just solid glass or other fully translucent material then instead of a map here you will likely just use a constant value. 0.0 being opaque and 1.0 being transparent (your absolute values may differ from this example).
Ambient Occlusion
Ambient occlusion is a map that the PBR engine combines with the albedo at render time to define how it reacts to light.
It’s a grayscale map with white being an area that will pick up the most light with darker areas being more in shadow and less reactive to light.
Refraction
Refraction is the process of light bending as it passes through a solid, liquid, or gas, distorting the way things look when you view them through a transparent object.
It’s the phenomenon that allows magnifying glasses to work and makes things look different when they’re viewed underwater.
It’s an important part of a material workflow as all transparent materials in real life cause refraction, so it needs to be replicated to make CG work as realistic as possible.
Refraction maps are usually just constant values. The parts of your model you do not want to refract will likely be opaque anyway, so whether or not that part of your model refracts light is irrelevant.
Self-illumination
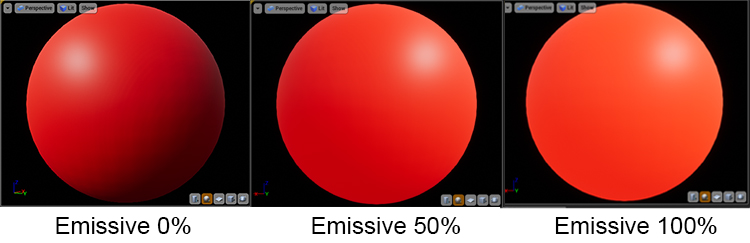
Self-illumination maps(sometimes called emissive colour) are another type that explain themselves in the name.
These are used to make some parts of your material seemingly emit their own light so they are still visible in dark areas.
Self-illumination is useful for making small LEDs light up or for some interesting strip lighting effects.
But if you use too much it causes detail to become washed out entirely and takes the life out of your scene.
These maps are full RGB. They are basically an albedo map but for light.
While it is possible to light an entire scene using a self-illumination map, it is bad practice and a lot more difficult than adding conventional lighting.
Non-PBR Texturing
Non-PBR texture workflows are a bit more difficult to write about.
Unlike PBR workflows, these non-PBR workflows are not standardised across 3D programs.
However I will talk about a couple of common ones that appear often. These examples appear from Autodesk 3ds Max but apply to other 3D software too.
Diffuse
Diffuse maps are the non-PBR equivalent of albedo maps.
They define the colour of the material as the light hits it. The main difference is diffuse maps are not usually made with a flat light profile.
It can be better explained as an albedo map and an ambient occlusion map baked into one image, as the shadow information is usually part of a diffuse map.
Bump

Bump maps are a more basic form of a normal map.
While a normal map uses full RGB to approximate all 3 dimensions of space, bump maps are greyscale maps that only work in an up or down direction.
As the map wraps around your base mesh it can still make bumps appear in every direction of your mesh.
The results are not as accurate as modern normal maps and thus bump maps are falling out of use in the industry.
Reflection
Due to a lack of metalness settings, non-PBR workflows use reflection maps.
These are usually a constant value similar to refraction in PBR, with their color and intensity being controlled by the specular map.
So after all those examples hopefully you’ve learned a lot! This is pretty much all you need to know about texture maps to get started using them in your work.
Author: Thomas Denham
Thomas is a 3D creative working with both high and low poly modelling for still renders or real time engines. He is currently working freelance after spending 4 years at a multi-national VR company. To see Thomas' work and learn more, feel free to look at his personal site.
")


