


Best Nuke Tutorials For Absolute Beginners: The Ultimate Collection
You might have well-shot footage or a photorealistic CGI render to start a new project. But ultimately what sells a scene is solid compositing where all the visual elements come together as if they’re one cohesive composition.
In terms of compositing software, Adobe After Effects is OK and Black Magic Design Fusion is catching up. But Foundry’s Nuke still remains the standard.
If you watch any blockbuster film with heavy visual effects, chances are you will see Nuke at work in one form or another.
For those starting out Nuke can be tough to learn and really pricey. The base version costs as much as $5000.
Fortunately Foundry offers a non-commercial version which you are free to work with and it’s perfect to learning.
To jumpstart your compositing journey we’ve compiled the best beginner tutorials that show what Nuke offers from simple green-screen keying to a complicated 3D camera projection and so much more. So let’s dive in!
Free Tutorials
Nuke In Production (Multipart)
In this tutorial you’ll learn about the fundamentals of Nuke’s workflow and user interface.
You’ll learn about the menus, node graph, viewer pane, and attribute panels. This video also explains why you need Nuke to composite heavy visual effects compared to just using Photoshop.
Along the way you’ll learn several hotkeys such as pressing S to bring up the project settings or pressing R to bring up the read node. In addition you can press Tab at any point to bring up the node commander to search for various nodes.
Practice lessons teach you several nodes such as merge and viewer nodes, among a few others.
This video might feel dry as it is technical and you will not be compositing quite yet. However this will serve as a solid blueprint on how Nuke works.
Basic Compositing in Nuke Studio
So this time you’ll be performing a basic green screen keying and finally dive into your first Nuke project.
Unlike in After Effects where you might need a separate plug-in, Nuke has powerful built-in nodes to perform the job. In particular, you’ll be using the keylight node.
The workflow is simple. You’ll need to color pick a shade of green on the image and this will serve as a screen matte where you will perform clean-up such as rotoscope animation.
You’ll be using the tracker node to determine the camera’s movement in 3D space and with the help of the merge, color correction, and light wrap nodes, you’ll be able to composite a character as if he is on a snowy mountain. The end result is just fantastic.
Using 3D Projection
It’s no surprise that if you want to build a 3D scene you’ll need dedicated 3D software such as Maya or Cinema4D.
However production time and budget do not necessarily allow for that. And that’s why many 3D artists opt to create a 3D scene in Nuke from a single image plane.
For this tutorial you’ll mainly be using a projection node along with several planes. While Nuke is not technically 3D software, it has a 3D viewer where you can easily place 3D cards.
You’ll be using the time-warp node to slow down footage which is very useful. And you’ll perform image adjustments such as luma key and color correction to blend background and FX elements.
Finally you’ll be adding particles from an ash footage using cards. While the technique has limitations, the output is more than enough for high quality production value on limited time.
3D Compositing
In this tutorial you learn how to track a moving camera for compositing.
The data will be used on a 2D element as if it was in a 3D space. The atmospheric and smoke footage are from the Action VFX collection.
With the help of the reliable simple 3D card you can easily create depth through adding foreground, midground, and background elements.
You’ll also be using several unconventional uses for common nodes such as the merge node to control an asset’s opacity.
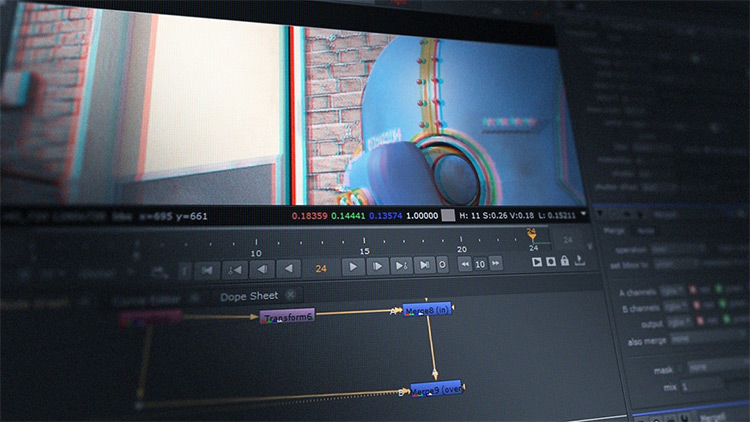
Nuke Basics: Merge
Apart from the read node, if you work in Nuke you’ll be working with the merge node in every single project.
In its essence, the merge node is the basic form of compositing where you can place an image on top of the another.
While the node is relatively simple you can do more if you utilize other settings.
And that’s where this tutorial can help. Here you’ll learn the different merge operations, union masking and bounding box options, among others valuable for compositing.
To follow along the author also provides the project files which you can download for free.
Remove Tattoos in Nuke
The title says it all but here you’ll learn how to remove tattoos in moving footage.
You’ll be using Photoshop to create a clean base which is a great way to start.
You’ll then use Nuke’s powerful planar tracker with the corner pin data where the tattoo exists. This allows you to retrieve the tattoo’s position and replace it with the clean base (something you may need to practice a lot to get right).
There are endless applications with this technique such as removing pimples or scars on an actor, so this is a tutorial you should practice over and over till it makes sense.
Asteroids in Nuke
As you might know by now, Nuke is not a 3D program but it fits into a 3D workflow.
In this case you’ll be creating an asteroid belt scene with the use of the 3D cards.
As the point of view will be limited, the author runs through necessary planning on how to approach the shot as such camera movement and asteroid positions.
By the end of the session you’ll be able to use several instance workflows to populate your scene. You’ll also learn how to add atmospheric effects and color corrections to add depth to your composition.
Sky Replacement & Track Mattes
One of the common compositing workflows is sky replacement.
In most cases you don’t have a choice what the cloud will be like when you’re shouting outdoors.
But let’s say you’re shooting a dramatic final scene but the clouds are gloomy that day. Fortunately Nuke offers a solution where you can replace that disappointing sky with a colorful set-up.
So here you’ll learn tried and proven workflows for sky replacement such as blowing out the sky’s exposure to create a matte. You’ll also be using the blur node to soften the effect.
With the help of the merge and premultiply node you’ll be able to blend your art-directed sky to your scene with ease.
Multipass Compositing
Multi-pass compositing comes into play with CGI renders. These passes have many forms such as diffuse, specular, and ambient occlusions.
With these elements the compositor can adjust the final look in a matter of seconds without rendering the whole image(which can take hours).
So if you follow along here you’ll learn the basics of multi-pass compositing: shuffle node.
You’ll also be using the grade node to emphasize specular highlights. This leads to creating depth of field which allows a great deal of flexibility such as performing rack focus.
Finally you’ll create an atmospheric fog using the Z-depth pass which is a handy technique to practice. You can grab the project files here if you want to follow along.
Green Screen Keying
Keying is rather complicated and can stack several nodes upon nodes – but with practice it gets far less complicated, especially over time.
In this tutorial you’ll learn fast and accurate keying using the IBK(Image Based Keyer). It mainly takes two images: the main footage with the green screen and then only green screen footage.
It has become a standard for static and stable shots such as those lit in the studio.
The instructor also shows common pitfalls working with the IBK node such as not chanigng the keyer color from the default blue to green.
Intro to Tracking and Rotopaint
In this tutorial you’ll learn how to use Nuke’s Tracker and Rotopaint nodes.
You’ll learn to avoid common errors that trick beginners such as choosing an improper area to track. You’ll also learn that the tracker doesn’t only retrieve position data but also rotation and scale data.
This means you need to consider various settings such as perspective shift or using an edge detection filter for more accurate recognition.
You’ll also pick up points on how roto paint will help add and remove a portion of any footage. It functions like the clone stamp in Photoshop. You can use the techniques here for the tutorial project to replace an image on a billboard.
Be sure to check out the source files with the footage and the 2D elements to follow along.
Day to Night Conversion
Day to night footage conversion is a bit tricky. Ideally you want to be practical and shoot night scenes in the evening.
But there is always an anomaly such as having the location booked only for specific hours. In this tutorial you’ll learn how to tackle such a task and do it right.
As usual, you’ll create a garbage matte that will serve to mask the daytime sky and replace it with the nighttime sky.
Through this lesson you’ll learn that getting a day time look is not as easy as bringing the brightness down. You’ll need a roto node and to isolate light sources and windows to create your own light source. Finally at the end you’ll create a light beam to sell the night scene.
Migrating From AE To Nuke
After Effects is geared to both visual effects and motion graphics. It also has a low barrier of entry with its affordable pricing.
So why not use After Effects instead of Nuke?
The difference becomes apparent in heavy visual effects shots where you have hundreds of live action and CGI clips to composite. Without a doubt, such a task will choke After Effects but Nuke can just keep chugging along.
This demo shows how to use Nuke with existing knowledge of After Effects, a very handy teaching tool for anyone with AE experience.
You’ll learn the significant differences between a layer and node workflow. You’ll also learn what panels are similar and in both programs.
Ultimately if you have an AE background and want to move into Nuke, this is the place to start.
3D Environments with Camera Projections
Moving into cameras you should check out this video tut for tips on camera projects to create a 3D scene from a 2D image.
As a caveat, you need a high-resolution image to create this effect. You’ll be using mainly the 3D object, camera, projection, scene and scanline renderer nodes.
To start you’ll use a grid texture to get the proper perspective to block out the walls, ceiling, and floor. The instructor also reassures that it’s normal to have a lot of guesswork here, especially if you don’t have exact measurements written down.
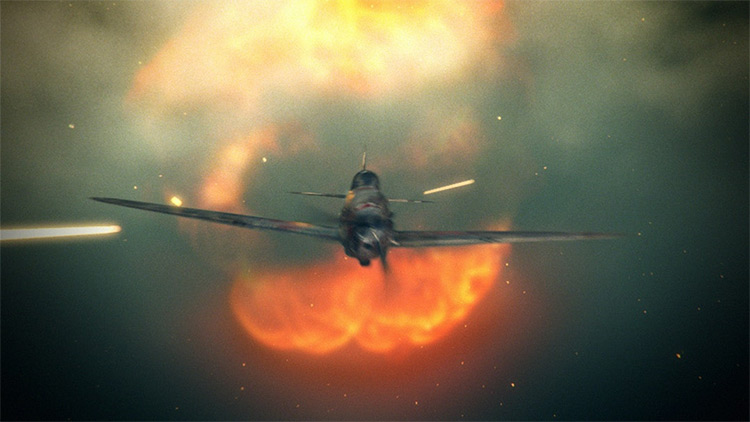
Compositing Aerial Explosions
In this tutorial you’ll work on a plane chase scene where the bad guys are closing in.
You’ll present this scenario with explosions trailing behind the plane. As the plane is CGI you’ll prepare various render passes with the shuffle node.
By default, this will mess up the alpha and you’ll solve it with a really valuable trick.
Interestingly, while the plane is in CGI, the explosions you’ll be using come from 2D element footage.
This means you’ll be using 3D cards and place them properly within the scene along with all animation. You’ll finish the composition by adding interactive lighting with clouds and ultimately blending everything together.
Force Field Tutorial
Got a fantasy character or a sci-fi idea where a forcefield might come in handy? Well then this tutorial is for you.
The whole effect is made within Nuke with no CGI passes used. This means you can readily use such techniques on your projects.
First you’ll prep the footage by adding a blue tint through color creation. You’ll use the shuffle copy node to crush some channels to create a mask.
With the lens distortion and noise node you create the bulk of the force field look. You’ll then track the footage and add some lens flare for a finishing touch.
VFX Car Fire
One of the cost-savings for performing visual effects rather than practical effects is creating fire.
Not only will you save your team from a logistical nightmare, but you’ll also keep your crew safe.
So this super fun tutorial lets you set a car on fire. Not in real life, but still pretty cool!
The author discusses the importance of using references before starting the project too. The artist should have a clear idea of what shape to use and the behavior of the fire.
This will guide your decisions on what type of flames to place when compositing.
You’ll start with the fire and proceed with adding smoke and detailed effects.
Like in a usual compositing workflow, here you’ll create several mattes from backgrounds to tires using the roto node. You’ll feather out the edges to blend footages seamlessly. You’ll also learn how to add fires onto tricky areas such as under shadows by warping and retiming the footage.
This is a tricky video but worth the effort if you can get through it. Also be sure to check out the project files that you can download and work with.
Premium Tutorials
Fundamentals Course
Aimed at total beginners, this fundamentals course will get you up and running with Nuke in no time.
Most of the techniques discussed have been tackled in free tutorials above, but what makes this course essential is its project files.
You’ll get to perform compositing alongside a professional rather than just watching how someone else works.
This course will also serve as a refresher for seasoned veterans as it tackles every topic comprehensively. The version used is slightly old but the concept still applies as Nuke has matured a lot by now.
Green Screen Keying
There are mainly two ways to create a matte for compositing footage over another: painstaking rotoscope and green screen keying.
In most cases you’ll use two. However, as much as possible, you’ll create most of the matte through green screen keying as rotoscope work is labor intensive.
In this course you’ll learn how to analyze green/blue screen footage and perform effective and efficient keying in Nuke.
You’ll discover several keying workflows and learn their respective advantages and disadvantages. You’ll also solve case-specific problems such as dealing with motion blur and transparency. By far, this is the #1 keying video series on Nuke covering more detail than anything else.
Intermediate Rendering
Unlike rendering CGI elements, Nuke rendering does not take as much time since it doesn’t necessarily compute all rays for every pixel.
The problem is not rendering times, but making elements fit and blend together while rendering.
In this massive video series you’ll learn professional rendering workflows for color management, look-up tables, and color spaces, among other techniques from pro Nuke users.
The task is tedious but it is a must for creative professionals. So if you’re interested in the film or game industry at all, this series is worth looking into. Especially if you already have a beginner’s understanding of Nuke and want to push it further.
Deep Compositing Project Workflow
Deep compositing made its appearance about a decade ago and is still relevant to complicated visual effects today.
Its application can be found on films like Planet of the Apes, Life of Pi and Pacific Rim. In essence, a deep image is still 2D footage but with 3D data.
This allows a compositor to insert shots at depth rather than creating individual mattes for every intersection.
However there’s a catch: a deep pass can be 10 times as heavy as a regular pass. But from this course you’ll learn how to optimize such data and use a deep image in a practical setting whether it’s for movies, television, or games.
Stereoscopic Compositing and Conversion
Despite working in a 3D workspace, whether live action or CGI, you’ll still be viewing a film on a flat 2D surface.
To replicate depth, well that’s where stereoscopic compositing comes in.
Fortunately Nuke comes with an off-the-shelf toolkit to perform tasks with 3D stereoscopic rendering.
You’ll start this course learning how stereoscopy works and how it affects our perspective. This base theory will help you prepare and modify footage in a more realistic way.
You’ll also study various topics such as converge and depth maps. By the end of the entire series you’ll be ready to supervise a stereoscopic project with ease.
Nuke for After Effects Users
Due to its nodal workflow, Nuke might be harder to understand compared to layer based software such as After Effects.
We did cover a free tutorial on this subject but if you want to do 3D/VFX work as a career then you know premium courses are well worth the money. Especially something like this taught by an industry professional.
In this course you’ll learn how to use Nuke by comparing many features to After Effects. This means you can leverage pre-existing knowledge of Adobe AE rather than learning everything from scratch.
You’ll tackle some visual effects projects such as keying, rotoscoping, and multi-channel compositing. You’ll also discover how Nuke’s 3D workspace is so much better than After Effects for this type of work.
Along the way you’ll also learn micro-tasks such as color correction and grading, among many other techniques that port nicely from AE into Nuke.
And if you’re serious about VFX work I highly recommend skimming through our list of courses on this subject. These days you can learn everything you need online, build up a great portfolio, and then land a job without ever paying for college.
The key is finding the right learning materials online and really putting in the effort to study.
Author: Ben Traje
Ben is a stylized character rigger based in Davao City, Philippines. Proficient in Maxon, Cinema4D, and Autodesk Maya, he's available for remote freelance work with plenty of samples in his portfolio.
")


